Archaeology in Sobell’s “Unix System V – A Practical Guide”

Clearing some boxes recently, and pulled up an old gem that I used to carry around university. Mark Sobell’s Unix System V – A Practical Guide A lot of it is still relevant today for linux and even OSX users, with basic guides to shells, redirections, awk, sed and vi. Some of it is however (predictably) dated. Chapter 7 has some lovely spots to dig for buried treasure.

finger

Does my current machine even have finger? hehe, wow, it does.

karlp@teros:~$ finger
Login     Name           Tty      Idle  Login Time   Office     Office Phone   Host
karlp     Karl Palsson  *:0             Sep  7 10:09                           (:0)
karlp     Karl Palsson   pts/0      23  Sep  7 10:09                           (:0)
karlp     Karl Palsson   pts/1      29  Sep  7 11:35                           (:0)
karlp     Karl Palsson   pts/2          Sep  7 11:35                           (:0)
karlp@teros:~$

Ok, cool, let’s try the example from the book!

karlp@teros:~$ finger quake@gldfs.cr.usgs.gov
finger: unknown host: gldfs.cr.usgs.gov
karlp@teros:~$ 

Oh well, somewhat predictable. No live earthquake list for me.

telnet services

We’ll skip over all the descriptions of FDDI, XNS, rlogin and hosts files, proceed straight to the library of congress information system.

karlp@teros:~$ telnet locis.loc.gov
telnet: locis.loc.gov: Name or service not known
locis.loc.gov: Unknown host
karlp@teros:~$

Or not.

archie and gopher

wow, archie, I’d forgotten about archie and gopher. can’t even try these, no archie in current fedora, and no package for it either :)

Oh well. it was fun to skim over the chapter again :)

Cypress CY8CKIT-059 PSoC 5LP proto kit – first impressions

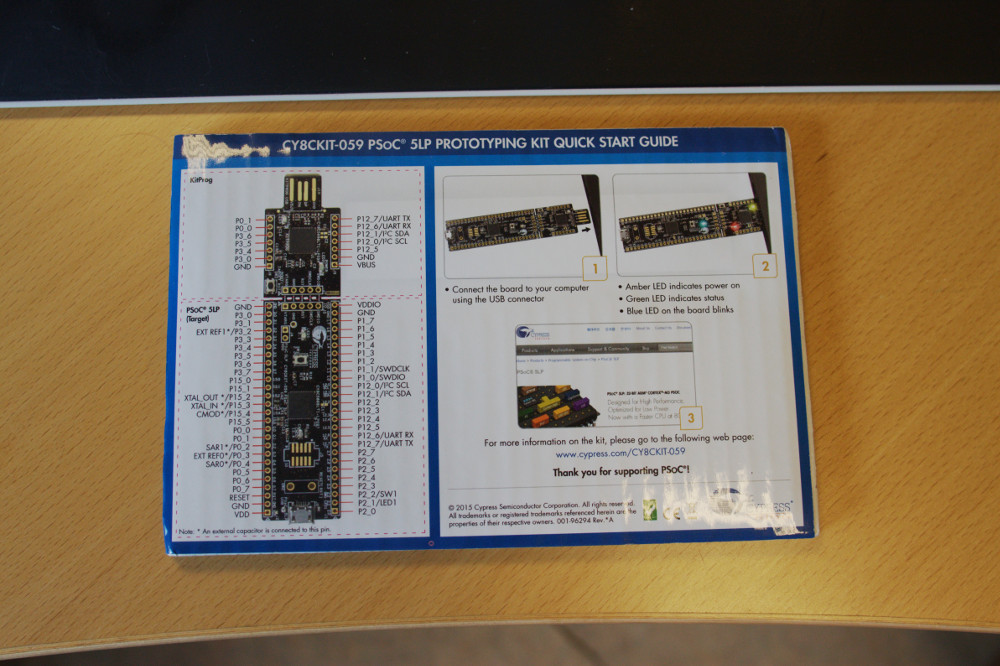
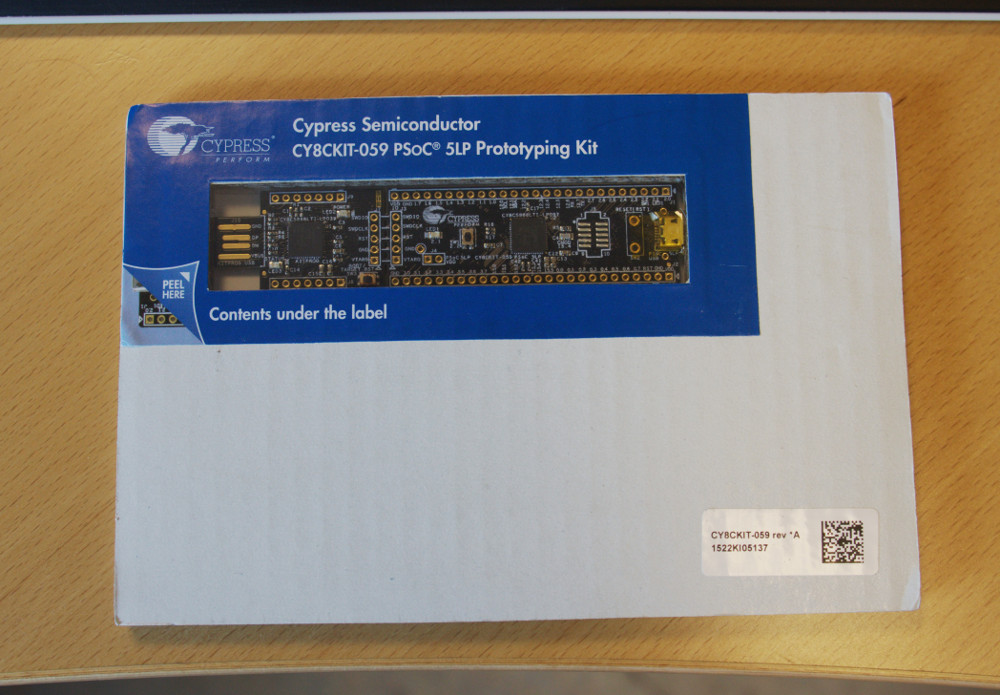
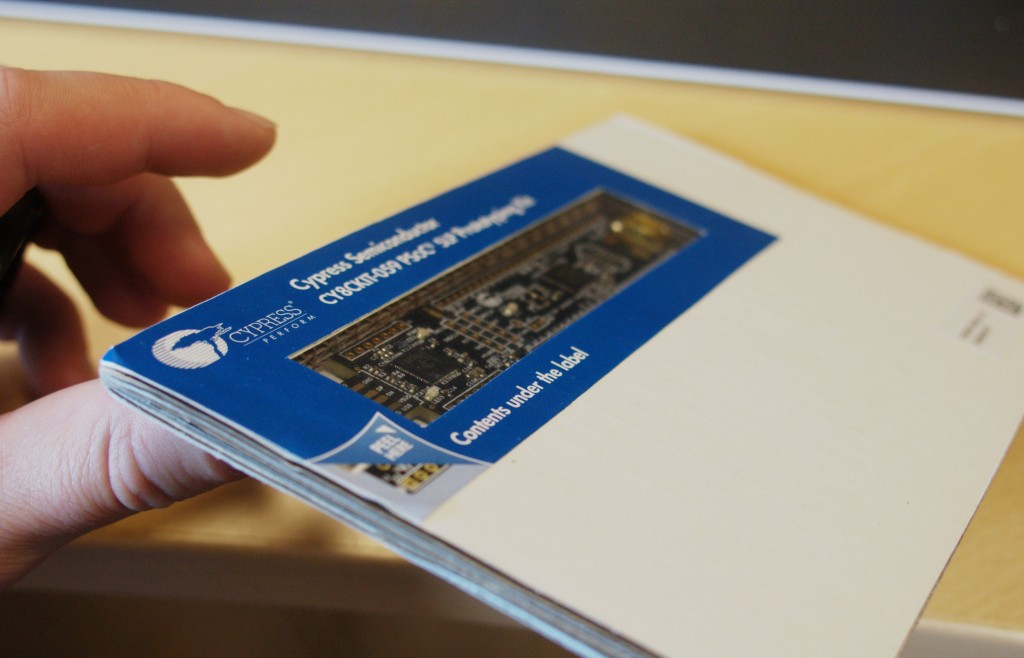
Love the packaging! I got this CY8CKIT-059 PSoC 5LP proto kit, and the CY8CKIT-049-42xx, the PSoC 4 proto kit, as they’re both super cheap, and they both came in rather excellent packaging. The pcb is behind a peel off window, in a cutout of a sandwich of three sheets of corrugated cardboard. The backside has a nice graphical layout with pins labelled, and some basic info on where to get more info. Very nice, compact, easy to ship, well done Cypress.
cypress-kit-edge-on_sm

cypress-kit-backside_sm

cypress-kit-front_sm

Of course, that’s about all that’s nice. The PSoC family seems interesting, I’ve been wanting to play with them for a while, but Cypress has absolutely zero linux support, and because of the configurable nature of the device, you really do seem to need to use their windows PSoC Creator tool. Allegedly once you’ve designed your system, you can edit the code portions freely, but it seems a long way off. OpenOCD has support for the flash in the PSoC 4 family, but nothing (yet) for the flash, and definitely no support for the KitProg programming dongle. That KitProg does seem like a nice bit of gear in it’s own right though, it’s USB2I2C, USB2UART, SWD debug adapter, on a little snap off portion of the board. However, even the USB2UART portion fails to be recognised as CDC-ACM in linux, presumably due to a bug in the descriptors. lsusb implies that they’re trying to be CDC-ACM. This one will have to be on the shelf for quite a while I’d imagine.

Full lsusb output for posterity here:

Bus 003 Device 011: ID 04b4:f139 Cypress Semiconductor Corp. 
Device Descriptor:
  bLength                18
  bDescriptorType         1
  bcdUSB               2.00
  bDeviceClass          239 Miscellaneous Device
  bDeviceSubClass         2 ?
  bDeviceProtocol         1 Interface Association
  bMaxPacketSize0         8
  idVendor           0x04b4 Cypress Semiconductor Corp.
  idProduct          0xf139 
  bcdDevice            2.0b
  iManufacturer           1 Cypress Semiconductor
  iProduct                2 Cypress KitProg
  iSerial               128 1C210338012E4400
  bNumConfigurations      1
  Configuration Descriptor:
    bLength                 9
    bDescriptorType         2
    wTotalLength          130
    bNumInterfaces          4
    bConfigurationValue     1
    iConfiguration          2 Cypress KitProg
    bmAttributes         0x80
      (Bus Powered)
    MaxPower              400mA
    Interface Descriptor:
      bLength                 9
      bDescriptorType         4
      bInterfaceNumber        0
      bAlternateSetting       0
      bNumEndpoints           2
      bInterfaceClass         3 Human Interface Device
      bInterfaceSubClass      0 No Subclass
      bInterfaceProtocol      0 None
      iInterface              3 KitBridge
        HID Device Descriptor:
          bLength                 9
          bDescriptorType        33
          bcdHID               1.11
          bCountryCode            0 Not supported
          bNumDescriptors         1
          bDescriptorType        34 Report
          wDescriptorLength      43
         Report Descriptors: 
           ** UNAVAILABLE **
      Endpoint Descriptor:
        bLength                 7
        bDescriptorType         5
        bEndpointAddress     0x83  EP 3 IN
        bmAttributes            3
          Transfer Type            Interrupt
          Synch Type               None
          Usage Type               Data
        wMaxPacketSize     0x0040  1x 64 bytes
        bInterval               1
      Endpoint Descriptor:
        bLength                 7
        bDescriptorType         5
        bEndpointAddress     0x04  EP 4 OUT
        bmAttributes            3
          Transfer Type            Interrupt
          Synch Type               None
          Usage Type               Data
        wMaxPacketSize     0x0040  1x 64 bytes
        bInterval               1
    Interface Descriptor:
      bLength                 9
      bDescriptorType         4
      bInterfaceNumber        1
      bAlternateSetting       0
      bNumEndpoints           2
      bInterfaceClass       255 Vendor Specific Class
      bInterfaceSubClass      0 
      bInterfaceProtocol      0 
      iInterface              5 KitProg Programmer
      Endpoint Descriptor:
        bLength                 7
        bDescriptorType         5
        bEndpointAddress     0x81  EP 1 IN
        bmAttributes            2
          Transfer Type            Bulk
          Synch Type               None
          Usage Type               Data
        wMaxPacketSize     0x0040  1x 64 bytes
        bInterval               0
      Endpoint Descriptor:
        bLength                 7
        bDescriptorType         5
        bEndpointAddress     0x02  EP 2 OUT
        bmAttributes            2
          Transfer Type            Bulk
          Synch Type               None
          Usage Type               Data
        wMaxPacketSize     0x0040  1x 64 bytes
        bInterval               0
    Interface Association:
      bLength                 8
      bDescriptorType        11
      bFirstInterface         2
      bInterfaceCount         2
      bFunctionClass          2 Communications
      bFunctionSubClass       0 
      bFunctionProtocol       0 
      iFunction               0 
    Interface Descriptor:
      bLength                 9
      bDescriptorType         4
      bInterfaceNumber        2
      bAlternateSetting       0
      bNumEndpoints           1
      bInterfaceClass         2 Communications
      bInterfaceSubClass      2 Abstract (modem)
      bInterfaceProtocol      0 None
      iInterface              4 KitProg USBUART
      CDC Header:
        bcdCDC               1.10
      CDC ACM:
        bmCapabilities       0x02
          line coding and serial state
      CDC Union:
        bMasterInterface        2
        bSlaveInterface         1 
      CDC Call Management:
        bmCapabilities       0x00
        bDataInterface          1
      Endpoint Descriptor:
        bLength                 7
        bDescriptorType         5
        bEndpointAddress     0x85  EP 5 IN
        bmAttributes            3
          Transfer Type            Interrupt
          Synch Type               None
          Usage Type               Data
        wMaxPacketSize     0x0008  1x 8 bytes
        bInterval               2
    Interface Descriptor:
      bLength                 9
      bDescriptorType         4
      bInterfaceNumber        3
      bAlternateSetting       0
      bNumEndpoints           2
      bInterfaceClass        10 CDC Data
      bInterfaceSubClass      0 Unused
      bInterfaceProtocol      0 
      iInterface              4 KitProg USBUART
      Endpoint Descriptor:
        bLength                 7
        bDescriptorType         5
        bEndpointAddress     0x86  EP 6 IN
        bmAttributes            2
          Transfer Type            Bulk
          Synch Type               None
          Usage Type               Data
        wMaxPacketSize     0x0040  1x 64 bytes
        bInterval               0
      Endpoint Descriptor:
        bLength                 7
        bDescriptorType         5
        bEndpointAddress     0x07  EP 7 OUT
        bmAttributes            2
          Transfer Type            Bulk
          Synch Type               None
          Usage Type               Data
        wMaxPacketSize     0x0040  1x 64 bytes
        bInterval               0
Device Status:     0x0000
  (Bus Powered)
$

The KitProg also has a bootloader of some form, if you hold down reset while plugging it in, though it times out and reboots normally after a couple of seconds idle.

Bus 003 Device 012: ID 04b4:f13b Cypress Semiconductor Corp. 
Device Descriptor:
  bLength                18
  bDescriptorType         1
  bcdUSB               2.00
  bDeviceClass            0 (Defined at Interface level)
  bDeviceSubClass         0 
  bDeviceProtocol         0 
  bMaxPacketSize0         8
  idVendor           0x04b4 Cypress Semiconductor Corp.
  idProduct          0xf13b 
  bcdDevice            1.00
  iManufacturer           1 Cypress Semiconductor
  iProduct                4 KitProg Bootloader
  iSerial               128 1C210338012E4400
  bNumConfigurations      1
  Configuration Descriptor:
    bLength                 9
    bDescriptorType         2
    wTotalLength           41
    bNumInterfaces          1
    bConfigurationValue     1
    iConfiguration          2 Configuration 0x0001
    bmAttributes         0x80
      (Bus Powered)
    MaxPower              500mA
    Interface Descriptor:
      bLength                 9
      bDescriptorType         4
      bInterfaceNumber        0
      bAlternateSetting       0
      bNumEndpoints           2
      bInterfaceClass         3 Human Interface Device
      bInterfaceSubClass      0 No Subclass
      bInterfaceProtocol      0 None
      iInterface              3 Interface 0x0001
        HID Device Descriptor:
          bLength                 9
          bDescriptorType        33
          bcdHID               1.11
          bCountryCode            0 Not supported
          bNumDescriptors         1
          bDescriptorType        34 Report
          wDescriptorLength      36
         Report Descriptors: 
           ** UNAVAILABLE **
      Endpoint Descriptor:
        bLength                 7
        bDescriptorType         5
        bEndpointAddress     0x01  EP 1 OUT
        bmAttributes            3
          Transfer Type            Interrupt
          Synch Type               None
          Usage Type               Data
        wMaxPacketSize     0x0040  1x 64 bytes
        bInterval               1
      Endpoint Descriptor:
        bLength                 7
        bDescriptorType         5
        bEndpointAddress     0x82  EP 2 IN
        bmAttributes            3
          Transfer Type            Interrupt
          Synch Type               None
          Usage Type               Data
        wMaxPacketSize     0x0040  1x 64 bytes
        bInterval               1
Device Status:     0x0000
  (Bus Powered)

SiLabs EFM32 Happy Gecko starter kit – first impressions

More unboxing. It includes a CR2032 coin cell in the box. Handy when the product line’s premise is ultra low power. It includes two usb cables, one mini, one micro. What the hell. why are you using mixed connectors?! (One for debug, one for user, similar to the original STM32F4 discovery)

Nice looking board, nice screen. Factory demo software is space invaders! Nice demo of touch buttons, physical buttons and the screen. Startup screen shows the debugger state as well. Expansion header seems to have a full silkscreen with correct positioning. Debug connector for connecting your own debug hardware is the full ARM Cortex with trace header, 2×10@1.27mm pitch. This is somewhat unusual, I’ve never had one that broke out the full ETM pins.

The kit user guide implies that there’s a USB flash drive in the box, containing simplicity studio. Thankfully that’s not the case. That would have been really wasteful. (Yes, yes, helpful for some people with shitty internet, but incredibly wasteful for everyone else)

The onboard JLink OB also presents a mass storage device, with a (broken) mbed link, a link to the starter kit’s home page, and a link to simplicity studio’s homepage. Rather shitty filenames, but I guess that helped someone’s day :) Bit lame about the mbed link not working though. It looks like something that mbed setup to be permanent, but someone overlooked somewhere: http://mbed.org/device/?code=200501120000B7A4D74B847B (Update: It might actually work, but mbed’s website was hacked at the time of writing….)

The rest of the kit user guide doc is rather sparse, (to be polite) simply containing some screenshots of how to run demos and get more information from within Simplicity studio. The kit home page does have a link to download the schematics though, that’s nice.

Doesn’t work with OpenOCD at the time of writing, but very basic preliminary support is proposed in http://openocd.zylin.com/#/c/2931/

Atmel SAMD10 Xplained mini board review

Got a pile of dev boards for some testing. Some first impressions of the ATSAMD10-XMINI. First off, it’s nice and cheap, $9 or so. Comes in a really small cardboard box, with absolutely no documentation beyond some links on the box. Totally fine, no need for anything else these days. The board is a somewhat unusual shape, with the micro usb connector for the onboard DDBG (CMSIS-DAP) protruding out the back. Whatever. At first glace, the board appears well labelled. A closer glance….. well…

The user guide for this board refers to all the headers as JXXX. The J number is NOT in the silk on the board. The userguide has a picture of the board, and marks some of the J headers, but not all. The rest you have to just sort of figure out. This seems like a really amateur oversight. Fixing the silk would have been ideal, but at least the documentation could have a better overview of the board! (The userguide does manage to include screenshots of how to install atmel FLIP, which seems like a total waste of space for this document)

The user guide refers to the pins with J200-1, -2, -3, etc. The silk on the pad arrays is just numbered 1..5, and A..P. There’s silk on the back describing some pins, no idea why some and not others. There’s a big box of silk on the back that seems to be describing some pins, but no idea which, or what order.

There’s a specially boxed off section of pads in the top right, 2×10. It’s unlabeled. No idea what it’s for. (Update, turns out this is for Xplained Pro addons, the userguide covers this, and actually uses the grid array notation that matches the board.)

The user guide does (un)helpfully include arduino pin numbers, for the arduino compatible pin arrays, but there’s no mention of arduino software, or linked anywhere, so who cares about that. The column in the table that includes this is unlabeled as well.

The factory firmware is a morse application. Connecting to the CDC-ACM uart provided by the EDBG module lets you blink out letters, and tapping in keys on the user button prints them to the uart. It resets every few seconds idle and prints some help text. Neat enough.

The user guide does NOT include the schematic of the board. This is a serious omission. Particularly given the poor documentation/silk screen match up, but also as these boards are often used as examples for your own projects. A snippet of the power supply section is included, but again, the labels don’t match the board. I went back and forth through the user guide a few times to make sure I wasn’t missing anything. However, the software package download, which I skipped initially, actually includes no software. It includes all the schematics and proper board diagrams that should have been in the user guide. Pretty poor form Atmel :|

No comments on the tools or device itself yet, that’s for a much later date :)
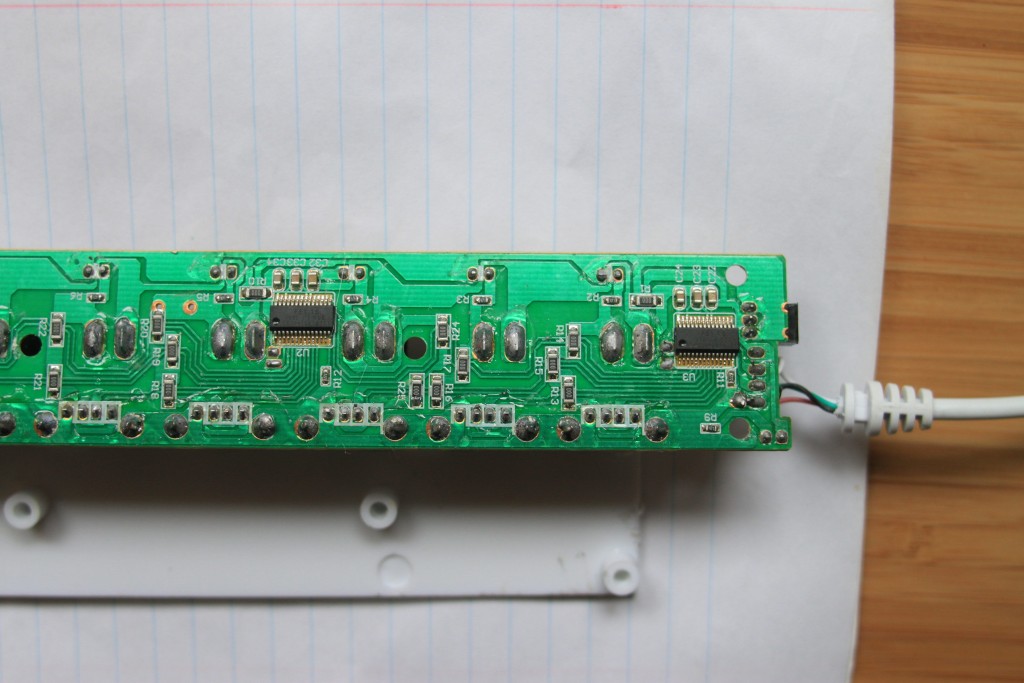
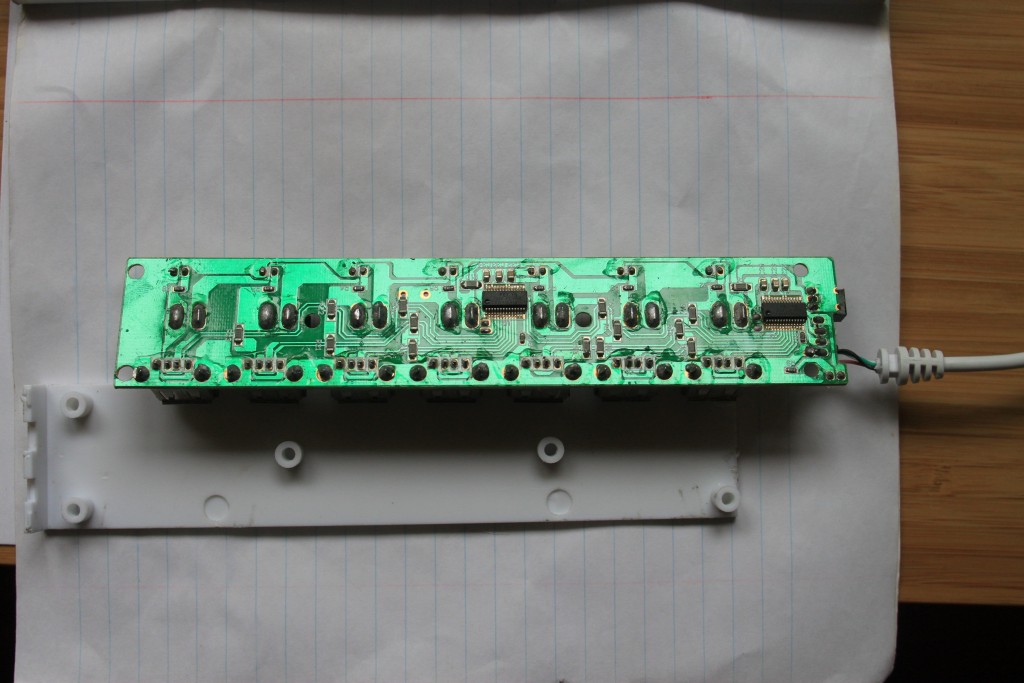
Terminus Tech 7 port usb 2 “high speed” hub teardown

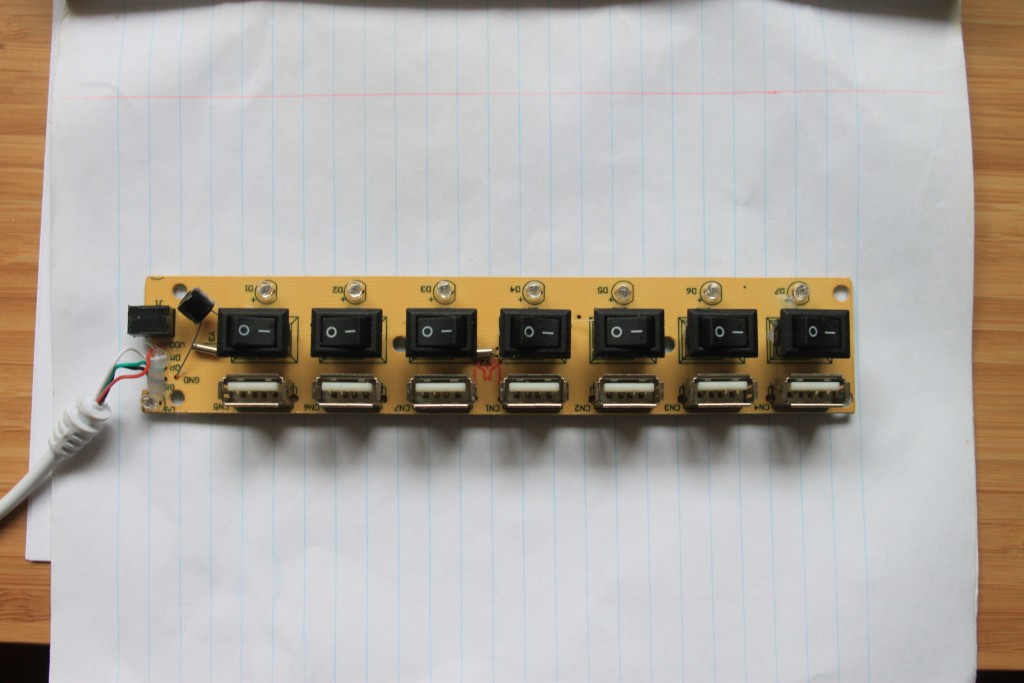
7 port usb 2.0 “high speed” hub, with per port power switches and leds. Only shows up as full speed in lsusb. Leds on ports are very bright, power switches only cut vbus line, rather flaky construction, shaking or bumping can cause disconnects. Seems to consume too much power, without external 5V (not included) vbus can be very low. Available on ebay, tmart, dx.com… http://www.ebay.com/itm/371304833792

The fe1.1s chips are meant to support high speed, so…?

Update: When I had it open, connected to a different computer, it showed up reliably as high speed. Back on the original computer, disassembled, still high speed. Case closed up again, it would show up normally as full speed fallback, and only occasionally as high speed. Further testing indicated that the front panel usb socket is the actual cause. Connecting this hub to another high speed hub showed up reliably as high speed.

The sexy input cap is 200uF, 10V. The rocker switches are KCD11, rated 3A 250VAC, or 6A, 125VAC! The crystal is umarked, but must be 12Mhz from the datasheet.

2015_06_17-14_30_42--img_9408_JFR

2015_06_17-14_30_37--img_9407_JFR

2015_06_17-14_30_00--img_9406_JFR

version control of tools – part 2

Oh look! again! Remember kids, it’s not just compilers that you should keep around, but libc/binutils, and all libraries you’re ever going to use.

Today it’s avr-libc, and this gem:

In file included from ../../common/FreqCounter.h:17:0,
                 from ../../common/FreqCounter.c:35:
/usr/avr/include/util/delay.h: In function '__vector_21':
/usr/avr/include/util/delay.h:246:2: error: __builtin_avr_delay_cycles expects a compile time integer constant
  __builtin_avr_delay_cycles(__ticks_dc);
  ^

Apparently it was always actually a requirement in the notes, but everyone did it anyway. Now, you need to write a wrapper function like this sort of shit:

void do_what_I_say_delay_us(int us) {
     while (us-- > 0) {
         _delay_us(1);
     }
}

Hooray, isn’t that better for everyone! See http://nongnu.org/avr-libc/user-manual/group__util__delay.html for more information, if you can read carefully enough :)

version control of tools

Ahh, it’s always the right thing to do, but normally it’s so heavy to check in things like GCC/Binutils versions into every project. It’s the sort of thing you do if you’re a big serious company, working on big serious things, with big serious support. Besides, I’m not relying on anything weird or esoteric right?

Wrong.


../../common/pjrc/usb_debug_only.c:96:45: error: variable 'device_descriptor' must be const in order to be put into read-only section by means of '__attribute__((progmem))'
static uint8_t PROGMEM device_descriptor[] = {

Thanks for nothing avr-gcc updates. I understand what you’re getting at, but still, this used to compile, and put things in PROGMEM. Now it fails the compile. GCC bug in question is https://gcc.gnu.org/bugzilla/show_bug.cgi?id=44643, or at least, that’s where it came from. A nice case of, “everybody’s using this code, but it was never actually meant to work, so let’s make it fail for them all, like it was meant to anyway.”

Compilers are awesome.

Installing Eagle 7.3 on fedora 21 x64

So, as before, you need to symlink libssl and libcrypto, but this time, you need to do the symlinking in the normal 64bit lib path.

/usr/lib64$ sudo ln -s libssl.so.1.0.1k libssl.so.1.0.0
/usr/lib64$ sudo ln -s libcrypto.so.1.0.1k libcrypto.so.1.0.0

This is despite the eagle installer saying that it needs the 32bit libraries installed!

mosquitto in OpenWrt which versions are where

With more and more versions of OpenWrt and mosquitto being released with more dependencies and features, here’s a quick overview of what versions are available where.

This is the out of the box versions. An extra packages feed, https://github.com/remakeelectric/owrt_pub_feeds is available for running mosquitto and it’s dependencies on older OpenWrt releases, should you need that functionality. At the time of writing, this feed contains mosquitto version 1.4.2, and libwebsockets 1.3.x.

I should clarify, this is what you get if you build your own images out of the box. Not the version that was available at release day.

Openwrt Backfire (10.03)

Attitude Adjustment (12.09)

Barrier Breaker (14.07)

Chaos Calmer (15.05)

master/trunk

Mosquitto version unavailable 0.15 1.3.5 1.4.2 1.4.2
libwebsockets n/a n/a n/a 1.3.x 1.4.x

Carlo Gavazzi EM210 coupled display panel teardown

The Carlo Gavazzi EM210 series [1] of 3 phase energy meters have a rather neat feature. You can mount them on a DIN rail or panel mount, with the same unit, and the display portion is simply detachable, and plugs back in on the reverse side. This is neat tech, and probably saves on inventory in a few distributor places at least, though I don’t imagine it makes any real difference for the end user, who will mount it once and leave it. Still, the display piece has the control buttons and the LCD display, no batteries, and no contacts. So I pulled it apart :)

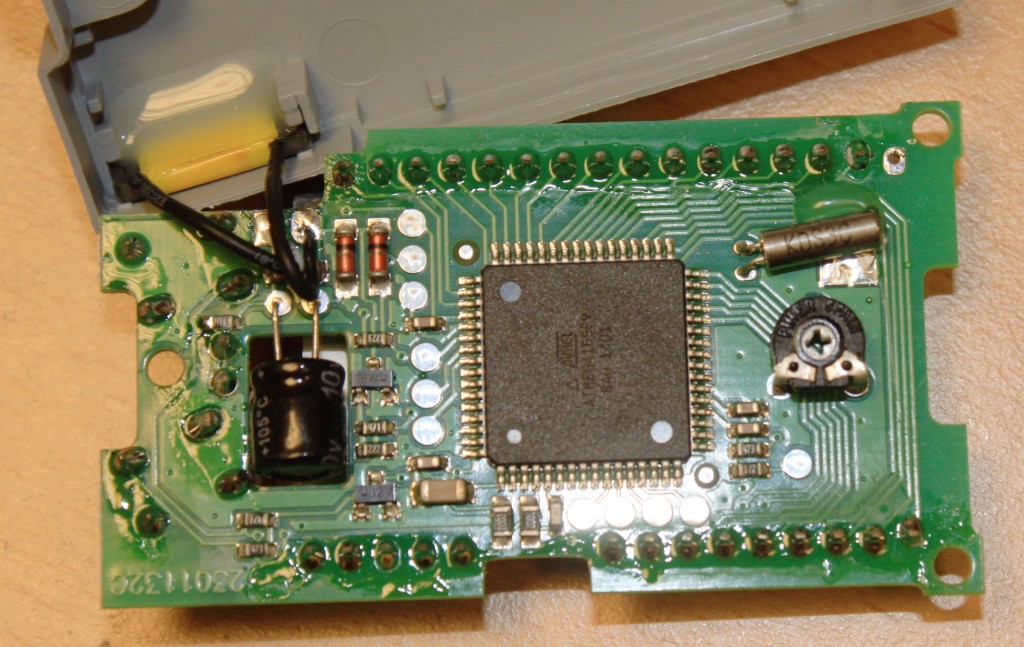
I don’t know how it works really, it’s presumably the same method as NFC, by modulating the power draw from a capacitively or inductively coupled connection. It’s cool though. ATMega169 for the LCD control and buttons. Not entirely sure what the crystal is for, it’s marked “KDS3C” but I didn’t look further for a speed marking. Presumably you need a proper crystal to be able to synchronize the coupled connection properly? I don’t believe it’s an RTC crystal, as this is the detachable display portion. I always like seeing cutouts mid PCB for inserting big components.

The trimpot is an interesting idea. It’s used as a “lock”. With it turned all the way one way, the device is considered locked, and this screw access is on the back of the display portion. This portion also has tags for tamper seals, so I guess that’s one way of doing it on the cheap? Presumably just an ADC input to determine lock status.

The oddly slanted through hole parts on the left are the front panel buttons, nice alignment :)

ATMega169 for LCD control, coupled connection

ATMega169 for LCD control, coupled connection

[1] I’d link to them, but their website is junk and doesn’t let you link to products, and requires sign up to get a datasheet, that uses old names. The same sort of stupid games with redirecting you to different websites for different markets for the same device and all the usual terrible product management choices that lead engineers to ignore your products.