Rum Balls for christmas

Surprise cooking post! Rum balls are somewhat common in some families in Australia around christmas, but about the only thing many of them have in common is being mostly chocolatey, mostly with some sort of alcohol flavour, and normally somewhat ball shaped, and rolled in coconut. Here’s the original recipe copied out of my handwritten recipe book, copied from my mother’s hand written recipe book.

Ingredients:

  • 220g sweet biscuits, crumbled
  • 2 tbsp cocoa
  • 1/2 cup coconut
  • 1/2 powdered milk
  • 1/2 glazed cherries
  • 400g tin of condensed milk

Now, that’s the original in the book. I’m sure it’s lovely, but mine are a little different. Firstly, what are “sweet biscuits” ?! In Australia we would use “Scotch finger” biscuits. Here in Iceland, I use “Marie” biscuits. Anything plainish but still sweet is what you’re looking for. In Iceland, at least this year, Marie biscuits come in twin pack tubes, 2x200g. Don’t worry about the 20g :)

Next up, “2 tbsp” In Australia, at least when the recipe was written, that’s a tablespoon, not a desertspoon. (And not a teaspoon) I use 3 regular food eating spoons. (It won’t make much difference in this recipe, but it will in some others)

Powdered milk is an odd product too, but very important in this sort of thing. Skim milk or whole milk doesn’t make an awful lot of difference in this recipe. In Iceland, the only place selling this as of December 2014 that I’m aware of is Fjarðarkaup. MS manufacturers it, but only in 25kg bags. In other countries this is often readily available.

Condensed milk is also unusual. This is most definitely not evaporated milk, don’t even try. In Iceland, this is available in most of the asian groceries, I get it at Mai Thai on Laugavegur. Nestle makes and sells it worldwide, but there’s other brands too. In Singapore for instance, this stuff is used instead of milk in coffee. (It’s a wonderful product, worthy of further mention)

Glazed cherries can be replaced with whatever you prefer, or as I do, simply omitted. (I find the 1/2 cup in the original far too much at least, and as they’re somewhat difficult to find (notice a theme?) here, I just don’t use them)

Finally, notice that there’s no rum in that recipe. I use a good 2-3 shots or so. You want dark rum, but I’d avoid spiced stuff. Austalians would use Bundaberg, here in Iceland I’ve used “Old Navy”, and really any of the dark unspiced carribean rums. It doesn’t have to be fancy stuff.

Ok, ingredients in hand, hopefully. Now what? You just mix them all up. Crumbling biscuits can be tedious. A food processor works really well for this. Once it’s all mixed up evenly, put it in a covered container in the fridge overnight. The next day, (later that week, etc) you fill up a bowl with further coconut, spoon out chunks of the mixture, roll it out to a smooth ball between your hands, then drop it in the coconut and roll it around to coat it. Here’s some pictures of making them

Pile up all this coated balls back into a box and keep them in the fridge. Yummy. A lot easier than it sounds, once you’ve got the ingredients together :)
Rust on OpenWrt – baby steps

Well, it works, at least hello world. I followed the steps here: http://www.cnblogs.com/yido9932/p/3980362.html but had to make a few changes. First, I’m using the old atheros target, so I used “mips-unknown-linux-gnu” instead of mipsel. I still had to make symlinks into the STAGING_DIR path, because rust required the compiler to be with a certain name, and the target triplets don’t line up with OpenWrt.

./configure --target=mips-unknown-linux-gnu --disable-docs --prefix=/home/karlp/dummylib

I also had to remove the -mno-compact-eh flags from [rustroot]/mk/platform.mk in a couple of places. This is an unknown option in gcc as far as I can tell, it appears to be only in CodeSourcery/Mentor’s hacked up version? Then to actually compile the code I needed a few more incantations…

LD_LIBRARY_PATH=/home/karlp/dummylib/lib ~/dummylib/bin/rustc --target=mips-unknown-linux-gnu -C linker=mips-linux-gnu-gcc -L /home/karlp/dummylib/lib/rustlib/mips-unknown-linux-gnu/lib hicore.rs 

And, there’s been a rust language change since that blogpost was made. Using the sample code from that article, you’ll get an error on the “hicore.rs” example about error: language item required, but not found: `fail_fmt`, so you need to add an extra magic line into your sample code,

#[lang = "fail_fmt"] fn fail_fmt() -> ! { loop {} }

This is outlined on: http://doc.rust-lang.org/guide-unsafe.html

All in all, somewhat neat, maybe, I guess. But the rust std library is huge, as noted in the google translation of the chinese article linked above. And writing it all in “unsafe” code sounds kinda pointless. So, maybe not so interesting for OpenWrt at this point, but it runs at least.

linux mainline: minix neo x5 mini: USB works!

yay, progress. (by other people in the mainline community, I’m just enabling sections in devicetree files and building and testing.)

So, if you’ve built a kernel, and you think it should work, but you’re getting errors in syslog that look like this…

Jan  1 00:00:28 linaro-developer kernel: usb 2-1: new full-speed USB device number 3 using dwc2
usb 2-1: device v1a86 p7523 is not supported
usb usb2-port1: unable to enumerate USB device
Jan  1 00:00:29 linaro-developer kernel: usb 2-1: device v1a86 p7523 is not supported
Jan  1 00:00:29 linaro-developer kernel: usb usb2-port1: unable to enumerate USB device
Jan  1 00:00:59 linaro-developer kernel: usb 2-1: new high-speed USB device number 4 using dwc2
usb 2-1: device v0fce p5171 is not supported
usb usb2-port1: unable to enumerate USB device
Jan  1 00:01:52 linaro-developer kernel: usb 2-1: Dual-Role OTG device on HNP port
Jan  1 00:01:52 linaro-developer kernel: usb 2-1: device v0fce p5171 is not supported
Jan  1 00:01:52 linaro-developer kernel: usb usb2-port1: unable to enumerate USB device

This is actually a problem with your USB OTG config. Make sure that both CONFIG_USB_OTG_WHITELIST and CONFIG_USB_OTG_FSM are not set

A quick rebuild and reflash and presto…

Jan  1 00:00:32 linaro-developer kernel: usb 2-1: new full-speed USB device number 2 using dwc2
usb 2-1: device v1a86 p7523 is not supported
Jan  1 00:00:32 linaro-developer kernel: usb 2-1: device v1a86 p7523 is not supported
Jan  1 00:00:32 linaro-developer kernel: ch341 2-1:1.0: ch341-uart converter detected
Jan  1 00:00:32 linaro-developer kernel: usb 2-1: ch341-uart converter now attached to ttyUSB0

It’s still “not supported”, but I’m led to believe that means it’s not supported as a gadget in some manner.

The only additions to the device tree for the minix board were…

&usb_host {
       status = "okay";
};

&usb_otg {
       status = "okay";
};

Unfortunately, “only” these additions means there’s no power control for vbus. So the usb devices only work on the second port, if you have the funky A-A recovery cable plugged into the dual mode OTG/Host port used for recovery. Working out more pins is an ongoing project.
Thanks as always to the kindly people of #linux-rockchip

Further linux mainline adventures on minix neo x5 mini

This is a follor on from the last post, and as before, is a bit of a braindump post.

So, basically, it’s working now. The mystery part was adding “rootwait” to the kernel command line, presumably because of the mmc controller not having finished finding the card before it tried to mount root. This was only the kernel command line in the _linux_ build, nothing to do with the rockchip parameters file at all.

I followed the directions at http://hwswbits.blogspot.com/2013/11/your-own-official-linux-distro-in-sd.html to make an SD card with just the linux RFS. I’m still working on a generally “simpler is better” process. No initramfs, modules built in, plain RFS on sdcard because nand doesn’t work in mainline linux.

So…

wget http://releases.linaro.org/14.08/ubuntu/trusty-images/server/linaro-trusty-server-20140821-681.tar.gz # or similar
sudo umount -l /dev/sdd
sudo mkfs.ext4 -F -L linuxroot /dev/sdd
sudo su - # to keep permissions
cd /run/media/karlp/linuxroot
tar -xf ~karlp/Downloads/linaro-trusty-server-20140821-681.tar.gz --strip 1
sync
# back to regular user

Then put the sdcard in the minix and power cycle, and yay, I finally have a semblance of a linux system booting up!

It’s not entirely complete, but it’s getting a lot further than before!

bootlog.sdcard

I still don’t have any of the following working yet…. so it’s still a ways to go

  • ethernet
  • wifi
  • usb

:)

linux-rockchip v3.17-next on minix neo x5 mini

This is a braindump post, probably of very little interest to anyone but myself. It outlines further adventures towards getting a plain linux system booted on a minix neo x5 mini.

rk3066 support is expanding in the bleeding edge linux trees, and seeing as I don’t care about HDMI (yet) for my purposes, I thought it would be a good way to go forward. Device tree support, recent, near vanilla code, a snowflakes chance of getting a patch to work, and a single clear path to upstream. Of course, I thought for practice, I should start with one of the existing “gpl release” trees, all built on 3.0.x. That was an adventure. I tried the “omegamoon” repository, which _seemed_ to be the most uptodate, with backports of “important” things. https://github.com/omegamoon/Rockchip-GPL-Kernel

We ignore all the build script crap, at least until we’ve looked at them all, because we’re trying to work out what they’re doing, not just monkeys on keyboards.

$ export ARCH=arm
# This line your toolchain, mine is from "yum install gcc-arm-linux-gnu" on fedora 20
# Note, that you can actually skip this with the right entries in your .config
$ export CROSS_COMPILE=arm-linux-gnu-

In any tree, have a look in arch/arm/configs for an appropriate defconfig for your device…. (This is where it gets fun!)
So, let’s start with something basic

make rk3066b_sdk_defconfig
# now we would need to go into menuconfig and make sure we've turned on drivers we might need....
# but let's just build this one first and see what we get....
make -j8

And… it fails here. Awesome. Turns out all the 3066 configs here don’t even compile, presumably because of rk3188 support getting patched in, without any testing. so, toss this repo out and try another…

We’re going back to a “clean” rk3066 tree, following the directions here: http://hwswbits.blogspot.com/2013/11/linux-on-ug008-tv-box-rk3066.html This site has been generally helpful, and the ug008 is a very similar device to the minix neo x5 mini. I originally intended to go all the way back to basics, just follow any build guide first, make sure the code worked as is, before I tried anything more specific to the x5mini.

git clone https://github.com/Galland/rk3x_kernel_3.0.36 galland-rk
cd galland-rk
cp galland.config .config
make menuconfig
General Setup->Cross Compiler tool prefix -> Update the prefix so you don't have to export CROSS_COMPILE...
make

watch it fail…

/home/karlp/projects/galland-rk3x-3.0.36/scripts/gen_initramfs_list.sh: Cannot open '../initramfs/initramfs.cpio'

Ok, that was clearly skipping steps. Why do I need a damn initramfs, I just want to build in the modules I need in one go! But, ok, we’re going to follow the instructions given.

clone galland initramfs image, choose to use the one with rk mtd nand support, as we are hoping eventually to get linux, not android. rebuild
watch it fail, no uudecode. wtf?! and yum search uudecode only turns up a perl module?! Turns out you need the sharutils package. Ok, my bad, this was listed at the top of galland’s page of requirements. No idea why I haven’t had this installed already before, but so be it, install and make again…

Realise it doesn’t compile either. Bugs in the drivers/mtk_wcn_combo/drv_wlan/wlan/common/wlan_lib.c file. Awesome. I did consider resetting this repository to the date the blog post was written, and also looked at the rest of the forks, but ultimately decided, I wasn’t interested in trying this any further, they were all deadends. On to “near” mainline.

from #linux-rockchip on freenode, on earlier discussions I’d come across a more recent repo, on kernel.org no less, from one of the people who’s involved in mainlining efforts for rockchip support.

So, this is now…. _very recent_
Git repo: git://git.kernel.org/pub/scm/linux/kernel/git/mmind/linux-rockchip.git
Branch: v3.17-next/rk3xxx-dts

I’ve hacked a .config together, but I don’t know if it’s worth sharing at this point. So many options!

make -j8
# That spat out arch/arm/boot/zImage
make scripts # This makes the dts/dtb compiler
make rk3066a-bqcurie2.dtb # The only rk3066 in the tree, this is where I'll eventually have to make one for the minix neox5 mini
# that spat out arch/arm/boot/rk3066a-bqcurie2.dtb
cat arch/arm/boot/zImage arch/arm/boot/rk3066a-bqcurie2.dtb > zImage_with_dtb
[rktools]/rkcrc -k zImage_with_dtb > kernel.img
rkflashtool w kernel kernel.img (Or flashkit, or whatever)

Yay, now we actually get a booting kernel that we built ourselves….

425482 Starting kernel...@0x60408000

Uncompressing Linux... done, booting the kernel.
Booting Linux on physical CPU 0x0
Linux version 3.16.0-rc3 (karlp@teros) (gcc version 4.8.2 20140120 (Red Hat 4.8.2-2) (GCC) ) #1 SMP Wed Jul 30 21:08:48 GMT 2014
CPU: ARMv7 Processor [413fc090] revision 0 (ARMv7), cr=10c53c7d
CPU: PIPT / VIPT nonaliasing data cache, VIPT aliasing instruction cache
Machine model: bq Curie 2
..... snip....
Please append a correct "root=" boot option; here are the available partitions:
Kernel panic - not syncing: VFS: Unable to mount root fs on unknown-block(0,0)
CPU: 1 PID: 1 Comm: swapper/0 Not tainted 3.16.0-rc3 #1
..... snip (same on cpu2) ....

whee, that’s actually doing the right thing. It actually gets all the way to failing to mount a rootfs, which is reasonable, as I hadn’t configured one, mounted one, or set anything up on an sd card. So, I guess next, we’re looking at making at least a stub rootfs, and looking at maybe a more specific device tree file for this hardware.

Note: If you don’t concat the DTS to the end of zImage, you’ll get a boot something like this…

 424337 Starting kernel...@0x60408000

Uncompressing Linux... done, booting the kernel.

Error: unrecognized/unsupported machine ID (r1 = 0x00000bfa).

Available machine support:

ID (hex)	NAME
ffffffff	Generic DT based system
ffffffff	Rockchip Cortex-A9 (Device Tree)

Please check your kernel config and/or bootloader.

A good write up of this is at http://billauer.co.il/blog/2014/02/uboot-linux-dtb-fdt-device-tree/

minix neo x5 mini – backup partitions and investigate

Urgh, I hate the massive pile of rom noise around anything to do with android devices.

I’m using https://github.com/neo-technologies/rkflashtool because it appears to be actually maintained. https://github.com/linuxerwang/rkflashkit is also somewhat convenient, though it’s gui only. If it was a nice python tool with a gui front end that would be even better. (no idea why you need waf and install either, simple “python run.py” is perfectly suitable.) libusb+python is perfectly acceptable for this sort of thing. No idea why people went straight to C code. https://github.com/neo-technologies/rockchip-mkbootimg looks good too, but I’ve not poked it yet. Anything that’s being maintained basically.

A commonly referred tool, https://github.com/naobsd/rkutils while often pointed to, is effectively a dead end with zero follow up commits. I’ve no interest in following that nest of forks.

Anyway, here’s the bits that actually worked to open up the boot partition image extracted with either rkflashkit or rkflashtools…

  • ./rkflashtool r boot > boot.img
  • dd if=boot.img of=bootimg.gz skip=8 bs=1 count=20000000
  • mkdir hohoho && cd hohoho
  • gunzip < ../bootimg.gz | cpio -i --make-directories

According to this review of boot.img formats, this means the x5mini uses format 4.

karlp@teros:~/projects/rkflashtool/hoho (master)$ ls
charger       init.goldfish.rc       init.usb.rc               sbin                 ueventd.rk30board.rc
data          init.rc                proc                      sys
default.prop  init.rk30board.rc      res                       system
dev           init.rk30board.usb.rc  rk30xxnand_ko.ko.3.0.36+  ueventd.goldfish.rc
init          init.trace.rc          rk30xxnand_ko.ko.3.0.8+   ueventd.rc
karlp@teros:~/projects/rkflashtool/hoho (master)$ 

Still learning the pieces, this is as much diary as blog.

Minix NEO X5 mini – teardown and serial console

Well, I bought a “Minix NEO X5 mini” for various experiments, eventually planning just a plain linux server, with ethernet and wifi, and a pile more ram and flash than the regular OpenWRT router platforms. I chose this based mostly on the smallest, cheapest that had a physical ethernet port. The other contender was the UG008. (And UG008B) Those are marginally smaller, and have one less fullsize USB, also, I _thought_ I’d read good instructions on getting linux running on the x5mini, but it turned out the instructions were for the x5 (full size) which is very similar, but not the same. I’ve since found instructions for the ug008, maybe I should have bought that. It also has a power button and from the pcb pics, looks like the pads for test points are bigger. No heatsink though, and I’d heard it’s wifi wasn’t as good. (Rumous and hearsay, I’ve no idea really) The second fullsize USB port however, is kinda of interesting. The x5mini came with a rather unusual fullsize USB A male-male cable. And there’s no microusb port for the OTG like normal. Plugging this in to a regular pc host would be disastrous, so the supplied android has a special menu option to enable “connecting to pc” which resets on every boot. If you do have it turned on, and you push the pinhole on the bottom while plugging in the power, you’ll get a usb device that ADB can find. dodgy, a regular OTG port would have been preferable.

So yeah, it works pretty well out of the box, but there’s enough reviews of that. We’re here to pull it apart. The little screws are glued in, so you need a good screwdriver, I almost stripped them getting them out. Then, whee, brown PCB! And whee, they put a weight in it to feel pro ;)

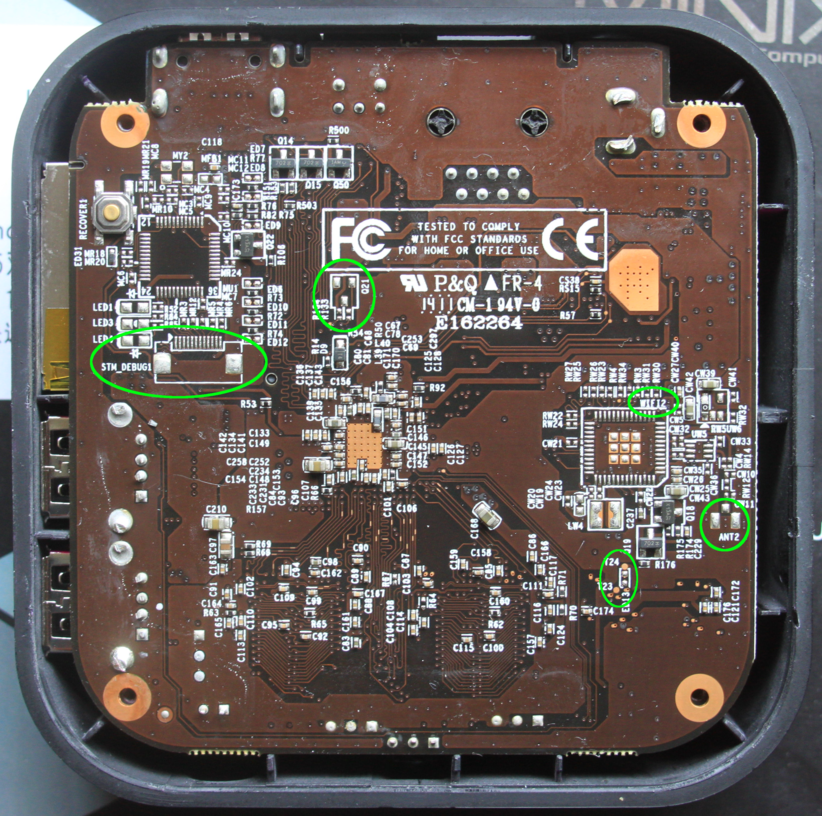
The wifi (rtl8188es) antenna is soldered on, then soldered to an adhesive antenna on the lid, a little awkward, but perfectly reasonable of course. Immediately on the board you can see two missing ICs, one, labelled “WIFI2” is almost certainly Bluetooth, which is not on the x5mini, but is on the x5. More curious though is missing QFP48 IC by the recovery button, and it’s 12 pin “STM_DEBUG” connector. It certainly reminds me of an STM32 footprint, though the debug for cortex-m is normally 10 or 20 pins, not 12? No idea. Two test points on this side, T23 and T24, if it’s indeed a bluetooth module, this is possibly a uart between them? *shrugs*

Back to the “top” side, ethernet is an SMSC LAN8720A, power is a TI T659102, which seems to be pretty common on these boards. There’s two filled jumper blocks with interesting text, “USB1 Device / USB1 Host” and “Auto power on enable/disable” but I’ll leave them for a later time. There’s a rather unexpected battery connector too. Minix doesn’t have any battery backed devices in their catalog, so someone’s design company has been working on this. So much for thinking that minix was an OEM.

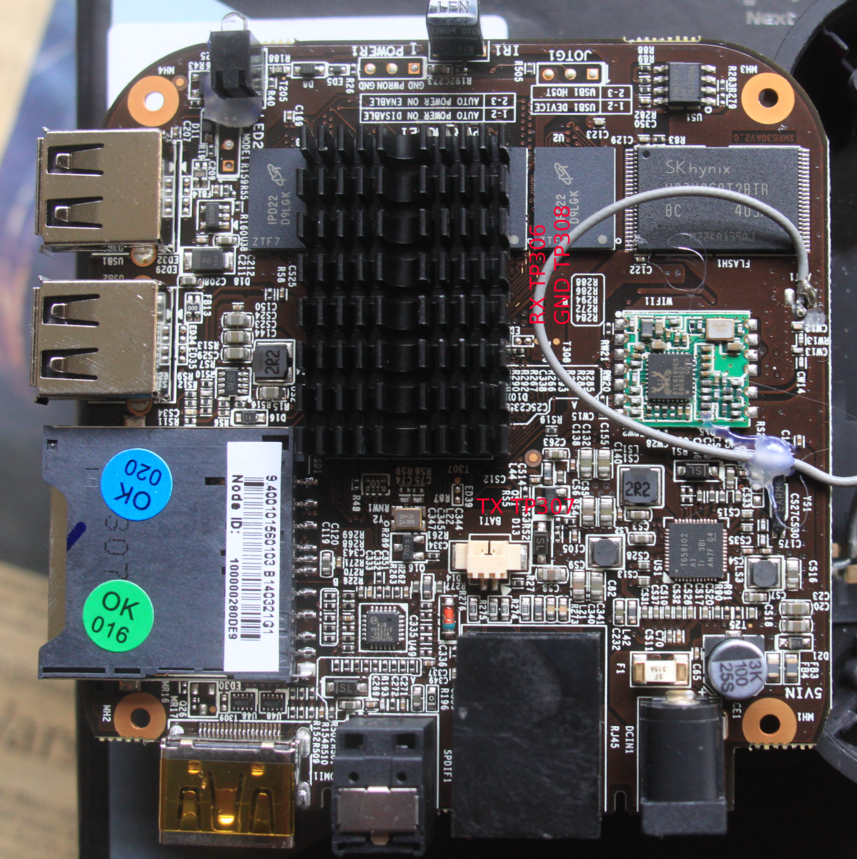
T306 is RX, T307 is TX and T308 is GND, for a serial console at 115200, 8N1

minix-neo-x5-mini-pcb-top-notes-30
minix-neo-x5-mini-pcb-bottom-notes-30

Finally, here’s most of the bootup

Using SWO/SWV streaming data with STLink under linux – Part 2

In Part 1, we set up some (very) basic code that writes out data via Stimulus Channel 0 of the ITM to be streamed otu over SWO/SWV, but we used the existing ST provided windows tool, “STLink” to be view the stream. Now let’s do it in linux.

OpenOCD has some very draft support for collecting this data, but it’s very rough around the edges. [1]

I wrote a tool based on my own decoding of USB traffic to be a little more flexible. You connect to the STLink hardware, and can start/stop logging, change trace files, and change which stimulus ports are enabled. It is quite rough, but functional. It should not be underestimated how important being able to start/stop tracing is. In the ARM debug docs, turning on or reconfiguring trace is undefined as far as having the output bitstream be properly synced. (Section D4.4 of “Flush of trace data at the end of operation” in the Coresight Architecture spec, and most importantly, “C1.10.4 Asynchronous Clock Prescaler Register, TPIU_ACPR” in the ARMv7M architecture reference manual)

Don’t get me wrong, although my tool works substantially better than OpenOCD does, it’s still very rough around the edges. Just for starters, you don’t have debug or flash at the same time! Having it integrated well into OpenOCD (or pyOCD?) is definitely the desired end goal here.

Oh yeah, and if your cpu clock isn’t 24MHz, like the example code from Part 1, then you must edit DEFAULT_CPU_HZ in the top of hack.py!

So, how do you use it?

First, get the source from github: https://github.com/karlp/swopy. You need pyusb 1.x, then run it, and type connect

karlp@tera:~/src/swopy (master)$ python hack.py 
:( lame py required :(
(Cmd) connect
STLINK v2 JTAG v14 API v2 SWIM v0, VID 0x483 PID 0x3748
DEBUG:root:Get mode returned: 1
DEBUG:root:CUrrent saved mode is 1
DEBUG:root:Ignoring mode we don't know how to leave/or need to leave
(1682, 2053)
('Voltage: ', 2.9293697978596906)
DEBUG:root:enter debug state returned: array('B', [128, 0])
('status returned', array('B', [128, 0]))
('status is: ', 'RUNNING')
(Cmd) 

Yes, there’s lots of debug. This is not for small children. You have been warned, but there is some help!

(Cmd) help

Documented commands (type help ):
========================================
connect     raw_read_mem32   run       swo_read_raw
magic_sync  raw_write_mem32  swo_file  swo_start   

Undocumented commands:
======================
EOF          exit  leave_state  raw_read_debug_reg   swo_stop
enter_debug  help  mode         raw_write_debug_reg  version 

(Cmd) 

The commands of interest are swo_file, swo_start and swo_stop. So, enter a file name, and start it up…

(Cmd) swo_file blog.bin
(Cmd) swo_start 0xff
INFO:root:Enabling trace for stimbits 0xff (0b11111111)
DEBUG:root:READ DEBUG: 0xe000edf0 ==> 16842752 (0x1010000) status=0x80, unknown=0x0
DEBUG:root:WRITE DEBUG 0xe000edfc ==> 16777216 (0x1000000) (res=array('B', [128, 0]))
DEBUG:root:READMEM32 0xe0042004/4 returned: ['0x0']
DEBUG:root:WRITEMEM32 0xe0042004/4 ==> ['0x27']
DEBUG:root:WRITEMEM32 0xe0040004/4 ==> ['0x1']
DEBUG:root:WRITEMEM32 0xe0040010/4 ==> ['0xb']
DEBUG:root:STOP TRACE
DEBUG:root:START TRACE (buffer= 4096, hz= 2000000)
DEBUG:root:WRITEMEM32 0xe00400f0/4 ==> ['0x2']
DEBUG:root:WRITEMEM32 0xe0040304/4 ==> ['0x0']
DEBUG:root:WRITEMEM32 0xe0000fb0/4 ==> ['0xc5acce55']
DEBUG:root:WRITEMEM32 0xe0000e80/4 ==> ['0x10005']
DEBUG:root:WRITEMEM32 0xe0000e00/4 ==> ['0xff']
DEBUG:root:WRITEMEM32 0xe0000e40/4 ==> ['0xff']
DEBUG:root:READMEM32 0xe0001000/4 returned: ['0x40000000']
DEBUG:root:WRITEMEM32 0xe0001000/4 ==> ['0x40000400']
DEBUG:root:READMEM32 0xe000edf0/4 returned: ['0x1010000']
DCB_DHCSR == 0x1010000
(Cmd) rDEBUG:root:reading 16 bytes of trace buffer
DEBUG:root:Wrote 16 trace bytes to file: blog.bin
unDEBUG:root:reading 16 bytes of trace buffer
DEBUG:root:Wrote 16 trace bytes to file: blog.bin
DEBUG:root:reading 16 bytes of trace buffer
DEBUG:root:Wrote 16 trace bytes to file: blog.bin
DEBUG:root:reading 16 bytes of trace buffer
DEBUG:root:Wrote 16 trace bytes to file: blog.bin
DEBUG:root:reading 16 bytes of trace buffer
DEBUG:root:Wrote 16 trace bytes to file: blog.bin
DEBUG:root:reading 16 bytes of trace buffer
DEBUG:root:Wrote 16 trace bytes to file: blog.bin
DEBUG:root:reading 16 bytes of trace buffer
DEBUG:root:Wrote 16 trace bytes to file: blog.bin
DEBUG:root:reading 16 bytes of trace buffer
DEBUG:root:Wrote 16 trace bytes to file: blog.bin
DEBUG:root:reading 16 bytes of trace buffer
DEBUG:root:Wrote 16 trace bytes to file: blog.bin
DEBUG:root:reading 18 bytes of trace buffer
DEBUG:root:Wrote 18 trace bytes to file: blog.bin

Ok, great. but… where’d it go? Well. It’s in the native binary ARM CoreSight trace format, like so…

karlp@tera:~/src/swopy (master *)$ tail -f blog.bin | hexdump -C 
00000000  01 54 01 49 01 43 01 4b  01 20 01 37 01 31 01 38  |.T.I.C.K. .7.1.8|
00000010  01 0d 01 0a 01 54 01 49  01 43 01 4b 01 20 01 37  |.....T.I.C.K. .7|
00000020  01 31 01 39 01 0d 01 0a  01 54 01 49 01 43 01 4b  |.1.9.....T.I.C.K|
00000030  01 20 01 37 01 32 01 30  01 0d 01 0a 01 54 01 49  |. .7.2.0.....T.I|
00000040  01 43 01 4b 01 20 01 37  01 32 01 31 01 0d 01 0a  |.C.K. .7.2.1....|
00000050  01 54 01 49 01 43 01 4b  01 20 01 37 01 32 01 32  |.T.I.C.K. .7.2.2|
00000060  01 0d 01 0a 01 54 01 49  01 43 01 4b 01 20 01 37  |.....T.I.C.K. .7|
00000070  01 32 01 33 01 0d 01 0a  01 54 01 49 01 43 01 4b  |.2.3.....T.I.C.K|
00000080  01 20 01 37 01 32 01 34  01 0d 01 0a 01 54 01 49  |. .7.2.4.....T.I|
00000090  01 43 01 4b 01 20 01 37  01 32 01 35 01 0d 01 0a  |.C.K. .7.2.5....|
000000a0  01 54 01 49 01 43 01 4b  01 20 01 37 01 32 01 36  |.T.I.C.K. .7.2.6|
000000b0  01 0d 01 0a 01 54 01 49  01 43 01 4b 01 20 01 37  |.....T.I.C.K. .7|
000000c0  01 32 01 37 01 0d 01 0a  01 54 01 49 01 43 01 4b  |.2.7.....T.I.C.K|
000000d0  01 20 01 37 01 32 01 38  01 0d 01 0a 01 50 01 75  |. .7.2.8.....P.u|
000000e0  01 73 01 68 01 65 01 64  01 20 01 64 01 6f 01 77  |.s.h.e.d. .d.o.w|
000000f0  01 6e 01 21 01 0d 01 0a  01 54 01 49 01 43 01 4b  |.n.!.....T.I.C.K|
00000100  01 20 01 37 01 32 01 39  01 0d 01 0a 01 54 01 49  |. .7.2.9.....T.I|
00000110  01 43 01 4b 01 20 01 37  01 33 01 30 01 0d 01 0a  |.C.K. .7.3.0....|
00000120  01 68 01 65 01 6c 01 64  01 3a 01 20 01 32 01 34  |.h.e.l.d.:. .2.4|
00000130  01 35 01 32 01 20 01 6d  01 73 01 0d 01 0a 01 54  |.5.2. .m.s.....T|
00000140  01 49 01 43 01 4b 01 20  01 37 01 33 01 31 01 0d  |.I.C.K. .7.3.1..|
00000150  01 0a 01 54 01 49 01 43  01 4b 01 20 01 37 01 33  |...T.I.C.K. .7.3|

Which is ugly, but you get the idea.

This is where swodecoder.py comes in. The author of the original SWO support in OpenOCD has some code to do this too, it’s more forgiving of decoding, but more likely to make mistakes. Mine is somewhat strict on the decoding, but probably still has some bugs.

Usage is pretty simple

$ python swodecoder.py blog.bin -f
Jumping to the near the end
Not in sync: invalid byte for sync frame: 1
Not in sync: invalid byte for sync frame: 73
Not in sync: invalid byte for sync frame: 1
Not in sync: invalid byte for sync frame: 67
Not in sync: invalid byte for sync frame: 1
Not in sync: invalid byte for sync frame: 75
Not in sync: invalid byte for sync frame: 1
Not in sync: invalid byte for sync frame: 32
Not in sync: invalid byte for sync frame: 1
Not in sync: invalid byte for sync frame: 50
Not in sync: invalid byte for sync frame: 1
Not in sync: invalid byte for sync frame: 49
Not in sync: invalid byte for sync frame: 1
Not in sync: invalid byte for sync frame: 53
Not in sync: invalid byte for sync frame: 1
Not in sync: invalid byte for sync frame: 51
Not in sync: invalid byte for sync frame: 1
Not in sync: invalid byte for sync frame: 13
Not in sync: invalid byte for sync frame: 1
Not in sync: invalid byte for sync frame: 10
TICK 2154
TICK 2155
TICK 2156
TICK 2157
---snip---
TICK 2194
TICK 2195
TICK 2196
Pushed down!
held: 301 ms
Pushed down!
TICK 2197
held: 340 ms
TICK 2198
TICK 2199
Pushed down!
TICK 2200
TICK 2201
---etc---

You (hopefully) get the idea. When the writes to the stimulus ports are 8bit, swodecoder.py simply prints it to the screen. So here we have a linux implementation of the SWV viewer from the windows STLink tool. It’s got a lot of debug, and a few steps, but the pieces are all here for you to go further.

In part three, we’ll go a bit further with this, and demonstrate how SWO lets you interleave multiple streams of data, and demux it on the host side. That’s where it starts getting fun. (Hint, look at the other arguments of swodecoder.py and make 16/32bit writes to the stimulus registers)

To stop SWO capture, type “swo_stop” and press enter, or just ctrl-d, to stop trace and exit the tool.

[1] Most importantly, you can not stop/start the collection, you can only set a single file at config time, which isn’t very helpful for running a long demon. Perhaps even worse, OpenOCD is hardcoded to only enable stimulus port 0, which is a bit restrictive when you can have 32 of them, and being able to turn them on and off is one of the nice things.

Using SWO/SWV streaming data with STLink under linux – Part 1

This is part 1 in a short series about using the SWO/SWV features of ARM Cortex-M3 devices [1]
This post will not explain what SWO/SWV is, (but trust me, it’s cool, and you might work it out by the end of this post anyway) but will focus on how to use it.

First, so you have a little idea of where we’re going, let’s start at the end…

enum { STIMULUS_PRINTF }; // We'll have more one day
 
static void trace_send_blocking8(int stimulus_port, char c) {
        while (!(ITM_STIM8(stimulus_port) & ITM_STIM_FIFOREADY))
                ;
        ITM_STIM8(stimulus_port) = c;
}
 
int _write(int file, char *ptr, int len)
{
        int i;
        if (file == STDOUT_FILENO || file == STDERR_FILENO) {
                for (i = 0; i < len; i++) {
                        if (ptr[i] == '\n') {
                                trace_send_blocking8(STIMULUS_PRINTF, '\r');
                        }
                        trace_send_blocking8(STIMULUS_PRINTF, ptr[i]);
                }
                return i;
        }
        errno = EIO;
        return -1;
}

You can get this code from either:

  • My github repository
  • The swo-1-printf directory in swo-stlink-linux-1

    That’s all[2] you need to have printf redirected to an ITM stimulus port. It’s virtually free, doing nothing if you don’t have debugger connected. [3]

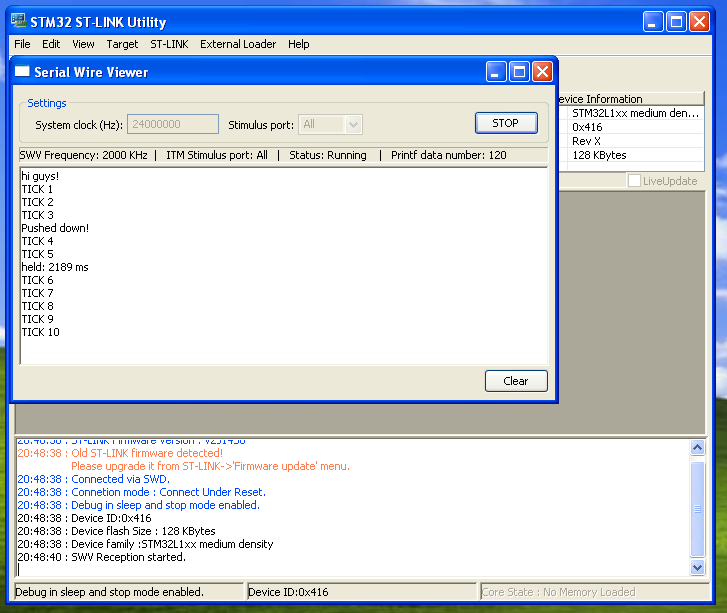
    Groovy. If you have the Windows STLink Utility, you can use this right now. Enter the correct clock speed of your main app, and choose stimulus 0 (or all) and watch your lovely console output.

    stlink-windows-swv

    Ok, that’s cool, but weren’t we going to do this in linux? We were, and we will, but let’s stop here with a good working base, so we can focus on just the extra stuff later.

    [1] Cortex M4 too, but not M0, that’s another day altogether. Specifically, STM32L1 parts, but the concepts and code are the same
    [2] Expects you have your general makefiles all set up to do “the right thing” for newlib stubs and so on.
    [3] Except for generating the formatted string of course, that’s not free. And it does take a _little_ bit of time to write the characters out without overflowing, but that’s a story for another day.

Who pays for shipping? FedEx, TI and overseas agents

Update: I lost this in my drafts folder for over a year!

I live in Iceland. It’s a nice place to live, but it’s small, so I often have to buy things from overseas, particularly in for hobby electronics gear, but anything small and cheap has this problem.

Now, let’s get this straight, I’m not complaining about customs or VAT. (Not today anyway) VAT here in Iceland is 25.5%, and is applied at the end, on top of shipping charges. Customs rate isn’t always as easy to work out.

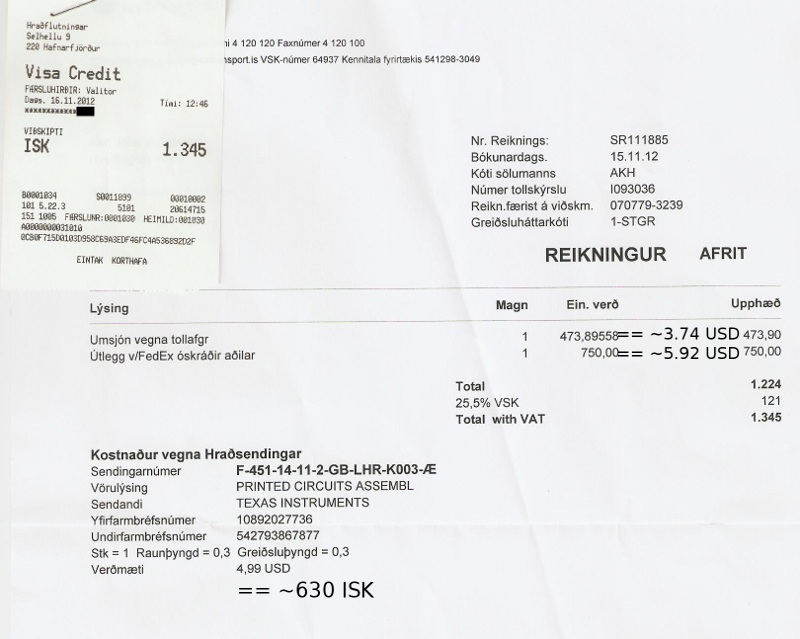
Now, in this example, I bought a device from Texas Instruments, for $US4.99, or about 630 ISK. This was advertised as shipping included, worldwide. Add 25.5% VAT, 790 ISK. Not bad. So it arrived yesterday.

Now, what does that even mean? They’ve charged me ~473 ISK for “customs handling” It doesn’t seem to be anything like the VAT rate, or the VAT rate plus the customs rate. (FIXME – finish getting customs rate)

Customs officially don’t collect anything like this, they simply say that agents are allowed to charge for filing paperwork.

So, this seems to be some arbitrary amount they just felt like charging. Next we have 750 ISK for being “an unregistered customer.” Well, that sounds awesome. I didn’t choose this company, I ordered a product from Texas Instruments with shipping included. Who knows if it’s even possible to become a registered customer.

Then there’s VAT on those charges. So, a whole 120% charge (of original purchase) on being the wrong sort of customer and another 75% (of original purchase) for “handling”. I can’t actually see where they charge the VAT/Customs on the product itself, but the end result is that I’ve paid 170% of the original purchase ON TOP of the basic vat rate + the product price. (1345 ISK + 790 ISK)

How is this remotely reasonable for “shipping included” ? And who’s responsible? Texas Instruments clearly believes they paid FedEx, (or presumably FedEx wouldn’t accept the shipment?) I can only assume that FedEx delivers the package to Iceland, believing that they’ve been paid, but I have zero insight into what the deal is between the local agent (Hraðflutningar ehf)

I believe the party responsible is IceTransport. As they said earlier, local customs agents, defined here, are allowed to charge basically whatever they like. So they do. I presume they treat customers shipping outbound through them quite a lot better, but what are my options at the end of the day? I refuse to pay their arbitrary charges, they hold the parcel, and they’ve already been paid by FedEx/Texas Instruments? So they bin the package, and are already in front? Or do I just suck it up, and pay through the nose? They’re both distasteful.

Customs official answer on handling charges:

http://www.tollur.is/displayer.asp?cat_id=2816&module_id=210&element_id=10177