Emby and Jellyfin with Podman

I had some “unplanned outages” with my home infrastructure, and had to quickly get something up to watch some TV. I was planning on running plex again, when the “main” infrastructure is up again, but took a moment to try out Emby and Jellyfin, to see what they’re like. I’m just running them as quick demos from my main PC, so I had zero intention of setting up some permanent custom linux. And I’ve gotten pretty happy with podman these days, instead of root docker, so….

Emby

$ podman run -d -p 8096:8096 -v $(realpath some-place-to-keep-config):/config:z  -v /mnt/<some local path to tv>:/mnt/share-tv:z emby/embyserver:latest

Pretty normal really. Add as many volume maps as you need for different media types, remembering that everything for the last X years insists that tv and movies are kept in entirely separate top level directories…. for… reasons…. The :z is “normal” to get the mapping permissions right

I’ve not yet tested whether it’s finding things well with local web browsing, might need a –network=host but… nothing special.

Jellyfin

Same same…. Just had to map the port differently, as I was running them both side by side to give them a try…

$ podman run -d -p 8097:8096 -v $(realpath media-jellyfin/config):/config:z -v $(realpath media-jellyfin/cache):/cache:z  -v /mnt/blah/somewhere/tv:/mnt/share-tv:z jellyfin/jellyfin:latest

Now to just see how they both go?

Updating an NXP MCU-Link to work with OpenOCD

Not just OpenOCD, but just.. get it updated.

MCU-Link is a USB-HS “CMSIS-DAP” compatible debug interface, cheaply available. It has a 2x5x1.27mm cortex debug connector, a bonus usb2uart TTL on 2.54mm pins, and even has the 1.27mm 10pin cable in the little case. Supports SWO trace at ~9M they say. Excellent!

As shipped it was running a very old firmware, older than they even have in their release notes. MCU-LINK r0FF CMSIS-DAP V0.078 OpenOCD didn’t even recognise this.

NXP Offers a “MCU-Link installer for Linux” which at the time of writing was v3.128. which certainly sounds more up to date. I downloaded that, found a shell script that wanted to be run as root…. So, with less commentary, here’s how I jumped all the hoops to upgrade the MCU-Link to recent, and get it working properly…

$ sh MCU-LINK_installer_3.128.x86_64.deb.bin --noexec --target .
$ ar x MCU-LINK_installer_3.128.x86_64.deb
$ tar -xf data.tar.gz
$ cd usr/local/MCU-LINK_installer_3.128/
# Now, plug in the "firmware update" jumper and replug the dongle
# This flashes the firmware itself...
$ bin/blhost --usb 0x1fc9,0x0021 flash-image probe_firmware/MCU-LINK_CMSIS-DAP_V3_128.s19 erase 0

# and here we "configure" it, leaving it as unlocked as we can...
$ bin/blhost --usb 0x1fc9,0x0021 read-memory 0x9dc00  512 myoutdump.bin 0
$ bin/mculink_cfg myoutdump.bin --clear --no-device_vendor --no-device_name --no-board_vendor --no-board_name
$ bin/blhost --usb 0x1fc9,0x0021 flash-erase-region 0x9dc00  512
$ bin/blhost --usb 0x1fc9,0x0021 write-memory 0x9dc00  myoutdump.bin  0

Now, unplug, take off the jumper, and replug. You now have a much more standard looking USB descriptors, and running Product: MCU-LINK (r0FF) CMSIS-DAP V3.128

And… now it happily supports non-NXP parts too.

$ openocd -f interface/cmsis-dap.cfg  -f target/stm32g4x.cfg 
Open On-Chip Debugger 0.12.0+dev-00469-g1b4afd13f (2024-01-08-22:49)
Licensed under GNU GPL v2
For bug reports, read
	http://openocd.org/doc/doxygen/bugs.html
Info : auto-selecting first available session transport "swd". To override use 'transport select <transport>'.
Info : Listening on port 6666 for tcl connections
Info : Listening on port 4444 for telnet connections
Info : Using CMSIS-DAPv2 interface with VID:PID=0x1fc9:0x0143, serial=X1JALQM40K3MS
Info : CMSIS-DAP: SWD supported
Info : CMSIS-DAP: JTAG supported
Info : CMSIS-DAP: SWO-UART supported
Info : CMSIS-DAP: Atomic commands supported
Info : CMSIS-DAP: Test domain timer supported
Info : CMSIS-DAP: UART via USB COM port supported
Info : CMSIS-DAP: FW Version = 2.1.1
Info : CMSIS-DAP: Serial# = X1JALQM40K3MS
Info : CMSIS-DAP: Interface Initialised (SWD)
Info : SWCLK/TCK = 0 SWDIO/TMS = 1 TDI = 0 TDO = 0 nTRST = 0 nRESET = 1
Info : CMSIS-DAP: Interface ready
Info : clock speed 2000 kHz
Info : SWD DPIDR 0x2ba01477
Info : [stm32g4x.cpu] Cortex-M4 r0p1 processor detected
Info : [stm32g4x.cpu] target has 6 breakpoints, 4 watchpoints
Info : [stm32g4x.cpu] Examination succeed
Info : starting gdb server for stm32g4x.cpu on 3333
Info : Listening on port 3333 for gdb connections

Later, I’ll test the actual trace, just wanted to write these down while I still had it all.

Home Assistant Matter Server with Podman

Yet more updates, turns out as of a few days ago, they now actually provide a container of the matter server _without_ all the home assistant OS cruft. so it’s even easier:

$ podman run -v /etc/localtime:/etc/localtime:ro -v /run/dbus:/run/dbus:ro  -d --network=host ghcr.io/home-assistant-libs/python-matter-server:stable

(Original below)

so, home assistant only formally supports matter via an home assistant “Addons” which are only supported by the Home Assistant “OS”. That’s… not a cool way of runnings for me, and all it really does is run a docker server wrapping an external service they made, python-matter-server

The Docker service they made is here: https://github.com/home-assistant/addons/tree/master/matter_server This… doesn’t run nicely with podman, but it can mostly be worked around pretty easily.

So, assuming you have home assistant already running on localhost, under podman:

$ podman run -v /etc/localtime:/etc/localtime:ro -v /run/dbus:/run/dbus:ro  -d --network=host -e SUPERVISOR_API=http://localhost docker.io/homeassistant/aarch64-addon-matter-server:latest

The -e SUPERVISOR_API call doesn’t actually do anything, because you don’t actually have the home assistant supervisor, but it might be helpful in some cases, and shows you how to do it anyway.

Originally there were more instructions, below, but they actually went and fixed my bug report eventually, so you no longer need anything other then “usual” podman invocations on their default image.


Unfortunately you will need to edit a few layers, as they seem pretty against letting this be run easily without their entire OS

# First make sure we're up to date
$ podman pull docker.io/homeassistant/aarch64-addon-matter-server
# now, run that, and get a shell in it, we need to edit...
$ podman run -d docker.io/homeassistant/aarch64-addon-matter-server
390841611cf49675741ec72ea91341aef628fd6865bba51eeee9d0f1533473b8
$ podman exec -it -l /bin/bash
root@390841611cf4:~#

Ok, now, what are we fixing? Well, the log line from that bug report linked first… Despite closing my issue, they actually fixed this later…

That… actually means you don’t need to do any image fuckery at all… Lets just do some magic podman to replicate the docker file sufficiently…

Podman and OpenCart

I have been doing some experiments with shopping cart systems, and was trying to run them on podman for some “quick” testing. (I’m not much of a container expert, but I don’t have a php setup on my workstation right now, so this seemed like a good time to become one)

Now, OpenCart installation instructions are super manual but that shouldn’t be too hard right?

Well, after a bit of faffing around, looking for an nginx+php-fpm container ready to go, I just fell back and tried:

$ podman run -p 8081:80 -d -v ./opencart-4.0.2.1/upload:/var/www/html php:8-apache

This runs ok, but you’ll instantly get problems trying to access it:

Warning: mkdir(): Permission denied in /var/www/html/system/storage/vendor/twig/twig/src/Cache/FilesystemCache.php on line 50
Warning: file_put_contents(/var/www/html/system/storage/logs/error.log): Failed to open stream: Permission denied in /var/www/html/system/library/log.php on line 34
Warning: file_put_contents(/var/www/html/system/storage/logs/error.log): Failed to open stream: Permission denied in /var/www/html/system/library/log.php on line 34RuntimeException: Unable to create the cache directory (/var/www/html/system/storage/cache/template/c3). in /var/www/html/system/storage/vendor/twig/twig/src/Cache/FilesystemCache.php on line 53

Ok… you are clever and wise, and have been around computers. You understand, in your bones, that podman’s rootless containers means that “apache” is really running as your normal user id, but thinks it has another id inside the container. You do a lot of reading about “podman unshare” but, you really don’t give a shit what fucking UID is being used inside the php apache container?! You finally find what sounds like the right solution, which sounds exactly right, but… not… quite?

$ podman run -p 8082:80 -d --userns=keep-id -v ./opencart-4.0.2.1/upload:/var/www/html php:8-apache
0e726377f1ecdf7120cdd74f9c9b89b424eba6602c01c167440da91e7069685a

$ podman logs -l
AH00558: apache2: Could not reliably determine the server's fully qualified domain name, using 10.0.2.100. Set the 'ServerName' directive globally to suppress this message
(13)Permission denied: AH00072: make_sock: could not bind to address [::]:80
(13)Permission denied: AH00072: make_sock: could not bind to address 0.0.0.0:80
no listening sockets available, shutting down
AH00015: Unable to open logs

Ok, this is because apache runs as root to bind port 80 inside the container, even though you’re always going to map it from the outside anyway, that sucks. Ok, one more bit of magic right? We can just tell the container that it’s allowed to bind to low ports!

podman run -p 8083:80 -d --userns=keep-id --sysctl net.ipv4.ip_unprivileged_port_start=0 -v ./opencart-4.0.2.1/upload:/var/www/html php:8-apache

And you finally get the OpenCart installation page at http://localhost:8083 None of this addresses the rest of the installation, like “removing the install folder once you’re done” and “configure mysql…”

Silabs Silicon Labs Configurator (SLC) command line

Wow, this is clearly not used much! but, it does seem to work so far? I’ve only taken a few steps, so this is note taking for me and the rest of the internet!

Installation

It talks about pip install -r requirements.txt, but even if you run it in a venv, somewhere it … escapes? and relies on system libraries, or something. You’ll get failures about unable to find jinja2 anyway. (I already had python3-jinja2 installed system wide, but it failed anyway. I had to remake the virtual env with

$ python3 -m venv --system-site-packages .env33
$ . .env33/bin/activate
(.env33) $ pip install -r requirements.txt

Generate a project

Ok, this is described (poorly, IMO) in their UG520: Software Project Generation and Configuration with SLC-CLI, (also linked from the bottom of the readme of the Gecko SDK) which at least is trying to document this process, so props for getting there I guess.

slc generate ~/SimplicityStudio/SDKs/gecko_sdk/app/bluetooth/example/soc_thermometer/soc_thermometer_freertos.slcp -d ~/src/slc-test1-soc-thermo -np --with brd4184a

Ok, that wasn’t so bad. You can use parts instead of brd ids, but that went ok. You’ll need to use “slc configuration …” to set your sdk path separately. I got a failure about “untrusted sdk” first, which was not described in UG520, but it at least gave me the command line to “trust” the sdk. I don’t know what the goals here are, I presume it’s important for secure boot stuff one day?

You can now simply “make” in the output directory. Not bad. Lots of files, lots of files but hey, command line ready to go…

Adding bluetooth configuration

Ok, but what about the UI for GATT config and things? Components I’m not covering (yet), I _think_ you just edit your .slcp in the output directory?) but I needed to know how to generate the bluetooth stuff again.

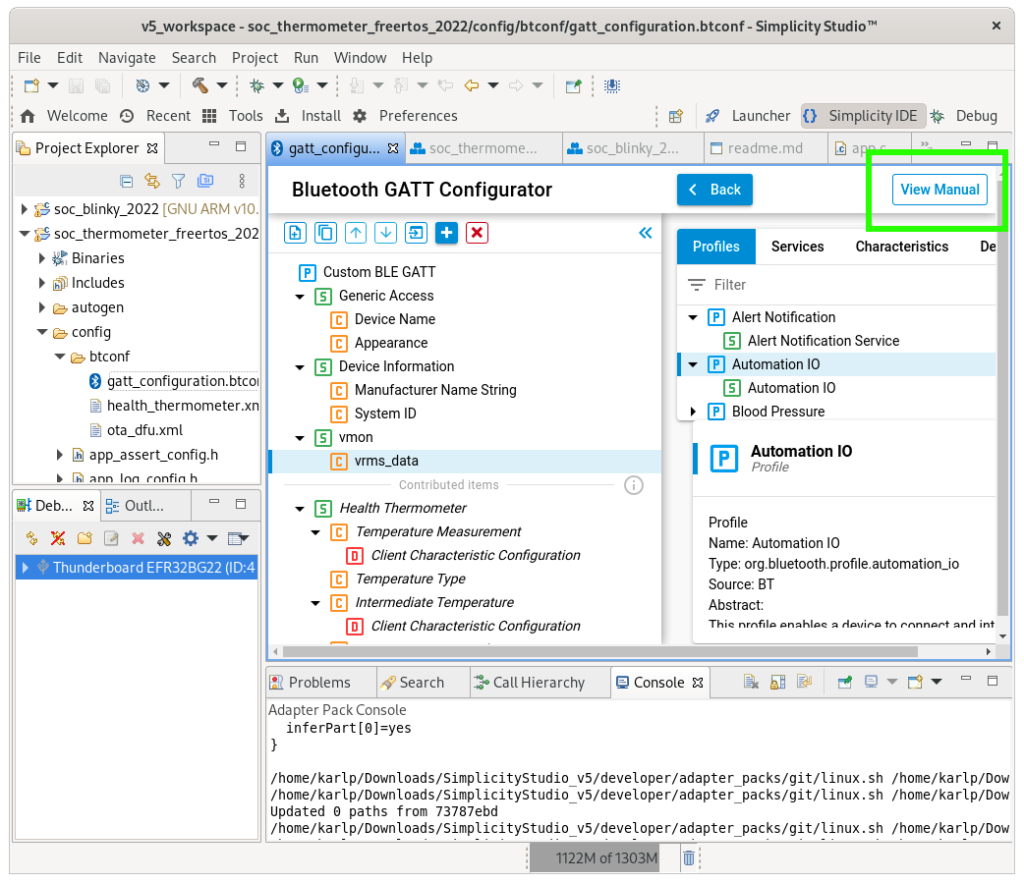
Bad news, you’re editing xml. Good news, it’s not terribly sucky, as long as you have a decent grasp of how bluetooth works. There’s online “help” for the syntax inside simplicity studio, if you click the “Manual” button

Click “View manual” to get the syntax for the XML

You can even, while you’re playing, do it in simplicity studio, and then rip it out again. Save in the UI, then right click the “gatt_configuration.btconf” and choose edit in text editor and view it as the plain old XML it is underneath. (What’s a namespace? What’s a QName? aintnobodygottime.gif)

Ok, so you edited your project_path/config/btconf/gatt_configuration.btconf and want to regenerate all the things that need regenerating, filling that sweet “autogen” folder right? slc has a temptingly named “btConfig” that sounds like it might do the right thing. So you run it and give it arguments until it’s happy right?

TL;DR:

$ slc btConfig generate -contentFolder $(realpath config/btconf) -generationOutput $(realpath autogen)

But how did we get there? Really?

$ slc btConfig generate -contentFolder config/btconfg -generationOutput autogen
Error: No 'gatt' node found in xml!
Error running command. Exit code: 1

Hrm. what? Maybe it wants the full path to the file, even though it says folder?

$ slc btConfig generate -contentFolder config/btconf/gatt_configuration.btconf -generationOutput autogen
Traceback (most recent call last):
  File "bgbuild.py", line 167, in <module>
    od = xml_to_dict(args.inputs)
  File "bgbuild.py", line 124, in xml_to_dict
    od[x] = GattXmlParser().to_string(x)
  File "/home/karlp/SimplicityStudio/SDKs/gecko_sdk/protocol/bluetooth/bin/gatt/gattxml.py", line 33, in to_string
    tree = ET.parse(xml)
  File "/home/karlp/tools/Silabs_slc_cli/bin/slc-cli/developer/adapter_packs/python/lib/python3.6/xml/etree/ElementTree.py", line 1196, in parse
    tree.parse(source, parser)
  File "/home/karlp/tools/Silabs_slc_cli/bin/slc-cli/developer/adapter_packs/python/lib/python3.6/xml/etree/ElementTree.py", line 586, in parse
    source = open(source, "rb")
FileNotFoundError: [Errno 2] No such file or directory: 'config/btconf/gatt_configuration.btconf'
Error running command. Exit code: 1

Well, progress, What? that smells like relative path brain damage….

$ slc btConfig generate -contentFolder $(realpath config/btconf/gatt_configuration.btconf) -generationOutput $(realpath autogen)

That… looks ok then? If you were clever, and had already committed the default state to revision control, you could check what it had done. And you’d see that you just lost the SiLabs OTA and health thermometer characteristics that were in the demo originally. If you look in the gatt_configuration.btconf, you also see that they’re not mentioned there! they’re just extra files dropped in the config/btconf directory. Ahhhh, so we don’t want to use the full path to the file, but we need to use our relative path workarounds we learnt later!

And that builds at least. Command line flashing/debugging/etc is for another day at least…. (We’re going to use SSv5 a bit more, we need to _work_ but at least we need to know how some of this might be possible

Simplicity Studio 5 on Fedora 34

UPDATE: You can do the steps below, and it will…. mostly work, but you’ll still run into broken things like, unable to enter text on the project config wizards or the bluetoot gatt configuration. The only _viable_ solution I’ve found really, is just to log out, and log in again choosing “Gnome on Xorg” and just not making wayland part of your daily headaches.


You still need the export GDK_BACKEND=x11 trick, and you still need the ./studio -Djxbrowser.chromium.dir=/home/$USER/.jxbrowser trick.

You also need to make sure you have git-lfs installed, or you will get fun errors like

/home/karlp/Downloads/SimplicityStudio_v5/developer/toolchains/gnu_arm/10.2_2020q4/bin/../lib/gcc/arm-none-eabi/10.2.1/../../../../arm-none-eabi/bin/ld:/home/karlp/SimplicityStudio/SDKs/gecko_sdk//protocol/bluetooth/lib/EFR32BG22/GCC/binapploader.o:1: syntax error

$ cat /home/karlp/SimplicityStudio/SDKs/gecko_sdk//protocol/bluetooth/lib/EFR32BG22/GCC/binapploader.o
version https://git-lfs.github.com/spec/v1
oid sha256:59b50942a2f0085fe2c87d0d038b13b8af279c742f0d3013b1d1ad6929070a3f
size 66088

Oops, that doesn’t look like a bootloader binary! This is actually mentioned on https://docs.silabs.com/simplicity-studio-5-users-guide/latest/ss-5-users-guide-overview/known-issues as issue 76584, but you wouldn’t find that til later. The tips are to reinstall, but you can also

cd ~/SimplicityStudio/SDKs/gecko_sdk && git lfs fetch && git lfs pull && echo "whew, that took aaaages"

You can _probably_ do tricks with git lfs to just pull the single files you need, and avoid pulling the 800meg or something at 1meg/sec that it took, but this got me a building and functional simplicity studio! wheee…..

Restoring a Kicad 6.99 PCB to Kicad 6.x

Yah, I was using the 5.99 nightlies via a “kicad-nightly” package on fedora, and after Kicad 6.0 came out, this moved (correctly) to the 6.99 branch, which brought in a whole slew of new changes to the project files, which are… not backward compatible. (Which I also understand… but…)

So, what to do? First, edit the “version” in the top of the file to something like 20211014.

Then try and open the file, see how far along you were and how much got munched….

Try and remove strokes

The following VIM regex will strip all the line settings out. :%s/(stroke.*type solid))// If you had customized lines, sorry, you can’t have that in 6.0 anyway. Try re-opening the file again…

Try also :%s/(stroke.*type default))//

Try and remove thermal angles

more vim regexping…. :%s/(thermal_bridge_angle \d*)//g

That was enough for my file. Hopefully this helps someone…

Xiaomi Miijia LYWSD03MMC with pure bluetoothctl

Because software is software, it all gets thrown out every now and again for….. reasons. BlueZ, on linux, has moved away from hciconfig and hcitool and gattttool and so on, and it’s all “bluetoothctl” and “btmgmt” See https://wiki.archlinux.org/title/Bluetooth#Deprecated_BlueZ_tools for some more on that.

Anyway, I got some of these really cheap Xiaomi BTLE temperature+humidity meters. Turns out there’s a custom firmware you can flash to them and all sorts, but really, I was just interested in some basic usage, and also, as I’m getting my toes wet in bluetooth development, working out how to just plain use them as intended! (well, mostly, I’ve no intention of using any Xiaomi cloud apps)

This application claims to use the standard interface, and it’s “documentation” of this interface is https://github.com/JsBergbau/MiTemperature2#more-info and the little bit of code at

def connect():
	#print("Interface: " + str(args.interface))
	p = btle.Peripheral(adress,iface=args.interface)	
	val=b'\x01\x00'
	p.writeCharacteristic(0x0038,val,True) #enable notifications of Temperature, Humidity and Battery voltage
	p.writeCharacteristic(0x0046,b'\xf4\x01\x00',True)
	p.withDelegate(MyDelegate("abc"))
	return p

Well, that wasn’t very helpful. Using tools like NrfConnect, I’m expecting things like a service UUID and a characteristic UUID and things. Also, I don’t have gatttool to even try it like this :)

So, how to do it in “modern” bluetoothctl? Here’s the cheatsheet. First, find our meters…

$ bluetoothctl
# menu scan
# clear
# transport le
# back
# scan on
SetDiscoveryFilter success
Discovery started
[CHG] Controller <your hci mac> Discovering: yes
[NEW] Device <a meter mac> LYWSD03MMC
[NEW] Device <other devices> <other ids>
# scan off

Now, we need to connect to it. According to https://github.com/custom-components/ble_monitor#supported-sensors it actually does broadcast the details about once every 10 minutes, which is neat, but you need a key for it, and aintnobodygottimeforthat.gif.

# connect <mac address>
lots and lots of spam like
[NEW] Descriptor (Handle 0x9f94)
	/org/bluez/hci0/dev_MAC_ADDRESS/service0060/char0061/desc0063
	00002901-0000-1000-8000-00805f9b34fb
	Characteristic User Description
[NEW] Descriptor (Handle 0xa434)
	/org/bluez/hci0/dev_MAC_ADDRESS/service0060/char0061/desc0064
	00002902-0000-1000-8000-00805f9b34fb
	Client Characteristic Configuration
[NEW] Characteristic (Handle 0xa904)
	/org/bluez/hci0/dev_MAC_ADDRESS/service0060/char0065
	00000102-0065-6c62-2e74-6f696d2e696d
	Vendor specific
[NEW] Descriptor (Handle 0xb1d4)
	/org/bluez/hci0/dev_MAC_ADDRESS/service0060/char0065/desc0067
	00002901-0000-1000-8000-00805f9b34fb
	Characteristic User Description
....more lines like this.
[CHG] Device MAC_ADDRESS UUIDs: 00000100-0065-6c62-2e74-6f696d2e696d
[CHG] Device MAC_ADDRESS UUIDs: 00001800-0000-1000-8000-00805f9b34fb
[CHG] Device MAC_ADDRESS UUIDs: 00001801-0000-1000-8000-00805f9b34fb
[CHG] Device MAC_ADDRESS UUIDs: 0000180a-0000-1000-8000-00805f9b34fb
[CHG] Device MAC_ADDRESS UUIDs: 0000180f-0000-1000-8000-00805f9b34fb
[CHG] Device MAC_ADDRESS UUIDs: 0000fe95-0000-1000-8000-00805f9b34fb
[CHG] Device MAC_ADDRESS UUIDs: 00010203-0405-0607-0809-0a0b0c0d1912
[CHG] Device MAC_ADDRESS UUIDs: ebe0ccb0-7a0a-4b0c-8a1a-6ff2997da3a6
[CHG] Device MAC_ADDRESS ServicesResolved: yes

The characteristic you need is ebe0ccc1-7a0a-4b0c-8a1a-6ff2997da3a6, under the similar service UUID. So now, we just “subscribe” to notifications from it.

# menu gatt
[LYWSD03MMC]# select-attribute ebe0ccc1-7a0a-4b0c-8a1a-6ff2997da3a6
[LYWSD03MMC:/service0021/char0035]# notify on
[CHG] Attribute /org/bluez/hci0/dev_MAC_ADDRESS/service0021/char0035 Notifying: yes
Notify started
[CHG] Attribute /org/bluez/hci0/dev_MAC_ADDRESS/service0021/char0035 Value:
  36 09 2a f6 0b                                   6.*..           
[CHG] Attribute /org/bluez/hci0/dev_MAC_ADDRRESS/service0021/char0035 Value:
  35 09 2a f6 0b                                   5.*..           
[CHG] Attribute /org/bluez/hci0/dev_MAC_ADDRESS/service0021/char0035 Value:
  33 09 2a f6 0b                                   3.*..           
[LYWSD03MMC:/service0021/char0035]# notify off

And…. now we can go back to https://github.com/JsBergbau/MiTemperature2#more-info and decode these readings.

>>> x = "2a 09 2a 4e 0c"
>>> struct.unpack("<HbH",binascii.unhexlify((x).replace(" ","")))
(2346, 42, 3150)

With Python, that gives us a temperature of 23.46°C, humidity of 42%, and a battery level of 3.150V.

Yay.


Originally, I was blind to the subtle differences in the characteristic UUIDs, and thought I had to hand iterate them. The below text at least shows how you can do that, but it’s unnecessary.

Ok, now the nasty bit. We want to get notifications from one of the characteristics on service UUID ebe0ccb0-7a0a-4b0c-8a1a-6ff2997da3a6. But you can’t just “select” this, because, at least as far as I can tell, there’s no way of saying _which_ descriptor you want.

So, first you need to use scroll that big dump of descriptors (or view it again with list-attributes in the gatt menu) to work out the “locally assigned service handle” In my case it’s 0021, but I’ve got zero faith that’s a stable number. You figure it from a line like this…

[NEW] Characteristic (Handle 0xd944)
	/org/bluez/hci0/dev_MAC_ADDRESS/service0021/char0048
	ebe0ccd9-7a0a-4b0c-8a1a-6ff2997da3a6
	Vendor specific

Now, which characteristic is which? Well, thankfully, Xiaomi uses the lovely Characteristic User Description in their descriptors, so you just go through them one by one, “read”ing them, until you get to the right one…

[LYWSD03MMC:]# select-attribute /org/bluez/hci0/dev_MAC_ADDRESS/service0021/char0035/desc0037 
[LYWSD03MMC:/service0021/char0035/desc0037]# read
Attempting to read /org/bluez/hci0/dev_MAC_ADDRESS/service0021/char0035/desc0037
[CHG] Attribute /org/bluez/hci0/dev_MAC_ADDRESS/service0021/char0035/desc0037 Value:
  54 65 6d 70 65 72 61 74 75 72 65 20 61 6e 64 20  Temperature and 
  48 75 6d 69 64 69 74 79 00                       Humidity.       
  54 65 6d 70 65 72 61 74 75 72 65 20 61 6e 64 20  Temperature and 
  48 75 6d 69 64 69 74 79 00                       Humidity.       
[LYWSD03MMC:/service0021/char0035/desc0037]#

The sucky bit, is you need to manually select _each_ of the “descNNNN” underneath _each_ of the “charNNNN” under this service. (On my devices, it’s the second characteristic with dual descriptors…)

now, select the characteristic itself. (you can’t get notifications on the descriptor…)

[LYWSD03MMC:/service0021/char0035/desc0037]# select-attribute /org/bluez/hci0/dev_MAC_ADDRESS/service0021/char0035
[LYWSD03MMC:/service0021/char0035]# notify on
[CHG] Attribute /org/bluez/hci0/dev_MAC_ADDRESS/service0021/char0035 Notifying: yes
Notify started
[CHG] Attribute /org/bluez/hci0/dev_MAC_ADDRESS/service0021/char0035 Value:
  2b 09 2a 4e 0c                                   +.*N.           
[CHG] Attribute /org/bluez/hci0/dev_MAC_ADDRESS/service0021/char0035 Value:
  2a 09 2a 4e 0c                                   *.*N.           
[CHG] Attribute /org/bluez/hci0/dev_MAC_ADDRESS/service0021/char0035 Value:
  2b 09 2a 4e 0c                                   +.*N.           
[CHG] Attribute /org/bluez/hci0/dev_MAC_ADDRESS/service0021/char0035 Value:
  2b 09 2a 4e 0c                                   +.*N.           
[CHG] Attribute /org/bluez/hci0/dev_MAC_ADDRESS/service0021/char0035 Value:
  29 09 2a 4e 0c                                   ).*N.           
[LYWSD03MMC:/service0021/char0035]# notify off
FreeRTOS with STM32 Cube

Cube Sucks. But, if you’ve gotta use it, at least it has demos and things right? And you can use FreeRTOS, that’s integrated, right?

Not really. At the time of writing, working with STM32WB, the out of the box FreeRTOS demos will have problems with printf. Or, well, anything that uses a raw malloc() call.

Out of the box, the cube demo code uses FreeRTOS’s heap_4.c for memory management. This is fine. It means that you select a heap size in your FreeRTOSConfig.h file, and the port provides pvMalloc and pvFree that do the right thing. But, if any code, (anywhere!) uses malloc() itself, directly, then…. where does that come from? Well, it ends up in _sbrk() and the out of box implementation in the cube demos is completely busted. They provide you with the same implementation as for the non FreeRTOS demo.

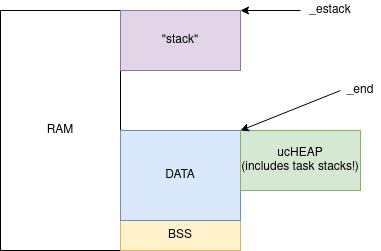
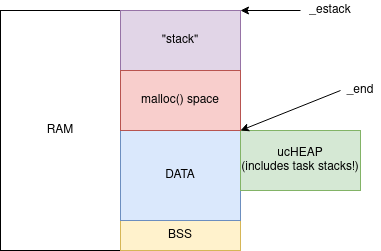
So, looking at a “classic” memory arrangement, with heap starting at the end of BSS/DATA, and stack growing downwards, you have something like this. (_estack and _end are in the default out of box linker scripts from ST) FreeRTOS’s heap_4.c declares “ucHEAP” (you can statically provide it to, if you like) based on your user provided configTOTAL_HEAP_SIZE which then becomes another (somewhat large) chunk of “DATA” space.

The _sbrk() implementation basically checks that malloc() is asking for space that’s above _end and below the current stack pointer. This is fine when you’re not using an RTOS, but! The RTOS tasks have their own stacks, allocated from the RTOS heap! This is good and right, but it means that the out of box sbrk implementation is now absolutely garbage. It will never succeed, as every single tasks’ stack pointer will be below _end.

You have options here. https://nadler.com/embedded/newlibAndFreeRTOS.html has written extensively, though I think they make it all sound really complicated.

Option 1 – Just don’t call malloc (or… call it early…)

This is a garbage option. You either need to make sure you never call malloc, or make sure that you only ever call malloc before you start the FreeRTOS task scheduler. This is safe, as the memory you allocate here will be in safely in the gap above DATA on the diagram, but you must make all malloc() calls before starting the task scheduler. This requires no changes to the _sbrk() system call implementation

Option 2 – Use newlib completely

This is Nadler’s approach. Switch heap_4 out for heap_3, rewrite your system calls (including _sbrk() to make all of FreeRTOS use standard newlib malloc/free natively. This isn’t a bad option, but it’s fairly messy, isn’t really something the FreeRTOS people like much, and puts a lot of reliance on how well newlib behaves. The upside here is that you only have one memory management mechanism for the entire system here. (I failed to get this working at the time of writing)

Option 3 – Fix _sbrk() only

You can also just fix _sbrk. The upside here is the change is trivial. The downside is that you now have two heaps. One that you statically give to FreeRTOS via the config options for heap_4.c (ucHEAP in the DATA section), and a new one, growing upwards on demand, classic style, above DATA, show in red on this diagram. Remember, that in the FreeRTOS context, all of the space marked in purple and red is untouched, or “wasted”. You want to size your ucHEAP that you leave “enough” for untracked raw malloc users, but still big enough for your polite, well behaved FreeRTOS consumers.

The change itself is straightforward, just stop looking at the stack pointer, and look at the linker script provided pointer to the end of ram.

--- /out-of-box/application/sysmem.c	2021-03-26 10:02:54.045633733 +0000
+++ /fixed/application/sysmem.c	2021-04-07 13:58:27.610330156 +0000
@@ -37,18 +37,19 @@
 **/
 caddr_t _sbrk(int incr)
 {
 	extern char end asm("end");
 	static char *heap_end;
 	char *prev_heap_end;
+	extern char _estack;
 
 	if (heap_end == 0)
 		heap_end = &end;
 
 	prev_heap_end = heap_end;
-	if (heap_end + incr > stack_ptr)
+	if (heap_end + incr > &_estack)
 	{
 		errno = ENOMEM;
 		return (caddr_t) -1;
 	}
 
 	heap_end += incr;

And that’s it. The _estack symbol is already provided in the out of box linker scripts. Risks here are that you are only checking against end of ram. Conceivably, if you ran lots of deeply nested code with lots of malloc() calls before you start the scheduler, you might end up allocating heap space up over your running stack. You’d have to be very tight on memory usage for that to happen though, and if that’s the case, you probably want to be re-evaluating other choices.

Option 4 – Make newlib use FreeRTOS memory

There is another option, which is to make newlib internally use FreeRTOS pvMalloc/pvFree() instead of their own malloc/free. This is the logical inverse of Option 2, and has the same sorts of tradeoffs. It’s probably complicated to get right, but you end up with only one memory management system and one pool.

Autofailing autotools are autohell, as always

“Needed” a new version of something, so build from source. Configure not available, because… autohell, so run “autogen.sh” instead.

karlp@nanopiduo2:~/src/libgpiod$ ./autogen.sh 
autoreconf: Entering directory `.'
autoreconf: configure.ac: not using Gettext
autoreconf: running: aclocal --force -I m4
aclocal: warning: couldn't open directory 'm4': No such file or directory
autoreconf: configure.ac: tracing
autoreconf: configure.ac: creating directory autostuff
autoreconf: configure.ac: not using Libtool
autoreconf: running: /usr/bin/autoconf --force
configure.ac:92: error: possibly undefined macro: AC_CHECK_HEADERS
      If this token and others are legitimate, please use m4_pattern_allow.
      See the Autoconf documentation.
configure.ac:172: error: possibly undefined macro: AC_LIBTOOL_CXX
configure.ac:174: error: Unexpanded AX_ macro found. Please install GNU autoconf-archive.
configure.ac:179: error: possibly undefined macro: AC_LANG_PUSH
configure.ac:181: error: possibly undefined macro: AC_LANG_POP
configure.ac:188: error: Unexpanded AX_ macro found. Please install GNU autoconf-archive.
autoreconf: /usr/bin/autoconf failed with exit status: 1
karlp@nanopiduo2:~/src/libgpiod$

Whatever, this is “traditional” that you can’t actually use autohell without adding more autohell from somewhere else, but ok, bend the knee, install autoconf-archive and continue….

karlp@nanopiduo2:~/src/libgpiod$ ./autogen.sh 
autoreconf: Entering directory `.'
autoreconf: configure.ac: not using Gettext
autoreconf: running: aclocal --force -I m4
aclocal: warning: couldn't open directory 'm4': No such file or directory
autoreconf: configure.ac: tracing
autoreconf: configure.ac: not using Libtool
autoreconf: running: /usr/bin/autoconf --force
configure.ac:92: error: possibly undefined macro: AC_CHECK_HEADERS
      If this token and others are legitimate, please use m4_pattern_allow.
      See the Autoconf documentation.
configure.ac:172: error: possibly undefined macro: AC_LIBTOOL_CXX
configure.ac:179: error: possibly undefined macro: AC_LANG_PUSH
configure.ac:181: error: possibly undefined macro: AC_LANG_POP
autoreconf: /usr/bin/autoconf failed with exit status: 1
karlp@nanopiduo2:~/src/libgpiod$

wat? really? that’s it? Thanks for nothing. Google and the accumulated wisdom of years of hate suggest that, as this is a “new” machine, I might not have installed pkg-config. (Given that the whole thing with autohell is finding things, you might think it could give you a better error?) ok, Install that, try again

karlp@nanopiduo2:~/src/libgpiod$ ./autogen.sh 
autoreconf: Entering directory `.'
autoreconf: configure.ac: not using Gettext
autoreconf: running: aclocal --force -I m4
aclocal: warning: couldn't open directory 'm4': No such file or directory
autoreconf: configure.ac: tracing
autoreconf: configure.ac: not using Libtool
autoreconf: running: /usr/bin/autoconf --force
configure.ac:172: error: possibly undefined macro: AC_LIBTOOL_CXX
      If this token and others are legitimate, please use m4_pattern_allow.
      See the Autoconf documentation.
autoreconf: /usr/bin/autoconf failed with exit status: 1
karlp@nanopiduo2:~/src/libgpiod$

Progress, but… still not there. Still absolutely atrociously useless error messages. Now, I’ve read the README, it says to install autoconf-archive, and that’s about it. I have python3-dev and libstdc++-9-dev I’m not sure what else now…

Oh right. libtool, another gross piece of historic nonsense, that mostly just gets in the way, and leaves pretend files around the place.

Now autogen will ~finish, and run configure, happily checking whether I’m running on a 30 year old unpatched sparc solaris, so it applies the right workarounds, but don’t worry…

configure: error: "libgpiod needs linux headers version >= v5.10.0"

I mean, I’m super glad we included all that “portable” autohell bullshit when we’re explicitly tied to linux anyway. And not just any linux. At the time of writing, 5.10.0 was three days old.

At this point, there are now _other_ problems that autotools, but this is just another example of why you should NEVER be using autotools in 2020.