Well, I bought a “Minix NEO X5 mini” for various experiments, eventually planning just a plain linux server, with ethernet and wifi, and a pile more ram and flash than the regular OpenWRT router platforms. I chose this based mostly on the smallest, cheapest that had a physical ethernet port. The other contender was the UG008. (And UG008B) Those are marginally smaller, and have one less fullsize USB, also, I _thought_ I’d read good instructions on getting linux running on the x5mini, but it turned out the instructions were for the x5 (full size) which is very similar, but not the same. I’ve since found instructions for the ug008, maybe I should have bought that. It also has a power button and from the pcb pics, looks like the pads for test points are bigger. No heatsink though, and I’d heard it’s wifi wasn’t as good. (Rumous and hearsay, I’ve no idea really) The second fullsize USB port however, is kinda of interesting. The x5mini came with a rather unusual fullsize USB A male-male cable. And there’s no microusb port for the OTG like normal. Plugging this in to a regular pc host would be disastrous, so the supplied android has a special menu option to enable “connecting to pc” which resets on every boot. If you do have it turned on, and you push the pinhole on the bottom while plugging in the power, you’ll get a usb device that ADB can find. dodgy, a regular OTG port would have been preferable.
So yeah, it works pretty well out of the box, but there’s enough reviews of that. We’re here to pull it apart. The little screws are glued in, so you need a good screwdriver, I almost stripped them getting them out. Then, whee, brown PCB! And whee, they put a weight in it to feel pro ;)
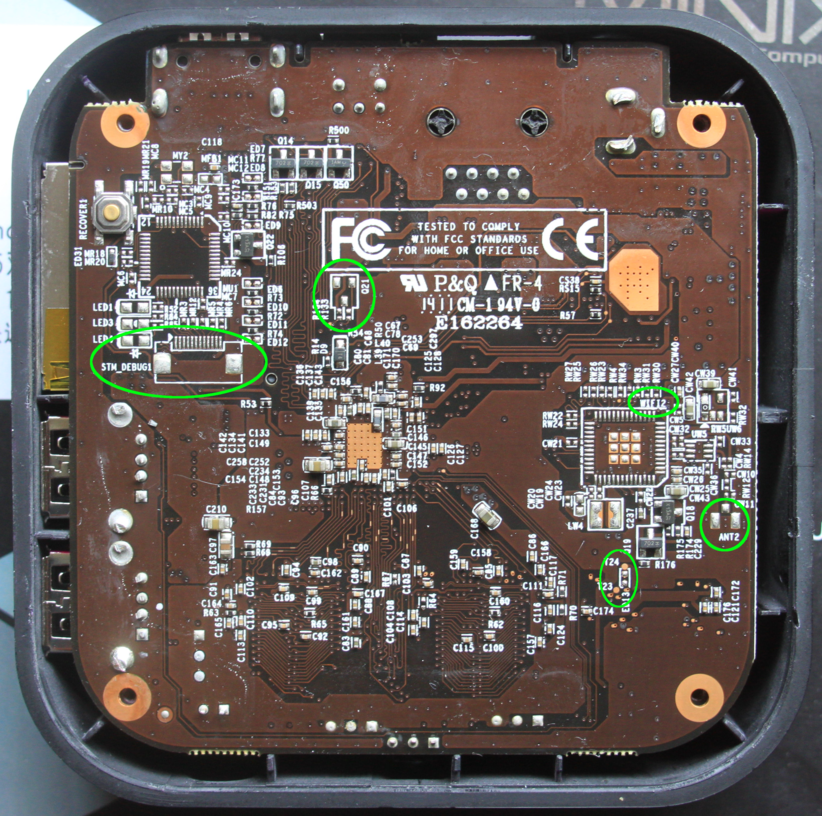
The wifi (rtl8188es) antenna is soldered on, then soldered to an adhesive antenna on the lid, a little awkward, but perfectly reasonable of course. Immediately on the board you can see two missing ICs, one, labelled “WIFI2” is almost certainly Bluetooth, which is not on the x5mini, but is on the x5. More curious though is missing QFP48 IC by the recovery button, and it’s 12 pin “STM_DEBUG” connector. It certainly reminds me of an STM32 footprint, though the debug for cortex-m is normally 10 or 20 pins, not 12? No idea. Two test points on this side, T23 and T24, if it’s indeed a bluetooth module, this is possibly a uart between them? *shrugs*
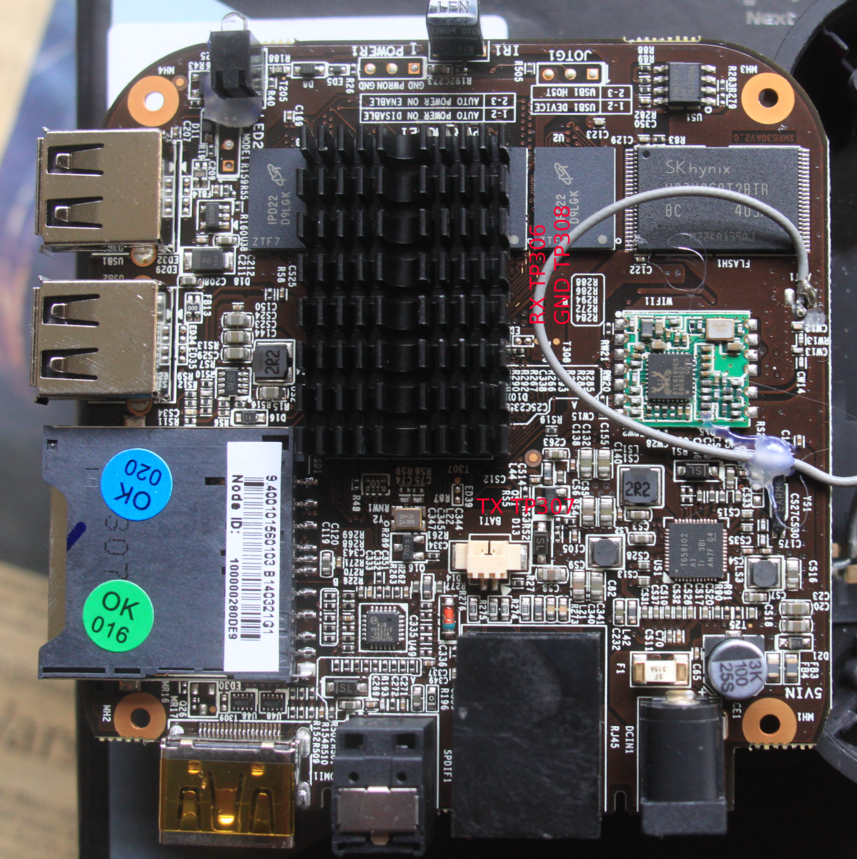
Back to the “top” side, ethernet is an SMSC LAN8720A, power is a TI T659102, which seems to be pretty common on these boards. There’s two filled jumper blocks with interesting text, “USB1 Device / USB1 Host” and “Auto power on enable/disable” but I’ll leave them for a later time. There’s a rather unexpected battery connector too. Minix doesn’t have any battery backed devices in their catalog, so someone’s design company has been working on this. So much for thinking that minix was an OEM.
T306 is RX, T307 is TX and T308 is GND, for a serial console at 115200, 8N1
Finally, here’s most of the bootup
More images here: http://hd.zol.com.cn/386/3867281.html
Hi, very nice work on your minix! I’ve a different problem, though and maybe you’ve got nice ideas to help me :) It is an interesting challenge anyway.
I would like to make my usb dvb-t receiver (asus mycinema u3100) work on my minix-x5. I don’t want to install linux, I keep the builtin (rooted) android 4.2.2.
I worked a lot adapting the video4linux drivers. In the end I managed to obtain the correct combination: now when I plug the receiver I can see that the system recognises it and the dvb-usb driver registers it (the receiver has a led light and it suddenly turns on!). But… as soon as the object is recognised, the system reboots! I thought there is a power problem, so I tried with a powered usb hub, but the problem persists. Any idea? I googled the problem and I found some people mentioning that there is an autopower jumper on the pcb which could be related to that. What do you think? Did you understand what is the autopower-on jumper you found?
Ciao!
Andrea
Here is Minix OEM: http://ugoos.net/about-us