One of my most finished projects, mostly because it’s simply much more important than having a battery powered thermometer sitting on a shelf. I brew beer, and serve beer in a converted fridge in my loungeroom. One day, the beer got slow, and what came out was suspicously cold. Turns out the thermostat was broken, so as long as the fridge had power, it was cooling, which resulted in deeply frozen kegs of beer.
It’s a pretty old fridge, that I got free, so I thought about simply getting a new (second hand) fridge and doing the conversion again. A newer fridge would probably be quieter, use less energy, all good things. But, not all fridges are the same shape, and finding one that fit three kegs, and doing all the work of the conversion again just felt like a lot of work. And goddamnit, I’ve been building sensor nodes, I always planned on having nodes that could control things too, so maybe I should just get down to business.
In the end there wasn’t much too it. I’m not doing any fancy PID control, just a set point, and a minimum motor run time, and minimum motor rest time. Initially, it didn’t even listen to any controls from my network, it reported temperature and motor status, but that was it. I had no beer! This was too important to have offline for weeks while I played around 24-480
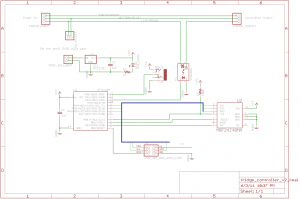
I got a (massivly overspecced) 25A SSR on ebay, and after a bit of thought about how to keep the cost down, came up with the following schematic:
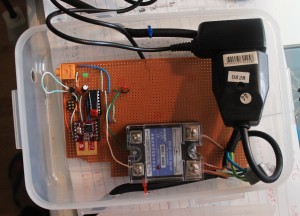
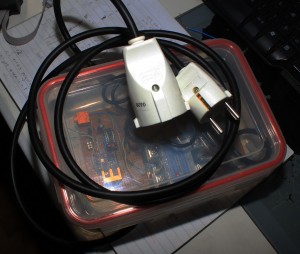
The clever bit, if I can call it that, was to not even think about making my own power supply for the control logic. Big companies can make 10 gazillion CE marked, compact, safe switch mode power supplies, and consumers can throw them out by the gazillion. I was just going to have a normal euro 2 prong socket, and a surplus phone charger plug pack with the jack cut off and soldered to the board. Presto, cheap _and_ safe. Far far cheaper, faster and easier than I could have done myself. Of course, the extra socket and jacks take up space, but you can only have so much cake.
There’s really not an awful lot more to it than that. I tested this with a teensy board first, because I could use the nice friendly USB port for debugging, then switched to the ATtiny84, and after a bit of fiddling to get USI working for SPI, it all “just worked” I was suitably impressed when the fridge turned on and off at the right times :)
If you want to make this cheaper, you can just drop the 802.15.4 radio altogether. It worked well enough to keep my beer cold but not frozen before I finished the code to listen for new parameters over the air. But, being able to tweak it’s settings is a nice thing.
The TMP36, or similar, is wired up on a chopped up length of headphone cable. This is the bit that’s easiest to get wrong. Take care with the pinouts of whatever headphone socket you use, and the way you wire which lead to which part of the 3.5mm stereo plug. (If you get it wrong, you’ll read temperatures like 50, then 80, then 90 degrees Celsius, which will actually be _correct_ if you touch the sensor!)
Things I would have liked to have done:
- Make the headphone socket mount flush on the wall of the box. Just takes more money and time to get the mounting perfect.
- Use a panel mount socket for both input and output. It would be much tidier, but it takes yet more space, and yet again, more money
Other notes
The SSR I got really needs 3V+ to control. I was mistakenly feeding it with about 2V, from the wrong side of a resistor divider, early on in testing, and the red LED on the device would light up, so I expected it to properly be switching the live side. However, it seems 2V was enough for the LED, but not enough to actually switch. As soon as I gave it 3V, it behaved perfectly.
There’s no LCD display. Which might have been nice, but really, how often do you look at the temperature of your fridge? Besides, because it’s reporting every 10 seconds to “karlnet” it becomes just another node that the rest of my system stores in databases, graphs, or uploads to pachube
The software has a fairly nice way of working with saved state in EEPROM I learnt recently. I’m quite happy with it :) However, in general, the code is a little bit harder to read, because it contains all the debug for a teensy board, with #defines separating the live code from the test code. This is however a fully fledged real demo of my updated MRF24J40 library code
Downloads
- code and eagle schematic (Will need the MRF24J40 library too)
- Full system is also on github
Parts list below.
| Part | quantity | price | supplier |
|---|---|---|---|
| 25A SSR, 3-25V control, 24-480VAC output | 1 | 7.99 US | ebay |
| grounded euro socket | 1 | 195 ISK | Byko |
| grounded euro plug | 1 | 195 ISK | Byko |
| Ungrounded euro socket | 1 | 181 ISK | Byko |
| 3 strand power cable | 2m | 363 ISK | Byko |
| lunch box | 1 | 499 ISK | Húsasmiðjan |
| Green LED | 1 | 0.05€ | Mouser |
| ATtiny84 | 1 | 2.39€ | Mouser |
| MRF24J40MA | 1 (optional) | 7.46€ | Mouser |
| 3.5mm stereo socket, board mount | 1 | 0.44€ | Mouser |
| MCP1702, 3.3V regulator | 1 | 0.39€€ | Mouser |
| TMP36 | 1 | 1.58 US | Digikey |
| 1uF capacitors | 2 | 0.40€ | Mouser |
| 5V DC plugpack/wallwart | 1 | 500 ISK | Second hand store |
| 2×3 pin header for AVR programming | 1 | ||
| sockets and header pins to comfort | ? | ? | ? |
The mouser parts should be available as Shared project 3411228a84 You can substitute something else for the TMP36, that’s just what I had wired up.
Because remember, Digikey are evil, and still refuse to recognise that the 802.15.4 encryption was removed from export restrictions years ago. Digikey, in their infinite wisdom REFUSE TO SHIP 802.15.4 modules to Iceland. We’re terrorists or something.


