Category Archives: C

Porting Contiki to the STM32L

WARNING – rambling diatribe that might help me….

This is mostly a notepad of what I did, why I think I did it, and what I couldn’t find documented anywhere obvious at the time of writing

Motivation: I am interested in low power wireless sensor nodes. Most of the commonly used MCU operating systems I had looked at treated power usage as a second class citizen at best (if at all) Contiki builds all that in, it’s a primary concern. I abhor the idea of custom wireless protocols (even though I hacked one up for the current nodes in my house) Contiki builds in IPv6 (amongst other protocols) and knows explicitly about 802.15.4 (what I like to use) IP all the way sounds like a pretty smart bet.

So, I want to use contiki on my devices.

Right, big blob of unknown new code. What do I need, where does it need to go…. There’s a rather ugly blob of code in the repository that supports the STM32W series (a rather awkward part to use. No reference manual, binary blobs of radio drivers, the complete inability to order them to Iceland thanks to arbitrary export encryptions, etc) so maybe it would be easy. The code makes no real sense, and seems to be completely abandoned. There’s meant to be ARM support though, so shouldn’t be too hard.

Hrmm. code is split between “cpu” and “platform” Hard to know what should be where.
Oh! Someone just added support for the stm32F1, a chip I know well, no radio driver yet, but that’s ok, I know the MRF24J40 radio well, and would be using that anyway.

Oh, that code got reverted due to (to me) a fairly arbitrary lpgl vs bsd arguments (despite the stm32w code having a binary blob radio driver, let’s not start in there)

Ok, so, nothing says I can’t have my own fork, at least while licensing is worked out. https://github.com/contiki-os/contiki/wiki/Out-of-Tree-Development is the best reference I’ve found for getting started so far.

Now, I’ve got the hello world “app” copied into my tree as “foo” and I can do “make” and then ./foo.native and it works.

 karlp@tera:~/src/kcontiki (master *)$ ./foo.native 
Contiki 2.6 started
Rime started with address 2.1
MAC nullmac RDC nullrdc NETWORK Rime
Hello foo world
^C

Excellent, now what? Now I start to leave the comfort of the directions. I decide to copy the reverted stm32f107_basic platform into my tree, still following the Out of Tree Development guide

I’ve added libopencm3 as a git submodule too now. I can do “make TARGET=stm32ldiscovery” and it sort of works, in that it finds platforms/stm32ldiscovery/Makefile.stm32ldiscovery. Now I just need to know what _else_ is needed to go into that makefile. What’s in it now? MCK=72000000, do I really need that? I’d like to not have to care in a makefile. Hrmm. I guess what is really next is sorting out what is part of cpu/arm/xxx and what goes into platform/stm32ldiscovery.

CONTIKI_TARGET_MAIN. What’s that for? why do I need that? grepping the source shows totally inconsistent usages of it. Let’s ignore that for now.

Ok, the libopencm3 based stm32f107basic tree has a uart driver and some newlib stubs. Let’s keep as much of that as possible, and just hack the uart driver to be L1 based rather than F1 based. (This is actually just a difference in gpio AF function settings, the uart code is all identical)

That seems to get a little further, but now we need to get the cpu/arm/stm32f1x_cl code to work out somehow. let’s see how much of that is really “platform” Ok clock.c is opencm3 specific, but not f1x specific. OH! Here’s the MCK setting being used. ok, we’ll set that. rtimer* and mtarch* are all stubs, so that’s ok for now too.

So, a bit more hacking on the cpu/arm/stm32f1x_cl makefile to make it a little more of a “stm32 libopencm3” makefile, and we have a build!

But… does it work? No. setvbuf goes straight into the blocking handler, and puts does too. I guess something didn’t get linked or built properly. But we’re getting somewhere. I’ll look at the backtrace a bit later on, but it’s late.

Code so far in

Code Size changes with “int” on 8bit and 32bit platforms

I was looking for a few bytes extra flash today, and realized that some old AVR code I had, which used uint8_t extensively for loop counters and indexes (dealing with small arrays) might not be all that efficient on the STM32 Cortex-M3.

So, I went over the code and replaced all places where the size of the counter wasn’t really actually important, and made some comparisons. I was compiling the exact same c file in both cases, with only a type def changing between runs.

Compiler versions and flags

platform gcc version cflags
AVR avr-gcc (GCC) 4.3.5 -DNDEBUG -Wall -Os -g -ffunction-sections -fdata-sections -Wstrict-prototypes -mmcu=atmega168 -funsigned-char -funsigned-bitfields -fpack-struct -fshort-enums
STM32 arm-none-eabi-gcc (GNU Tools for ARM Embedded Processors) 4.6.2 20120316 (release) [ARM/embedded-4_6-branch revision 185452] -DNDEBUG -Wall -Os -g -ffunction-sections -fdata-sections -Wstrict-prototypes -fno-common -mcpu=cortex-m3 -mthumb

And… here’s the results

counter type avr-size arm-none-eabi-size
unsigned int 1318 844
uint8_t (original) 1160 856
uint_least8_t 1160 856
uint_fast8_t 1160 844
int 1330 820
int8_t 1212 872
int_least8_t 1212 872
int_fast8_t 1212 820

I would personally say that it looks like ARM still has some work to go on optimizations. If _least8 and _fast8 take up more space than int it’s not really as polished as the avr-gcc code yet. For me personally, as this code no longer has to run on both AVR and STM32, I’ll just use int.

So, after extending this a bit, my original conclusion about the fast_ types not being fully optimized with arm-gcc were wrong. It’s more that, on AVR, your “don’t care” counters should be unsigned for smaller size, while on STM32, they should be signed (Though I still think it’s dodgy that int_least8_t resulted in bigger code than int_fast8_t) Also, even if signed is better in the best case, the wrong signed is also the worst case. Awesome.

Eclipse 4.2 Juno and C projects detecting include paths

Eclipse moved from 3.7 right up to 4.2, and it includes Lua now as well, so I thought I’d have a quick go at trying it out on some C projects again. It was less than awesome, but well, that’s eclipse I guess.

I chose File->New->”Makefile project with existing sources”, and selected the path to my project. I can’t find a combined “clean and build” but I cleaned and built, and it all mostly sort of worked.

Except, it completely failed to recognise the -I and -L flags from my Makefile. Which are important. That’s why they’re there. So, it builds, but you can’t navigate to any of the libraries you’re using, and your screen is full of red errors about undefined fields.

Under Project Properties->C/C++ build->Discovery options, there’s an unchecked setting for “Automate discovery…” but checking it just produces a warning that this is deprecated, and to use, “Preprocessor include paths, macros, etc” Good fucking job eclipse. Why have an option that you’ve decided to remove.

So, Project Properties->C/C++ General->Preprocessor include paths… (What’s the difference between build and general? fuck knows, classic eclipse UI design) And then “CDT GCC Build Output Parser”

Now, I never would have actually found this, but they have this pattern that’s apparently meant to help it find the calls to GCC in the makefile output. The default is (gcc)|([gc]\+\+)|(clang)

Now, on linux, by default, “cc” is gcc. and if you don’t override the CC variable in your own makefile, it will be invoked as cc. Which eclipse then completely ignores. I know that it’s not a good idea to always assume that cc is gcc, but hey, if it detected nothing when I ran the build, perhaps it should offer some other alternatives? Perhaps it should try and run cc and look at it’s version? Perhaps it should follow the symlinks?

If you want to fix it, use this text instead (gcc)|([gc]\+\+)|(clang)|(cc)
Then do a clean, a build, then right click your project, chose index, and choose rebuild.

Presto. The eclipse way.

Interrupt Service Routines double firing on STM32

This is just a quick note to self. Remember, never try and clear the flag that caused the interrupt as the last instruction in the ISR itself. It causes the ISR to reenter immediately. Your ISR/NVIC/EXTI interrupt will retrigger, trigger twice, whatever keyword you were searching for.

void exti9_5_isr(void)
{
    state.my_counter++;
    exti_reset_request(EXTI5);  // Will cause a double interrupt
}

It’s just a matter of doing it first.

void exti9_5_isr(void)
{
    exti_reset_request(EXTI5);  // This will work
    state.my_counter++;
}

Code examples are based on libopencm3, but the same concept applies when using StdPeriphLib

Static analysis for AVR code with Splint

Over on #avr, static analysis came up, particularly, getting Splint to run. _abc_ put this guide together, which I’ve reproduced verbatim below.

Running splint(1) on avr-gcc source code


Version 0.0 - tested 15.05.2012

by _abc_ @irc.freenode.org

software versions:
splint 3.1.2 compiled from source
avr-gcc-4.5.1 as supplied by Atmel (binary build for Linux)

Splint is a static C source code analyzer which can help
keep C source files and headers tidy and consistent. It can
also prevent a lot of silly errors, which is more important
in embedded C code than elsewhere. Many embedded code error
signals involve smoke, sparks, and lost devices.

Splint was never designed to run on embedded C, with its
extensions. In addition to that, splint has not been maintained
that much. The Wikipedia article on splint mentions that is is
'not relevant' as software anymore and that its Wikipedia page
should be removed. I disagree with that statement.

The following shows how splint (3.1.2) can be run successfully
on abr-gcc source code in 2012.

Checklist:

1. Install splint (it compiles cleanly from source on any gnu
compiler equipped system, using ./configure && make && sudo
make install). Alternately, get the distribution specific
package of splint if it exists.

2. Make a copy of your embedded source files for backup in case
something goes wrong.

3. Get used to the fact that the splint manual page is not so
useful. Running splint -help [something] 2>&1|less is much more
so. The pdf manual which comes in the package of splint 3.1.2 is
dated 2003 (proudly, on the first page). That's okay, since the
C standard most used today is dated 1999 (C99)...

4. Copy the following commands into a shell command file in
your project directory, and edit the relevant parts (path to
avr installed toolchain include, source file name etc):

--snip--
#
# splint-avr-gcc-code.sh 644
#
# V0.0 tested 15.05.2012 by _abc_ @ irc.freenode.org
#
# run the splint static source analyzer on a avr-gcc C source code file,
# in a avr-gcc compatible way.
#
# initial revision, tested with avr-gcc, throws lots of warnings on avr-gcc
# includes but runs AS LONG AS:
# i. __fuses and __lockbits sections are hidden from splint using 
#    #ifndef S_SPLINT_S
#      ...
#    #endif
# ii. any binary constants (0b000f) in the C source are either rewritten as
#   decimal or hex numbers, OR their sections are guarded as above, and
#   binary or hex values are provided instead.
#
# Comment: the splint parser should be patched to accept binary constants.
# The usual makefile used for project building should have a new section
# (target) called lint or splint which should lint the source. It can be
# easily written by adding the code below:
#

## adjust to suit your installation
AVR_TOOLCHAIN_INSTALLED_LOCATION="/some/where/" ;# edit me

SRC="mysource.c" ;# edit me, ONE source file per shell file for now

DEFS="-D__AVR_ATmega8__" ;# etc, edit this

#SPLINT_EXTRA_ARGS="-nolib"
## actually run
splint \
	-preproc \
	-unrecogcomments \
	$SPLINT_EXTRA_ARGS \
	-I${AVR_TOOLCHAIN_INSTALLED_LOCATION}/avr/include/ \
	$SRC
--snap--

5. while editing the required areas of the command file above, also 
read its header. It explains how the source can be splint proofed. It is
really easy. The -unrecogcomments comment is needed because there are
some semantic comments in the header files which throw errors. The other
ways to splint proof your code are explained by executing the commands:

  splint -help parseerrors 2>&1|less

in a shell.

6. splint should really be updated with embedded C extensions, especially
the 0b0001 style binary constant support.

7. avr-libc maintainers should run splint as above on sources which include
them (hello_world.c with just #include  and #include  are
enough for a start), as splint shows more than 90 warnings on running through
the avr-libc headers included by the simple main alluded to above at the
time of this writing.

-- the end --

Note, I haven’t actually used splint myself, on AVR code or regular desktop code. I do however endorse static analysis, having used PMD and friends on java code quite a lot. If you don’t like splint, or are looking for alternatives, perhaps something still being maintained, abcminiuser suggests Cppcheck, which covers both C and C++. There’s also the commercial Coverity and gimpel. I’ve not used any of these, but it seemed like such a worthwhile record that I was loathe to lose the discussion the depths of IRC logs.

Using netbeans for STM32 development with stlink (texane)

So, You got a STM32 Discovery board hey? Good for you! They’re cheap, and highly functional, but this ain’t your grandmother’s Arduino.

Here’s a rough and ready howto for developing in netbeans, and getting source level debugging for that code.

Required pieces

GNU arm toolchain installed and working.

I use summon-arm-toolchain for this. To test that it’s working, you can try any of the following:

You want to make sure that you can successfully compile via make from the command line first. If you can’t compile with the raw tools, netbeans isn’t going to magically fix that for you.

texane/stlink

A confusing name, but so be it. stlink (the software tool) provides tools for flashing STM32 chips via ST/Link v1 and v2 hardware. It also provides a gdbserver for debugging those chips. Get it from github (Sorry, there’s no tagged releases or anything yet, though there really should be)

Netbeans

Duh, this post is covering that. You need the c/c++ plugin and the gdbserver plugin. Download it here. For reference, I’m using 7.1 at the moment.

Setting up the toolchain in netbeans

  1. Click Tools->Options->C/C++
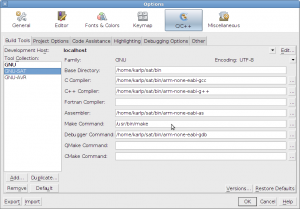
  2. Click on “Add” and set up a new toolchain for arm development. See the screenshot below
    Netbeans add tools dialog for gnu-arm

    Netbeans add tools dialog for gnu-arm

  3. Import your project as a makefile based project from existing sources. You can get netbeans to actually do all the compiling and things for you, but I find it hard to share the project that way. Not everyone uses netbeans, but makefiles are pretty portable.
  4. Build your project
  5. Flash your binary to the target. You can actually do this anyway you want, but we’ll use stlink’s st-flash tool.
    $ arm-none-eabi-objcopy -O binary your_project.elf your_project.bin
    $ /path/to/stlink/flash/st-flash write your_project.bin 0x08000000
    

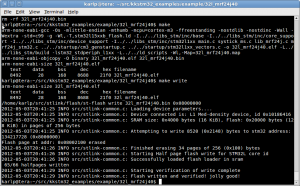
    Here’s a screenshot from my makefile. (You can set up run modes in netbeans to do this too, but that’s not the focus here)

    console log for make and upload via stlink

    make and upload via stlink

  6. Start stlink’s gdbserver.
    karlp@tera:~/src/stlink$ ./gdbserver/st-util 
    2012-05-03T20:44:56 INFO src/stlink-common.c: Loading device parameters....
    2012-05-03T20:44:56 INFO src/stlink-common.c: Device connected is: L1 Med-density device, id 0x10186416
    2012-05-03T20:44:56 INFO src/stlink-common.c: SRAM size: 0x4000 bytes (16 KiB), Flash: 0x20000 bytes (128 KiB) in pages of 256 bytes
    Chip ID is 00000416, Core ID is  2ba01477.
    init watchpoints
    Listening at *:4242...
    
  7. Whew, ok, just about there. Now in netbeans, choose “Debug->Attach debugger”.
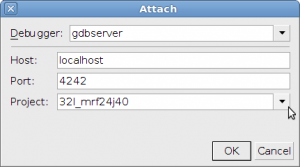
  8. Choose “gdbserver” and make sure you put in the right host and port, (normally localhost, and 4242) and make sure it’s set to debug your project.
    screenshot for netbeans gdbserver attach dialog

    gdbserver-attach

  9. MAKE SURE you have set at least one breakpoint first. Something in netbeans doesn’t like adding breakpoints while it’s running, and it doesn’t like pressing the pause button. (but see the footnotes)
  10. Profit…
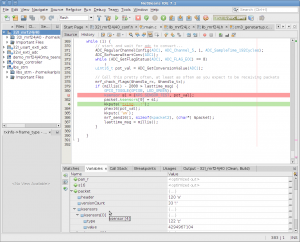
    screenshot showing netbeans Source debugging STM32 via stlink gdbserver

    Source debugging STM32 via stlink gdbserver

  11. That’s it. If any of the steps are glossed over too much, mail me and I’ll try and update to clarify.

    Sidenote: If you didn’t set any breakpoints in netbeans first, or you pressed pause, or you double clicked in the gutter to add some breakpoints, and nothing happened, you’ve hit whatever weirdness is in the gdbserver plugin. This problem is reported with other stm32 gdbservers, so it doesn’t appear to be a problem with stlink, but with netbeans. You can wake up netbeans again with kill -INT $(pidof arm-none-eabi-gdb)
    Thanks to gsmcmullin on ##stm32 on irc.freenode.net for that gem.

    Update for netbeans 7.2: Apparently you now have to put “target localhost:4242” into the gdbserver box, not just “localhost:4242”.

MRF24J40 driver for STM32

A while ago I put together a C driver for the MRF24J40 802.15.4 modules from microchip. I had been using them as a cheap alternative to xbees in some AVR projects. As I’ve been moving on to STM32 parts for hobby projects, (more power, cheaper) I started off porting my driver code from AVR over to cortex m3.

This has been quite an experience. The arm toolchain experience, and particularly the libc support and general documentation is completely different to, say, avr-libc (AVR-libc is a great project, reallly solid)

However, with lots of learning, and lots of mistakes, I’ve got it all working. It’s a first cut, but the basic features are there. There’s no magic for DMA, and you have to do a lot of the pin setup yourself, but this is Cortex M3, there’s so many pins you could be using for this! I’ve tried to reduce the required function calls as much as possible, but there’s still room for improvement.

    // Required by the user code
    extern void mrf_select(void);  // Chip select, if necessary
    extern void mrf_deselect(void);  // chip deselect, if necessary
    extern uint8_t spi_tx(uint8_t cData);
    extern void _delay_ms(int);  // only used at init time.

This still needs to move to a clear sub project, currently it’s a separate code base to the AVR code.

Get the code now!

More to come, as it gets tidied up and put into use!

Taking quiet output to the next level

I don’t know who thought this was a good idea, but this is the output of a successful build for one of the examples in the libopencm3 project


karlp@tera:~/opencm3_f4$ make clean
karlp@tera:~/opencm3_f4$ make
karlp@tera:~/opencm3_f4$

Really? Realllly? Ok, concise output is good, but this is no output at all!

Probably the same people who think making a stdlib implementation that is GPL….

Traps for new players, select() and FD_ISSET

So, you’re moving up into the world of multiple active tcp connections, and you know that you don’t want to poll them, but you haven’t learnt about libevent yet, or even heard of it perhaps. So you’re using select(), and it all seems pretty cool and groovy.

However, there’s a trap! when select returns, remember that it MODIFIES the fdsets, you need to reset the fd sets before each call to select(), and use FD_ISSET after the call to see which fd was hit.

Oh, and most importantly, more than one fd can trigger select to return. So don’t make any assumptions that FD_ISSET will only find a single fd.

C UnitTests with Check, and reporting in Jenkins/Hudson

Update 20110910 – This is now available as a standard feature in the current xUnit plugin for Jenkins/Hudson.

I’ve gotten quite spoilt over the years with things like Jenkins/Hudson, and automated test tools magically creating output that Jenkins understands, and magically creating pretty graphs and charts. But that is working in Java and python, where unit tests are common and easy. Working in raw C, this isn’t quite so common, nor quite so easy. I’ve been wanting to add unit testing to my C code for a while, and with a new task at hand, and having finally gotten Jenkins set up, it was time to get this done

I found http://stackoverflow.com/questions/65820/unit-testing-c-code and given the number of votes, gave Check a go. I had a few niggles with makefiles and library load paths and so on, (Isn’t C coding fun?) but then it was beautifully and happily giving me nice output on the command line.

XML output for Jenkins was another story. Check supports XML output, with just a single line of config in the test suite, but it’s yet another format. The regular standard JUnit plugin didn’t recognise it, and the xUnit plugin, depsite supporting almost a dozen other tools outputs, didn’t support Check. So much for Check being big and popular. However, the xUnit plugin does support applying a custom XSL stylesheet to your tool’s results. So I made a basic XSL for converting Check’s results into something compatible. And now I have pretty charts and graphs for my raw C code too. Whee

 
<xsl:stylesheet version="1.0"
xmlns:xsl="http://www.w3.org/1999/XSL/Transform"
xmlns:ck="http://check.sourceforge.net/ns"
exclude-result-prefixes="ck"> 
   <xsl:output method="xml" indent="yes"/> 
 
<xsl:variable name="checkCount" select="count(//ck:suite/ck:test)"/>
<xsl:variable name="checkCountFailure"
select="count(//ck:suite/ck:test[@result='failure'])"/>
<xsl:variable name="suitename" select="//ck:suite/ck:title"/>
 
<xsl:template match="/"> 
      <testsuite> 
         <xsl:attribute name="errors">0</xsl:attribute>
         <xsl:attribute name="tests"> 
          <xsl:value-of select="$checkCount"/> 
         </xsl:attribute> 
         <xsl:attribute name="failures"> 
          <xsl:value-of select="$checkCountFailure"/> 
         </xsl:attribute> 
         <xsl:attribute name="name"> 
            <xsl:value-of select="$suitename" /> 
         </xsl:attribute> 
         <xsl:apply-templates /> 
      </testsuite> 
   </xsl:template> 
 
<xsl:template match="//ck:suite/ck:test">
    <testcase>
      <xsl:attribute name="name">
        <xsl:value-of select="./ck:id"/>
      </xsl:attribute>
      <xsl:attribute name="classname">
        <xsl:value-of select="$suitename" /> 
      </xsl:attribute>
      <xsl:attribute name="time">0</xsl:attribute>
      <xsl:if test="@result = 'failure'">
        <error type="error">
          <xsl:attribute name="message">
            <xsl:value-of select="./ck:message"/>
          </xsl:attribute>
        </error>
      </xsl:if>
    </testcase>
</xsl:template>
 
<!-- this swallows all unmatched text -->
<xsl:template match="text()|@*" /> 
</xsl:stylesheet>

Known issues:

  • Check reports the duration of the entire testsuite. Junit expects a time per test. I tried putting the duration element from Check on the top level suite, but Jenkins ignored it.
  • The “classname” is a bit funky, but so be it.

JENKINS-10909 is tracking this as a feature over on their issue tracker.

As a friend said, “xml is just like violence. if it’s not solving your problem, use more.”