Tag Archives: linux

Updating an NXP MCU-Link to work with OpenOCD

Not just OpenOCD, but just.. get it updated.

MCU-Link is a USB-HS “CMSIS-DAP” compatible debug interface, cheaply available. It has a 2x5x1.27mm cortex debug connector, a bonus usb2uart TTL on 2.54mm pins, and even has the 1.27mm 10pin cable in the little case. Supports SWO trace at ~9M they say. Excellent!

As shipped it was running a very old firmware, older than they even have in their release notes. MCU-LINK r0FF CMSIS-DAP V0.078 OpenOCD didn’t even recognise this.

NXP Offers a “MCU-Link installer for Linux” which at the time of writing was v3.128. which certainly sounds more up to date. I downloaded that, found a shell script that wanted to be run as root…. So, with less commentary, here’s how I jumped all the hoops to upgrade the MCU-Link to recent, and get it working properly…

$ sh MCU-LINK_installer_3.128.x86_64.deb.bin --noexec --target .
$ ar x MCU-LINK_installer_3.128.x86_64.deb
$ tar -xf data.tar.gz
$ cd usr/local/MCU-LINK_installer_3.128/
# Now, plug in the "firmware update" jumper and replug the dongle
# This flashes the firmware itself...
$ bin/blhost --usb 0x1fc9,0x0021 flash-image probe_firmware/MCU-LINK_CMSIS-DAP_V3_128.s19 erase 0

# and here we "configure" it, leaving it as unlocked as we can...
$ bin/blhost --usb 0x1fc9,0x0021 read-memory 0x9dc00  512 myoutdump.bin 0
$ bin/mculink_cfg myoutdump.bin --clear --no-device_vendor --no-device_name --no-board_vendor --no-board_name
$ bin/blhost --usb 0x1fc9,0x0021 flash-erase-region 0x9dc00  512
$ bin/blhost --usb 0x1fc9,0x0021 write-memory 0x9dc00  myoutdump.bin  0

Now, unplug, take off the jumper, and replug. You now have a much more standard looking USB descriptors, and running Product: MCU-LINK (r0FF) CMSIS-DAP V3.128

And… now it happily supports non-NXP parts too.

$ openocd -f interface/cmsis-dap.cfg  -f target/stm32g4x.cfg 
Open On-Chip Debugger 0.12.0+dev-00469-g1b4afd13f (2024-01-08-22:49)
Licensed under GNU GPL v2
For bug reports, read
	http://openocd.org/doc/doxygen/bugs.html
Info : auto-selecting first available session transport "swd". To override use 'transport select <transport>'.
Info : Listening on port 6666 for tcl connections
Info : Listening on port 4444 for telnet connections
Info : Using CMSIS-DAPv2 interface with VID:PID=0x1fc9:0x0143, serial=X1JALQM40K3MS
Info : CMSIS-DAP: SWD supported
Info : CMSIS-DAP: JTAG supported
Info : CMSIS-DAP: SWO-UART supported
Info : CMSIS-DAP: Atomic commands supported
Info : CMSIS-DAP: Test domain timer supported
Info : CMSIS-DAP: UART via USB COM port supported
Info : CMSIS-DAP: FW Version = 2.1.1
Info : CMSIS-DAP: Serial# = X1JALQM40K3MS
Info : CMSIS-DAP: Interface Initialised (SWD)
Info : SWCLK/TCK = 0 SWDIO/TMS = 1 TDI = 0 TDO = 0 nTRST = 0 nRESET = 1
Info : CMSIS-DAP: Interface ready
Info : clock speed 2000 kHz
Info : SWD DPIDR 0x2ba01477
Info : [stm32g4x.cpu] Cortex-M4 r0p1 processor detected
Info : [stm32g4x.cpu] target has 6 breakpoints, 4 watchpoints
Info : [stm32g4x.cpu] Examination succeed
Info : starting gdb server for stm32g4x.cpu on 3333
Info : Listening on port 3333 for gdb connections

Later, I’ll test the actual trace, just wanted to write these down while I still had it all.

More arm android box conversion adventures

TL;DR: Still failing. Gave up again.

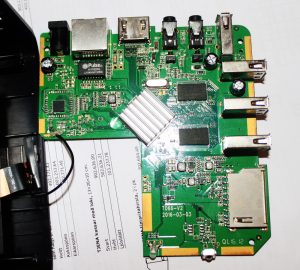
Back when I bought a RK3066 based device, I had seen rockchip developers start contributing directly upstream.  However, the RK3066 just missed the boat, and while I poked and prodded a bit, it was all just a bit too difficult and a bit too complicated a bit too much not much fun.  Still, I followed what was going on.  The plan was to use the swell of consumer electronics to get a cheap android tv box that I could run linux on, and use as a small home server.  “Just use a raspi” you say.  Well, no.  Raspi3 is at least decently powerful, but running everything off a sdcard, and not having a case is really not what I was looking for.  Little tiny cute black boxes, with a remote control and a power supply and ethernet and usb shipped for $30?  That’s what I want to reuse.  Rockchip continued to contribute upstream, so I bought a MXQ 4K (RK3229).  New hotness I thought, but the cheap end.  I still believed that rockchip was doing the best job of upstream support.  Note: My copy of this device has a much smaller heatsink, Spectek flash, not Sandisk, and some generic no name ram chips. (See pics)

Top side, smaller heatsink, no name ram.

Top side, smaller heatsink, no name ram.

Maybe they are.  And I’ve not worked on amlogic or sunxi chips, but goddamn, the work environment is still just as sucky.  A garbage world of “custom roms” and complicated documentation detailing multiple ways of doing things with rarely any explanation of why.  I’ve still no idea, but some things seem a little clearer than last time… maybe?

If you just want to run linux, in _theory_ you can just use the existing android kernel shipped stock.  It has support for all your hardware, you just need to replace the root file system (RFS) and amend the kernel command line to say where your rootfs is.  Except, because some of the drivers are actually separate binary proprietary modules, you end up needing a fucking initrd/initramfs timewaste so it can have such core details like a functional fucking nand driver.  Why the fuck rockchip is keeping _this_ bit proprietary is beyond me.  So that gets non-trivial quickly.  You can in theory extract the modules from your android system image.  If you have a stock firmware, (“update.img”) you can use rkunpack from the rkflashtool repository.  you’ll probably have to unpack more than once.  Documentation on what’s what is less than forthcoming.  The “system.img” wil be a raw ext4 image (in theory) and you can mount it locally to explore with “sudo mount -o loop blah.img somemountpoint”

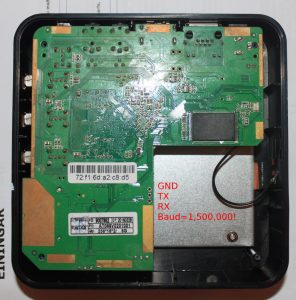
anyway, while some of this is just for my own notes, not really for anyone else, one thing has stuck out.  First, the default serial console is at 1500000 baud.  Thanks for nothing rockchip.  On a cp2102 serial dongle, you’ll need to use the silabs baud rate aliasing software to get to this baud rate.  Thanks for nothing silabs. and yeah, again, thanks for nothing rockchip.  The serial console is in the picture below.

Bottom side, spectek flash, serial console details

Bottom side, spectek flash, serial console details

Oh yeah, the “thing that has stuck out”  Despite being “unbrickable” because they have a maskrom bootloader, and normally just going into recovery mode,  I’ve had great difficulty.  After some bad flashing,  (bad why? no idea, rkflashtool or upgrade_tool both successfully report the flashing complete, then I reboot, and get…. bad things) the serial console will hang on a line like…

In
300MHz
DDR3
Bus Width=32 Col=10 Bank=8 Row=15 CS=1 Die Bus-Width=16 Size=1024MB
mach:2
OUT
Boot1 Release Time: 2016-03-15, version: 2.31
ChipType = c 275
No.1 FLASH ID:2c 64 64 56 a5 4
ECC:60
ReadRetry pageadd=15d800  ecc=3c err=ffffffff
Read pageadd=15d800  ecc=3c err=ffffffff
spare: 0x0:b8679151 b8679151 b8679151 b8679151 
ReadRetry pageadd=15d801  ecc=3c err=ffffffff
Read pageadd=15d801  ecc=3c err=ffffffff
spare: 0x0:527ded0c 527ded0c 527ded0c 527ded0c 
SdmmcInit=0 20
StorageInit ok = 134644
SecureMode : SBOOT_MODE_NS
powerOn 812121
Usb re Boot. 6812118

At this point, rkflashtool v will “fail” like so… (notice mangled text)

$ rkflashtool v
rkflashtool: info: rkflashtool v5.2
rkflashtool: info: Detected RK322X...
rkflashtool: info: interface claimed
rkflashtool: info: chip version: 322A-��..��-��

upgrade_tool will still say the device is connected, in “Loader” mode, and TestDevice, ReadFlashID, ReadFlashInfo and ReadChipInfo all still work. But attempting to download any image will fail saying parameter is invalid. rkflashtool p agrees.

 rkflashtool p
rkflashtool: info: rkflashtool v5.2
rkflashtool: info: Detected RK322X...
rkflashtool: info: interface claimed
rkflashtool: info: reading parameters at offset 0x00000000
rkflashtool: info: size:  0x0000ffff
rkflashtool: fatal: Bad parameter length!

One time this happened, I got out of it by having the USB-A-A cable disconnected (oh yeah, A-A for OTG? thanks for fucking nothing rockchip, hooray port overloads and reverse powering disasters) holding the recovery button down (with a toothpick down the SPDIF hole. (button down the AV hole _should_ be different but seems to behave the same for me)) and then plugging in the main power supply. Perhaps it had been a problem with powering the device purely via the A-A cable as I’d normally been doing?

Who knows. It’s currently in this state again, the unbrickable “bricked” Even shorting pins 7-8 on the NAND chip itself and powering up isn’t helping. (The “standard” rockchip method of getting back to maskrom mode) I get a different log, but it’s still non-responsive, even after inserting the A-A cable. (Still in loader, but not really working)

DDR Version V1.04 20160504
In
300MHz
DDR3
Bus Width=32 Col=10 Bank=8 Row=15 CS=1 Die Bus-Width=16 Size=1024MB
mach:2
OUT
Boot1 Release Time: 2016-03-15, version: 2.31
ChipType = c 276
No.1 FLASH ID:2c 64 64 56 a5 4
FlashLoadPhyInfo fail 2bc!!
sync para 32
sync para 32
ECC:60
ReadRetry pageadd=15d800  ecc=3c err=ffffffff
Read pageadd=15d800  ecc=3c err=ffffffff
spare: 0x0:b8679151 b8679151 b8679151 b8679151 
ReadRetry pageadd=15d801  ecc=3c err=ffffffff
Read pageadd=15d801  ecc=3c err=ffffffff
spare: 0x0:527ded0c 527ded0c 527ded0c 527ded0c 
SdmmcInit=0 20
StorageInit ok = 93093
SecureMode : SBOOT_MODE_NS
powerOn 770567
Usb re Boot. 6770565

So. No results, no future, but at least a weird log for the internet to archive if it helps anyone sometime.

linux mainline: minix neo x5 mini: USB works!

yay, progress. (by other people in the mainline community, I’m just enabling sections in devicetree files and building and testing.)

So, if you’ve built a kernel, and you think it should work, but you’re getting errors in syslog that look like this…

Jan  1 00:00:28 linaro-developer kernel: usb 2-1: new full-speed USB device number 3 using dwc2
usb 2-1: device v1a86 p7523 is not supported
usb usb2-port1: unable to enumerate USB device
Jan  1 00:00:29 linaro-developer kernel: usb 2-1: device v1a86 p7523 is not supported
Jan  1 00:00:29 linaro-developer kernel: usb usb2-port1: unable to enumerate USB device
Jan  1 00:00:59 linaro-developer kernel: usb 2-1: new high-speed USB device number 4 using dwc2
usb 2-1: device v0fce p5171 is not supported
usb usb2-port1: unable to enumerate USB device
Jan  1 00:01:52 linaro-developer kernel: usb 2-1: Dual-Role OTG device on HNP port
Jan  1 00:01:52 linaro-developer kernel: usb 2-1: device v0fce p5171 is not supported
Jan  1 00:01:52 linaro-developer kernel: usb usb2-port1: unable to enumerate USB device

This is actually a problem with your USB OTG config. Make sure that both CONFIG_USB_OTG_WHITELIST and CONFIG_USB_OTG_FSM are not set

A quick rebuild and reflash and presto…

Jan  1 00:00:32 linaro-developer kernel: usb 2-1: new full-speed USB device number 2 using dwc2
usb 2-1: device v1a86 p7523 is not supported
Jan  1 00:00:32 linaro-developer kernel: usb 2-1: device v1a86 p7523 is not supported
Jan  1 00:00:32 linaro-developer kernel: ch341 2-1:1.0: ch341-uart converter detected
Jan  1 00:00:32 linaro-developer kernel: usb 2-1: ch341-uart converter now attached to ttyUSB0

It’s still “not supported”, but I’m led to believe that means it’s not supported as a gadget in some manner.

The only additions to the device tree for the minix board were…

&usb_host {
       status = "okay";
};

&usb_otg {
       status = "okay";
};

Unfortunately, “only” these additions means there’s no power control for vbus. So the usb devices only work on the second port, if you have the funky A-A recovery cable plugged into the dual mode OTG/Host port used for recovery. Working out more pins is an ongoing project.
Thanks as always to the kindly people of #linux-rockchip

Further linux mainline adventures on minix neo x5 mini

This is a follor on from the last post, and as before, is a bit of a braindump post.

So, basically, it’s working now. The mystery part was adding “rootwait” to the kernel command line, presumably because of the mmc controller not having finished finding the card before it tried to mount root. This was only the kernel command line in the _linux_ build, nothing to do with the rockchip parameters file at all.

I followed the directions at http://hwswbits.blogspot.com/2013/11/your-own-official-linux-distro-in-sd.html to make an SD card with just the linux RFS. I’m still working on a generally “simpler is better” process. No initramfs, modules built in, plain RFS on sdcard because nand doesn’t work in mainline linux.

So…

wget http://releases.linaro.org/14.08/ubuntu/trusty-images/server/linaro-trusty-server-20140821-681.tar.gz # or similar
sudo umount -l /dev/sdd
sudo mkfs.ext4 -F -L linuxroot /dev/sdd
sudo su - # to keep permissions
cd /run/media/karlp/linuxroot
tar -xf ~karlp/Downloads/linaro-trusty-server-20140821-681.tar.gz --strip 1
sync
# back to regular user

Then put the sdcard in the minix and power cycle, and yay, I finally have a semblance of a linux system booting up!

It’s not entirely complete, but it’s getting a lot further than before!

bootlog.sdcard

I still don’t have any of the following working yet…. so it’s still a ways to go

  • ethernet
  • wifi
  • usb

:)

linux-rockchip v3.17-next on minix neo x5 mini

This is a braindump post, probably of very little interest to anyone but myself. It outlines further adventures towards getting a plain linux system booted on a minix neo x5 mini.

rk3066 support is expanding in the bleeding edge linux trees, and seeing as I don’t care about HDMI (yet) for my purposes, I thought it would be a good way to go forward. Device tree support, recent, near vanilla code, a snowflakes chance of getting a patch to work, and a single clear path to upstream. Of course, I thought for practice, I should start with one of the existing “gpl release” trees, all built on 3.0.x. That was an adventure. I tried the “omegamoon” repository, which _seemed_ to be the most uptodate, with backports of “important” things. https://github.com/omegamoon/Rockchip-GPL-Kernel

We ignore all the build script crap, at least until we’ve looked at them all, because we’re trying to work out what they’re doing, not just monkeys on keyboards.

$ export ARCH=arm
# This line your toolchain, mine is from "yum install gcc-arm-linux-gnu" on fedora 20
# Note, that you can actually skip this with the right entries in your .config
$ export CROSS_COMPILE=arm-linux-gnu-

In any tree, have a look in arch/arm/configs for an appropriate defconfig for your device…. (This is where it gets fun!)
So, let’s start with something basic

make rk3066b_sdk_defconfig
# now we would need to go into menuconfig and make sure we've turned on drivers we might need....
# but let's just build this one first and see what we get....
make -j8

And… it fails here. Awesome. Turns out all the 3066 configs here don’t even compile, presumably because of rk3188 support getting patched in, without any testing. so, toss this repo out and try another…

We’re going back to a “clean” rk3066 tree, following the directions here: http://hwswbits.blogspot.com/2013/11/linux-on-ug008-tv-box-rk3066.html This site has been generally helpful, and the ug008 is a very similar device to the minix neo x5 mini. I originally intended to go all the way back to basics, just follow any build guide first, make sure the code worked as is, before I tried anything more specific to the x5mini.

git clone https://github.com/Galland/rk3x_kernel_3.0.36 galland-rk
cd galland-rk
cp galland.config .config
make menuconfig
General Setup->Cross Compiler tool prefix -> Update the prefix so you don't have to export CROSS_COMPILE...
make

watch it fail…

/home/karlp/projects/galland-rk3x-3.0.36/scripts/gen_initramfs_list.sh: Cannot open '../initramfs/initramfs.cpio'

Ok, that was clearly skipping steps. Why do I need a damn initramfs, I just want to build in the modules I need in one go! But, ok, we’re going to follow the instructions given.

clone galland initramfs image, choose to use the one with rk mtd nand support, as we are hoping eventually to get linux, not android. rebuild
watch it fail, no uudecode. wtf?! and yum search uudecode only turns up a perl module?! Turns out you need the sharutils package. Ok, my bad, this was listed at the top of galland’s page of requirements. No idea why I haven’t had this installed already before, but so be it, install and make again…

Realise it doesn’t compile either. Bugs in the drivers/mtk_wcn_combo/drv_wlan/wlan/common/wlan_lib.c file. Awesome. I did consider resetting this repository to the date the blog post was written, and also looked at the rest of the forks, but ultimately decided, I wasn’t interested in trying this any further, they were all deadends. On to “near” mainline.

from #linux-rockchip on freenode, on earlier discussions I’d come across a more recent repo, on kernel.org no less, from one of the people who’s involved in mainlining efforts for rockchip support.

So, this is now…. _very recent_
Git repo: git://git.kernel.org/pub/scm/linux/kernel/git/mmind/linux-rockchip.git
Branch: v3.17-next/rk3xxx-dts

I’ve hacked a .config together, but I don’t know if it’s worth sharing at this point. So many options!

make -j8
# That spat out arch/arm/boot/zImage
make scripts # This makes the dts/dtb compiler
make rk3066a-bqcurie2.dtb # The only rk3066 in the tree, this is where I'll eventually have to make one for the minix neox5 mini
# that spat out arch/arm/boot/rk3066a-bqcurie2.dtb
cat arch/arm/boot/zImage arch/arm/boot/rk3066a-bqcurie2.dtb > zImage_with_dtb
[rktools]/rkcrc -k zImage_with_dtb > kernel.img
rkflashtool w kernel kernel.img (Or flashkit, or whatever)

Yay, now we actually get a booting kernel that we built ourselves….

425482 Starting kernel...@0x60408000

Uncompressing Linux... done, booting the kernel.
Booting Linux on physical CPU 0x0
Linux version 3.16.0-rc3 (karlp@teros) (gcc version 4.8.2 20140120 (Red Hat 4.8.2-2) (GCC) ) #1 SMP Wed Jul 30 21:08:48 GMT 2014
CPU: ARMv7 Processor [413fc090] revision 0 (ARMv7), cr=10c53c7d
CPU: PIPT / VIPT nonaliasing data cache, VIPT aliasing instruction cache
Machine model: bq Curie 2
..... snip....
Please append a correct "root=" boot option; here are the available partitions:
Kernel panic - not syncing: VFS: Unable to mount root fs on unknown-block(0,0)
CPU: 1 PID: 1 Comm: swapper/0 Not tainted 3.16.0-rc3 #1
..... snip (same on cpu2) ....

whee, that’s actually doing the right thing. It actually gets all the way to failing to mount a rootfs, which is reasonable, as I hadn’t configured one, mounted one, or set anything up on an sd card. So, I guess next, we’re looking at making at least a stub rootfs, and looking at maybe a more specific device tree file for this hardware.

Note: If you don’t concat the DTS to the end of zImage, you’ll get a boot something like this…

 424337 Starting kernel...@0x60408000

Uncompressing Linux... done, booting the kernel.

Error: unrecognized/unsupported machine ID (r1 = 0x00000bfa).

Available machine support:

ID (hex)	NAME
ffffffff	Generic DT based system
ffffffff	Rockchip Cortex-A9 (Device Tree)

Please check your kernel config and/or bootloader.

A good write up of this is at http://billauer.co.il/blog/2014/02/uboot-linux-dtb-fdt-device-tree/

Bash tab completion for python scripts

Bash completion is normally pretty awesome. You can even tab complete hostnames to ssh, if you’ve ssh’d to them before. It can complete arguments to all sorts of commands, and there’s even a python module that will let you provide completion for your custom command.

And this is all handled by plugins, so if you are executing something new/different, you get plain old regular completion of files and directories. This mostly all works, but I ran into a problem with a python script I’d written the other day, and I have no solution at all, only a workaround.

In all cases I expect to get full path plus file completion and prompting as my command is “unknown”

Command

Outcome

asdfasdf fileprefix[tab]

Works perfectly

python my-script.py fileprefix[tab]

Works perfectly

python my-script.py --my-argument fileprefix[tab]

only completes directories!

chmod +x myscript.py
./my-script-py --my-argument fileprefx[tab]

Works perfectly

I can only assume there’s a bug in the python completion module? No idea how to diagnose it further though. Having to make my own scripts executable isn’t the end of the world though, so it works for now. This was with bash 4.25.45(1) on Fedora 18, and bash-completion version 2.1, fwiw

CPU Profiling applications on OpenWrt with perf or oprofile

I have a problem were two applications running on an OpenWrt router are using too much CPU time. I can reproduce the problem fairly well, but I don’t have any easy obvious clues as to the cause yet. Worse, it’s behaves more like a memory leak. The task stays the same, but CPU usage slowly creeps up over an hour or so. I’ve tried setting up the same applications on a linux desktop, and I can make it happen, but it’s so very very slow. So while that was running, I looked into CPU profiling on linux, and particularly, which of them would run on OpenWrt. So immediately things like valgrind/cachegrind and dtrace and friends are ruled out. I scratched google cpu profiler as being too invasive, and gprof as having too many criticisms. Also, I’d never used any of these tools before, and I didn’t want to spend all day testing them individually. Searching for CPU profiling linux kept turning up two applications, oprofile and perf. First step then was, “which of these, if any, is already packaged for OpenWrt?”

Background requirements / assumptions

  • You’re building your own OpenWrt images here…
  • I started testing this on Backfire, but then moved to Attitude Adjustment when I started working with perf.
  • You are free to recompile the code under test, and aren’t trying to test a live system

Turns out the both are, but you have to jump some hoops. In “make menuconfig“, you need to got to “Gobal build settings” and enable “Compile the kernel with profiling enabled“. That’s all you need for oprofile, but for perf, go also to “Advanced configuration options (for developers)” and enable “Show broken platforms / packages“. I’m working on the atheros platform (ar2317), and apparently (I’m told on IRC) it’s a packaging problem more than a broken tool. It works on atheros at least, YMMV.

Continuing, you need to turn on the libelf1 library under “Libraries“, because the perf package doesn’t select it properly for you. Finally, under “Development” enable oprofile, perf or both. (When I started this, I didn’t have BROKEN packages enabled, so just used oprofile, and later used perf. If perf works, I’d only use perf, and skip oprofile altogether. I won’t talk about oprofile any further, but this was all you needed to get it to work)

So, that will make an image that can run the tools, but all binaries are (rightfully) stripped on OpenWrt by default in the build process, so you won’t get particularly useful results. In theory, you can record performance data on the router, and then generate the reports on your linux desktop with all the symbols, but I never worked out how to do this.

So, we want to run non-stripped binaries for anything we want to actually investigate. One way of doing this is the following magic incantation in your OpenWrt buildroot (Provided by jow_laptop on IRC)

make package/foo/{clean,compile} V=99 CONFIG_DEBUG=y

You can then copy the binary from [buildroot]/staging_dir/target-arch_uClibc-0.x.xx.x/root-platform/usr/bin/foo onto your device and run it. Actually, if you only want to analyse a single program, that may be enough for you. You can copy that non-stripped binary to the ramfs on /tmp, and just start profiling…

$ start_your_program
# capture 120 seconds worth of profiling data
$ perf record -p $(pidof your_program) sleep 120
# wait…
$ perf report

If your program actually runs to completion, rather than being a daemon of some sort, you can just use “perf record your_program”. This may actually give you enough information. Lucky you!

Here’s an example of recording a stripped binary, and recording a non-stripped binary. (This is a real program, but it’s not the point here.)

# Overhead  Command           Shared Object  Symbol
# ........  .......  ......................  ......
#
    59.34%  mlifter  [kernel]                [k] 0x800cd150
    25.04%  mlifter  libuClibc-0.9.33.2.so   [.] 0x37990 
     5.17%  mlifter  libgcc_s.so.1           [.] 0xaaa4  
     2.96%  mlifter  libpthread-0.9.33.2.so  [.] 0xfe54  
     1.68%  mlifter  libjson.so.0.0.1        [.] 0x4e00  
     1.25%  mlifter  [nf_conntrack]          [k] 0x22e4  
     0.87%  mlifter  libmosquitto.so.1       [.] 0x17d0  
     0.87%  mlifter  ld-uClibc-0.9.33.2.so   [.] 0x1478  
     0.64%  mlifter  mlifter                 [.] 0x6bac  
     0.61%  mlifter  [ip_tables]             [k] 0x5c8   
     0.26%  mlifter  libuglylogging.so       [.] 0x96c   
     0.26%  mlifter  libmodbus.so.5.0.0      [.] 0x2e60  
     0.23%  mlifter  [xt_conntrack]          [k] 0x2d0   
     0.20%  mlifter  [nf_conntrack_ipv4]     [k] 0x320   
     0.15%  mlifter  libcrypto.so.1.0.0      [.] 0x84e58 
     0.12%  mlifter  [iptable_raw]           [k] 0       
     0.12%  mlifter  [iptable_nat]           [k] 0x170   
     0.09%  mlifter  libuci.so               [.] 0x2cec  
     0.06%  mlifter  [nf_nat]                [k] 0x5e4   
     0.03%  mlifter  [nf_defrag_ipv4]        [k] 0x34    
     0.03%  mlifter  [iptable_mangle]        [k] 0xe0    
     0.03%  mlifter  [iptable_filter]        [k] 0x40    

And here’s the same thing, non-stripped

# Overhead  Command           Shared Object                         Symbol
# ........  .......  ......................  .............................
#
    59.29%  mlifter  [kernel]                [k] 0x800780e0
    26.30%  mlifter  libuClibc-0.9.33.2.so   [.] 0x39ff0 
     5.66%  mlifter  libgcc_s.so.1           [.] 0xa154  
     2.83%  mlifter  libpthread-0.9.33.2.so  [.] 0xaa20  
     1.70%  mlifter  libjson.so.0.0.1        [.] 0x4b54  
     0.85%  mlifter  [nf_conntrack]          [k] 0x6020  
     0.60%  mlifter  [ip_tables]             [k] 0x630   
     0.58%  mlifter  libmosquitto.so.1       [.] 0x39cc  
     0.47%  mlifter  ld-uClibc-0.9.33.2.so   [.] 0x29f0  
     0.23%  mlifter  libuglylogging.so       [.] 0x7d0   
     0.19%  mlifter  libmodbus.so.5.0.0      [.] 0x55cc  
     0.19%  mlifter  [nf_conntrack_ipv4]     [k] 0x2fc   
     0.17%  mlifter  mlifter                 [.] 0x1880  
     0.17%  mlifter  libcrypto.so.1.0.0      [.] 0x35b7c 
     0.15%  mlifter  mlifter                 [.] msg_add_branch_readings_full
     0.15%  mlifter  [xt_conntrack]          [k] 0xb0    
     0.15%  mlifter  [iptable_nat]           [k] 0x360   
     0.06%  mlifter  [iptable_filter]        [k] 0x40    
     0.04%  mlifter  mlifter                 [.] run_tasks
     0.04%  mlifter  mlifter                 [.] sfw_read_smart_bar
     0.04%  mlifter  [nf_defrag_ipv4]        [k] 0x54    
     0.02%  mlifter  mlifter                 [.] sfw_provides_circuit_readings
     0.02%  mlifter  mlifter                 [.] publish_backoff
     0.02%  mlifter  mlifter                 [.] sfw_verify_modbus_connection
     0.02%  mlifter  mlifter                 [.] task_modbus_poll
     0.02%  mlifter  mlifter                 [.] task_check_state_complete
     0.02%  mlifter  [nf_nat]                [k] 0x610   
     0.02%  mlifter  [iptable_mangle]        [k] 0x50    
     0.02%  mlifter  [fuse]                  [k] 0x70c   

Not much of a difference. We can see calls into our own code, but well, we don’t spend much time there :) Really, to get useful output, you need non-stripped libraries, and the kernel symbols. You’re never going to fit all of that on a ramdisk on your OpenWrt router. It’s time for some remote filesystems.

I used sshfs for this, which was very easy to setup, but it’s pretty cpu heavy on a small router. NFS probably would have been a better choice. However you do it, mount your OpenWrt buildroot somewhere on your router.

Then, even without any changes in how you call your application, you can add the kernel symbol decoding, just add the -k parameter. “perf report -k /tmp/remote/build_dir/linux-atheros/linux-3.3.8/vmlinux” Now we get the kernel chunks broken out, like in this snippet.

# Overhead  Command           Shared Object                             Symbol
# ........  .......  ......................  .................................
#
    26.30%  mlifter  libuClibc-0.9.33.2.so   [.] 0x39ff0 
     5.85%  mlifter  [kernel]                [k] finish_task_switch.constprop.58
     5.68%  mlifter  [kernel]                [k] __queue_work
     5.66%  mlifter  libgcc_s.so.1           [.] 0xa154  
     4.07%  mlifter  [kernel]                [k] n_tty_write
     2.83%  mlifter  libpthread-0.9.33.2.so  [.] 0xaa20  
     2.83%  mlifter  [kernel]                [k] __wake_up
     2.41%  mlifter  [kernel]                [k] tty_write
     1.85%  mlifter  [kernel]                [k] handle_sys
     1.70%  mlifter  libjson.so.0.0.1        [.] 0x4b54  
     1.58%  mlifter  [kernel]                [k] fsnotify
     1.57%  mlifter  [kernel]                [k] put_ldisc
     1.30%  mlifter  [kernel]                [k] vfs_write
     0.94%  mlifter  [kernel]                [k] tty_insert_flip_string_fixed_flag
     0.91%  mlifter  [kernel]                [k] __do_softirq
     0.91%  mlifter  [kernel]                [k] memcpy

We’re still missing symbols from uClibc, and any other user libraries we may call. (like libjson there) Fortunately, when we rebuilt our package with CONFIG_DEBUG=y earlier, it rebuilt the libraries it depends on in debug too. But now, we need to make sure we call our binary using the correct debug libraries. (This is the bit I think should be doable offline, but this is the way I got it to work at least!)

This is setting up the library path to use the non-stripped libraries. We then start perf using this process ID. (/tmp/remote is where I mounted my OpenWrt buildroot)

$ LD_LIBRARY_PATH=/tmp/remote/staging_dir/target-mips_uClibc-0.9.33.2/root-atheros/lib:/tmp/remote/staging_dir/target-mips_uClibc-0.9.33.2/root-atheros/usr/lib /tmp/remote/staging_dir/target-mips_uClibc-0.9.33.2/root-atheros/usr/bin/mlifter

And now we can see all the details….

# Overhead  Command           Shared Object                             Symbol
# ........  .......  ......................  .................................
#
     6.39%  mlifter  [kernel]                [k] finish_task_switch.constprop.58
     5.83%  mlifter  [kernel]                [k] __queue_work
     5.01%  mlifter  libuClibc-0.9.33.2.so   [.] _ppfs_parsespec
     3.98%  mlifter  [kernel]                [k] n_tty_write
     3.27%  mlifter  libuClibc-0.9.33.2.so   [.] _vfprintf_internal
     3.24%  mlifter  [kernel]                [k] __wake_up
     2.77%  mlifter  libuClibc-0.9.33.2.so   [.] __libc_write
     2.48%  mlifter  [kernel]                [k] tty_write
     1.60%  mlifter  [kernel]                [k] vfs_write
     1.60%  mlifter  [kernel]                [k] put_ldisc
     1.57%  mlifter  [kernel]                [k] fsnotify
     1.53%  mlifter  libuClibc-0.9.33.2.so   [.] _fpmaxtostr
     1.45%  mlifter  [kernel]                [k] handle_sys
     1.31%  mlifter  libgcc_s.so.1           [.] __muldf3
     1.11%  mlifter  libuClibc-0.9.33.2.so   [.] __stdio_WRITE
     1.08%  mlifter  [kernel]                [k] tty_insert_flip_string_fixed_flag
     1.06%  mlifter  libgcc_s.so.1           [.] __unpack_d
     1.04%  mlifter  libuClibc-0.9.33.2.so   [.] __stdio_fwrite
--- snip ---
     0.19%  mlifter  libjson.so.0.0.1        [.] json_object_put
--- snip --- 
     0.11%  mlifter  libjson.so.0.0.1        [.] json_object_double_to_json_string

We can now see into uClibc, and into user libraries like libjson. (Trust me, I just didn’t include _alllll_ the output.) This is not actually the same point in the program, so don’t read too much into the actual numbers here. If you want, you can comment that this program is spending far too much time printing something to the console. (which is true!)

That’s it. You can now get symbol level information on what’s happening and how much. Whether this is useful is a different story, but this was fairly complicated to setup and test out, so I thought this might be helpful to others at some point.
Installing Eagle (5.12) on Fedora 17 (64bit)

Eagle is only provided as a 32bit package for linux, even as of version 6.3. I’m still using 5.x, for compatibility reasons, so I was trying to get it installed on my newish Fedora 17 64 bit install. Eagle’s #1 FAQ item is how to do this, but it’s for fedora 10, and some of the packages have changed. You also don’t need to install as many, as some of them will be pulled in as dependencies.

  • glibc.i686
  • libXrender.i686
  • libXrandr.i686
  • libXcursor.i686
  • freetype.i686
  • fontconfig.i686
  • libXi.i686
  • libpng-compat.i686
  • libjpeg-turbo.i686
  • libstdc++.i686
  • openssl-devel.i686

There, much better.
Updated with corrections 2013-Nov-18