STM32 Device Electronic Signature – Unique Device ID Register

STM32 parts, in all families, have a “Device Electronic Signature” block, which contains a Unique Device ID register of 96 bits. It’s burnt in to the part during manufacture, and is guaranteed to be unique for any device in any context Now, 96 bits is fairly large, and in one application of mine, I need an 8 bit number that reliably varies between devices, and also a 48bit serial number. (Like a MAC address, or EUI48) The canonical way of doing this is to hash the large value to get a small value. I was hoping to use 48 bits of the unique id as “unique enough”

ST doesn’t provide much/any information about what goes into this 96 bit number, but there’s internet rumours that it includes things like wafer x,y position, manufacturing datecodes and so on. If I want something that reliably varies, I need to know a little bit more. I don’t have anything really conclusive, but it looks like I really will have to hash the unique id. Here’s the unique id bits from three STM32F100C8 parts purchased from mouser in the same lot. (Can’t find the order date right now)

device uniqueid[95:64] uniqueid[63:32] uniqueid[31:0]
STM32F100C8-A 0x43023307 0x36314732 0x06E30030
STM32F100C8-B 0x43022507 0x36314732 0x06CF0030
STM32F100C8-C 0x43022407 0x36314732 0x06D10030
STM32F100RB (STM32VL Discovery board) 0x43172128 0x30345532 0x06B30036

On the STM32F0 datasheet, the bits are actually described, and there’s no real reason to assume that it ever changed. They list bits 95:64 as LOT_NUM[55:24], bits 63:40 as LOT_NUM[23:0], bits 39:32 as WAF_NUM[7:0] and bits 31:0 as X and Y coordinates on the wafer expressed in BCD format. That would imply that my three parts in the same box came from the same wafter, but different lot numbers. So, well, maybe it was a different scheme for the F1 :)

Looks like I’ll be hashing anyway then :)

The strange prices of chips at distributors (STM32F100 prices)

A while ago I bought some STM32F100C8 chips (64k flash, 8k sram) because they were cheaper than the F100C6 chips, 32k flash, 4 k sram. At least at the time. I was recently looking at them again, and decided to price chart the whole family of STM32F100Cxxxx, across Digiey, Mouser and Farnell (/Newark/element14 etc)

STM32F100C is the 48pin LQFP package. Results were interesting to say the least. Prices are for 100 units, so not huge scale, but more than just a couple of prototypes. Prices are in USD, and were advertised when I wrote this post.

Points of note

  • Newark/farnell cheaper almost across the board. That’s unusual for us, but we may have to look at them a bit more often now :)
  • DigiKey is the only one where the price actually goes up as you increase the specs. Mouser has the C6 cheaper than the C4, and Newark/Farnell has the CB cheaper than the C8
Part flash ram DigiKey Mouser Newark/Farnell
STM32F100C4 16KB 4KB 1.98 2.11 1.64
STM32F100C6 32KB 4KB 2.091 1.99 1.91
STM32F100C8 64KB 8KB 2.8085 2.93 2.89
STM32F100CB 128KB 8KB 3.239 3.09 2.87

Oops! SoundHound update wasn’t tested on all screen sizes :)

Clearly not on the ultra tiny Vodafone 845 / Huawei Joy :) Let this be a lesson to your layout people! The android emulator lets you pick any screensize you like. I’m not saying you should do any serious work to make things look good on these tiny screens, but the app should still be useful not being able to press the big red button that your app provides, but still showing the ad isn’t really useful :)

"Listen Now" button missing on tiny android screens

On the bright side, an “email to the developers” through the android market was promptly replied to, promising a fix in the next update. Good response SoundHound :)

Interrupt Service Routines double firing on STM32

This is just a quick note to self. Remember, never try and clear the flag that caused the interrupt as the last instruction in the ISR itself. It causes the ISR to reenter immediately. Your ISR/NVIC/EXTI interrupt will retrigger, trigger twice, whatever keyword you were searching for.

void exti9_5_isr(void)
{
    state.my_counter++;
    exti_reset_request(EXTI5);  // Will cause a double interrupt
}

It’s just a matter of doing it first.

void exti9_5_isr(void)
{
    exti_reset_request(EXTI5);  // This will work
    state.my_counter++;
}

Code examples are based on libopencm3, but the same concept applies when using StdPeriphLib

Local development for LuCI

So, you’ve got some LuCi modules packaged up, and you can build them via the OpenWRT build root, and you can install them with opkg, and you can edit the final files in /usr/lib/lua/luci/{controller,views,etc} and the changes take effect immediately, but you don’t like working on the target router. You don’t get to use the editors you want, it’s hard to integrate into your version control to see what you’ve been doing. You’ve seen this page about a “local development environment”, but it didn’t help as much as you had hoped?

Here’s a few things that worked for me, based on lots of advice and snippets from jow_laptop and some experimentation.

First, I’m assuming you’ve got luci trunk checked out, and I’m going to refer to that directory as [LUCI_DIR]. I’m assuming that your working luci package, which has the OpenWRT opkg Makefile, and a luasrc and htdocs directory are in [YOUR_PKG].

Now, the opkg Makefile that does a great job of building your package normally isn’t going to cut it for running inside luci. Make a new directory in [LUCI_DIR]/applications/your_name and add a Makefile with the following contents

include ../../build/config.mk
include ../../build/module.mk

That’s it. Now, you need the luasrc/htdocs etc directories from your project. This is a touch tedious…

  1. [LUCI_DIR]/applications/your_name$ ln -s [YOUR_PKG]/luasrc
  2. [LUCI_DIR]/applications/your_name$ ln -s [YOUR_PKG]/htdocs

At this point, [LUCI_DIR]$ make runuhttpd will churn away, and copy things all over the place, and you should have your package working locally.

I had problems where controllers were simply not detected, with the page’s “entry” links simply returning a 404 “No page is registered at blah/wop” As best I can tell, this was a problem in the fast indexer, and editing [LUCI_DIR]/libs/web/dispatcher.lua, in the createindex function, to use the plain indexing instead of the fast indexing meant that all my controllers showed up properly. The controllers were all working perfectly on the target mind you.

So, with this, I don’t have to fiddle around with sshfs, and I can easily use things like git diff to see what I’ve actually done recently. However, because of the way make runuhttpd works, by copying all the files first into a dist directory, then copying that into the [LUCI_DIR]/host/ tree, you have to continually stop and start the server after any changes. A project for another day….

Static analysis for AVR code with Splint

Over on #avr, static analysis came up, particularly, getting Splint to run. _abc_ put this guide together, which I’ve reproduced verbatim below.

Running splint(1) on avr-gcc source code


Version 0.0 - tested 15.05.2012

by _abc_ @irc.freenode.org

software versions:
splint 3.1.2 compiled from source
avr-gcc-4.5.1 as supplied by Atmel (binary build for Linux)

Splint is a static C source code analyzer which can help
keep C source files and headers tidy and consistent. It can
also prevent a lot of silly errors, which is more important
in embedded C code than elsewhere. Many embedded code error
signals involve smoke, sparks, and lost devices.

Splint was never designed to run on embedded C, with its
extensions. In addition to that, splint has not been maintained
that much. The Wikipedia article on splint mentions that is is
'not relevant' as software anymore and that its Wikipedia page
should be removed. I disagree with that statement.

The following shows how splint (3.1.2) can be run successfully
on abr-gcc source code in 2012.

Checklist:

1. Install splint (it compiles cleanly from source on any gnu
compiler equipped system, using ./configure && make && sudo
make install). Alternately, get the distribution specific
package of splint if it exists.

2. Make a copy of your embedded source files for backup in case
something goes wrong.

3. Get used to the fact that the splint manual page is not so
useful. Running splint -help [something] 2>&1|less is much more
so. The pdf manual which comes in the package of splint 3.1.2 is
dated 2003 (proudly, on the first page). That's okay, since the
C standard most used today is dated 1999 (C99)...

4. Copy the following commands into a shell command file in
your project directory, and edit the relevant parts (path to
avr installed toolchain include, source file name etc):

--snip--
#
# splint-avr-gcc-code.sh 644
#
# V0.0 tested 15.05.2012 by _abc_ @ irc.freenode.org
#
# run the splint static source analyzer on a avr-gcc C source code file,
# in a avr-gcc compatible way.
#
# initial revision, tested with avr-gcc, throws lots of warnings on avr-gcc
# includes but runs AS LONG AS:
# i. __fuses and __lockbits sections are hidden from splint using 
#    #ifndef S_SPLINT_S
#      ...
#    #endif
# ii. any binary constants (0b000f) in the C source are either rewritten as
#   decimal or hex numbers, OR their sections are guarded as above, and
#   binary or hex values are provided instead.
#
# Comment: the splint parser should be patched to accept binary constants.
# The usual makefile used for project building should have a new section
# (target) called lint or splint which should lint the source. It can be
# easily written by adding the code below:
#

## adjust to suit your installation
AVR_TOOLCHAIN_INSTALLED_LOCATION="/some/where/" ;# edit me

SRC="mysource.c" ;# edit me, ONE source file per shell file for now

DEFS="-D__AVR_ATmega8__" ;# etc, edit this

#SPLINT_EXTRA_ARGS="-nolib"
## actually run
splint \
	-preproc \
	-unrecogcomments \
	$SPLINT_EXTRA_ARGS \
	-I${AVR_TOOLCHAIN_INSTALLED_LOCATION}/avr/include/ \
	$SRC
--snap--

5. while editing the required areas of the command file above, also 
read its header. It explains how the source can be splint proofed. It is
really easy. The -unrecogcomments comment is needed because there are
some semantic comments in the header files which throw errors. The other
ways to splint proof your code are explained by executing the commands:

  splint -help parseerrors 2>&1|less

in a shell.

6. splint should really be updated with embedded C extensions, especially
the 0b0001 style binary constant support.

7. avr-libc maintainers should run splint as above on sources which include
them (hello_world.c with just #include  and #include  are
enough for a start), as splint shows more than 90 warnings on running through
the avr-libc headers included by the simple main alluded to above at the
time of this writing.

-- the end --

Note, I haven’t actually used splint myself, on AVR code or regular desktop code. I do however endorse static analysis, having used PMD and friends on java code quite a lot. If you don’t like splint, or are looking for alternatives, perhaps something still being maintained, abcminiuser suggests Cppcheck, which covers both C and C++. There’s also the commercial Coverity and gimpel. I’ve not used any of these, but it seemed like such a worthwhile record that I was loathe to lose the discussion the depths of IRC logs.

Power consumption of monitors with black vs white backgrounds

I heard some time ago about some claims that google should use a black background instead of white, to save power on everyone’s monitors. It sounded somewhat reasonable when everyone still had CRTs, but I was always curious just how much power it would really save.

So, I hooked up one of the energy meters here to my monitor, and displayed a fullscreen black on white terminal, and then a fullscreen white on black terminal. And then back and forth a few times.

  • Black screen power usage: 0.188 Amps (@240V)
  • White screen power usage: 0.175 Amps (@240V)

How about that. On my monitor at least, (A Benq G222HDL, a fairly generic LED screen) the black background actually uses more power.

The computer itself uses far more of course, and the idle printer/scanner uses 0.051 Amps by itself, so there’s far more savings in switching off than in changing background colours.

Of course, I’m not the first person to question these claims…

Using netbeans for STM32 development with stlink (texane)

So, You got a STM32 Discovery board hey? Good for you! They’re cheap, and highly functional, but this ain’t your grandmother’s Arduino.

Here’s a rough and ready howto for developing in netbeans, and getting source level debugging for that code.

Required pieces

GNU arm toolchain installed and working.

I use summon-arm-toolchain for this. To test that it’s working, you can try any of the following:

You want to make sure that you can successfully compile via make from the command line first. If you can’t compile with the raw tools, netbeans isn’t going to magically fix that for you.

texane/stlink

A confusing name, but so be it. stlink (the software tool) provides tools for flashing STM32 chips via ST/Link v1 and v2 hardware. It also provides a gdbserver for debugging those chips. Get it from github (Sorry, there’s no tagged releases or anything yet, though there really should be)

Netbeans

Duh, this post is covering that. You need the c/c++ plugin and the gdbserver plugin. Download it here. For reference, I’m using 7.1 at the moment.

Setting up the toolchain in netbeans

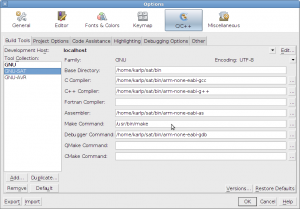
  1. Click Tools->Options->C/C++
  2. Click on “Add” and set up a new toolchain for arm development. See the screenshot below
    Netbeans add tools dialog for gnu-arm

    Netbeans add tools dialog for gnu-arm

  3. Import your project as a makefile based project from existing sources. You can get netbeans to actually do all the compiling and things for you, but I find it hard to share the project that way. Not everyone uses netbeans, but makefiles are pretty portable.
  4. Build your project
  5. Flash your binary to the target. You can actually do this anyway you want, but we’ll use stlink’s st-flash tool.
    $ arm-none-eabi-objcopy -O binary your_project.elf your_project.bin
    $ /path/to/stlink/flash/st-flash write your_project.bin 0x08000000
    

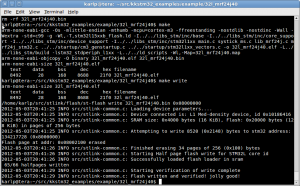
    Here’s a screenshot from my makefile. (You can set up run modes in netbeans to do this too, but that’s not the focus here)

    console log for make and upload via stlink

    make and upload via stlink

  6. Start stlink’s gdbserver.
    karlp@tera:~/src/stlink$ ./gdbserver/st-util 
    2012-05-03T20:44:56 INFO src/stlink-common.c: Loading device parameters....
    2012-05-03T20:44:56 INFO src/stlink-common.c: Device connected is: L1 Med-density device, id 0x10186416
    2012-05-03T20:44:56 INFO src/stlink-common.c: SRAM size: 0x4000 bytes (16 KiB), Flash: 0x20000 bytes (128 KiB) in pages of 256 bytes
    Chip ID is 00000416, Core ID is  2ba01477.
    init watchpoints
    Listening at *:4242...
    
  7. Whew, ok, just about there. Now in netbeans, choose “Debug->Attach debugger”.
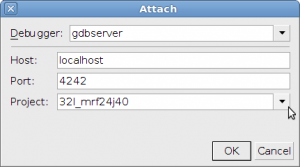
  8. Choose “gdbserver” and make sure you put in the right host and port, (normally localhost, and 4242) and make sure it’s set to debug your project.
    screenshot for netbeans gdbserver attach dialog

    gdbserver-attach

  9. MAKE SURE you have set at least one breakpoint first. Something in netbeans doesn’t like adding breakpoints while it’s running, and it doesn’t like pressing the pause button. (but see the footnotes)
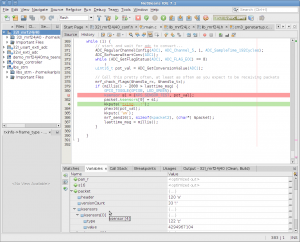
  10. Profit…
    screenshot showing netbeans Source debugging STM32 via stlink gdbserver

    Source debugging STM32 via stlink gdbserver

  11. That’s it. If any of the steps are glossed over too much, mail me and I’ll try and update to clarify.

    Sidenote: If you didn’t set any breakpoints in netbeans first, or you pressed pause, or you double clicked in the gutter to add some breakpoints, and nothing happened, you’ve hit whatever weirdness is in the gdbserver plugin. This problem is reported with other stm32 gdbservers, so it doesn’t appear to be a problem with stlink, but with netbeans. You can wake up netbeans again with kill -INT $(pidof arm-none-eabi-gdb)
    Thanks to gsmcmullin on ##stm32 on irc.freenode.net for that gem.

    Update for netbeans 7.2: Apparently you now have to put “target localhost:4242” into the gdbserver box, not just “localhost:4242”.

MRF24J40 driver for STM32

A while ago I put together a C driver for the MRF24J40 802.15.4 modules from microchip. I had been using them as a cheap alternative to xbees in some AVR projects. As I’ve been moving on to STM32 parts for hobby projects, (more power, cheaper) I started off porting my driver code from AVR over to cortex m3.

This has been quite an experience. The arm toolchain experience, and particularly the libc support and general documentation is completely different to, say, avr-libc (AVR-libc is a great project, reallly solid)

However, with lots of learning, and lots of mistakes, I’ve got it all working. It’s a first cut, but the basic features are there. There’s no magic for DMA, and you have to do a lot of the pin setup yourself, but this is Cortex M3, there’s so many pins you could be using for this! I’ve tried to reduce the required function calls as much as possible, but there’s still room for improvement.

    // Required by the user code
    extern void mrf_select(void);  // Chip select, if necessary
    extern void mrf_deselect(void);  // chip deselect, if necessary
    extern uint8_t spi_tx(uint8_t cData);
    extern void _delay_ms(int);  // only used at init time.

This still needs to move to a clear sub project, currently it’s a separate code base to the AVR code.

Get the code now!

More to come, as it gets tidied up and put into use!

Mailers and attached patches

The patch submission policy to open source projects is about as diverse as the number of projects. One policy that comes up fairly often is, “Email submission to blah-developers@example.org. Entire message plain text only, with patch inline, not as an attachment.” Apparently this is so that someone, somewhere, using some sort of mail agent can review the patch while reading their email, and still save the patch cleanly to be applied.

Projects with this sort of policy tend to enforce it rather fanatically. It also means that the list is often covered in reposts of patches, and complaints, about, “Your mailer has mangled your patch (spaces to tabs or vice versa), please fix it and resend” or, “Your mailer has sent the patch as an attachment instead of inline, please resend.” or even just the friendly, “You’ve sent a html message, don’t do that

Really? That’s the world we’re living in? What mailer in the world won’t let you view a plain text attachment inline? We’re in some lowest common denominator worldview, where for half the people, the answer is NOT USE their email mailer, but an entirely separate program, just for sending patches. (git-send-email)

One the one hand, yes, this sort of policy keeps out amateurs. It also makes damn sure that no amateur ever gets any better. It makes sure that only previously established members can ever submit anything. It’s one of the least friendly ways of accepting work I’ve ever dealt with. And somehow this is OK. I say we’ve failed, and we’ve failed on purpose, and I don’t understand it.