Remember, chip select pins need to be outputs!

I was struggling with (very) unreliable file reads and writes while trying to get FatFs running on an Arduino Mega 2560 board, with the standard Arduino Ethernet Shield. The ethernet connection was continually dropping and reconnecting as well.

What was missing? I hadn’t set the pin used for chip select on the SD card to be an output. As soon as I added that, my file operations became 100% reliable, and my ethernet connection stopped bouncing. Excellent!

(I’ll try and package up what we needed to get FatFs working, but it might not be today)

Dresden Elektronik ATmega128RFA1 breakout boards, deRFmega128

I’ll write up more about the parts themselves later, but I finally got boards made for Dresden Elektronik’s deRFmega128 modules, both made, and now assembled and tested. Briefly, these are a module with Atmel’s ATmega128RFA1 (a combined ATmega128 with a 802.15.4 2.4 Ghz transceiver on a single chip) with either a chip antenna, or a connector for your own antenna. These are TINY, and they also manage to pack a 1Mbit EEPROM on the module, for your own use. All for 21€

I’ve only tested a basic blinky thing so far, but it’s good to know that I can finally start doing something with these cool modules.

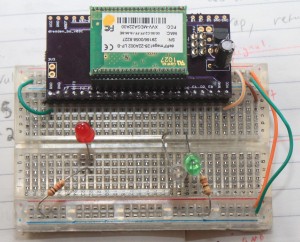
Here’s one up on a breadboard.

These modules are the same length as PJRC’s Teensy boards, but they have leads on 1.27mm pitch, not 2.54mm pitch. Lots more pins, but you’ll need some parts. For the 1.27mm socket holders, I ordered direct from Samtec. [1] Dresden recommends SLM Series, but I ordered SMS series. It may have been price, or availability, who knows. I ordered SMS-123-02-G-S, and the pins are really way too long on those. SMS-01-G-S would have been a better choice. Also, and I don’t know if the SLM would have been better, but I have a little bit of a hard time getting the modules into these sockets. They seem to “spring” out a little bit, to point that I initially thought I had failed to make my pcbs properly. Some of the pins weren’t making good contact. I have my modules mounted “upside down” with the silver RF can facing down. That’s the way the module leads are longest, and gold, and the only way they fit, when I was testing out the sockets and the modules. (Before the boards got here)

I’ve now found, that they will fit in nicely with the metal can UP and click into place nicely, but that’s not pin compatible with the AVR ISP header, or the power supply I put on the breakout.

So, I have some breakouts that work just fine, if you solder the part in, and probably well enough for development before your own boards, but I’m probably going to respin them :( The modules are cool, and they just came out with a pin compatible module, with an ARM7 core, instead of the ATmega128.

I still have a spare board from this revision though, if you are at all interested, I can send you one :)

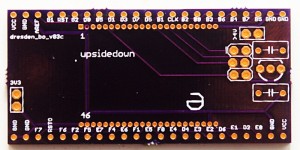
Here’s the board itself

Note, it already says rev3. That’s a story for another day :)

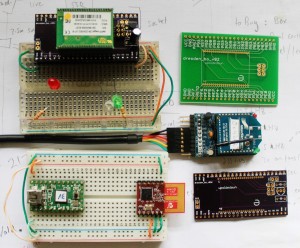
And to leave you, a picture of the different RF modules I’ve been working with here recently.

deRFmega128, Teensy v2 + MRF24J40MA, Xbee Series 1 + adafruit board

The current board files are available from https://github.com/karlp/karlnet/tree/master/experiments/dresden

The very basic blinking demo is also at github, should you really want it :)

[1] You can pretty much forget about getting 23pin headers from either digikey or mouser. Samtec were prompt, and had cheap enough shipping, relatively speaking. (I ordered a dozen)

avrdude 5.10, arduino mega 2560, command line uploading

Note: The following probably applies to the arduino UNO as well, as it also uses an onboard atmega 8u2, rather than the old raw serial converter.

Part 1 of probably many. I’ve inherited some arduino code, targetting the quite new mega2560 boards. You know, the ones that include an onboard atmega8u2, rather than the original old serial adapters. In many ways, this is a welcome step into the future. Anyway, this place doesn’t even have a regular AVR ISP programmer, and with the onboard real usb, the code running on the 8u2 is actually effectively an AVR ISP programmer itself, talking the stk500 protocol.

I am trying to move some of this code slowly out of the arduino IDE, and towards a more standard shared tree of c/c++. I have mostly succeeded in building plain hex files from the command line, based on arduino libraries (for things like LiquidCrystal and Ethernet and so on) but was having problems getting them to program. By editing arduino’s “preferences.txt” and adding “upload.verbose=true” I could see that when programming from the arduino IDE, it was using a private patched version of avrdude (5.4-arduino) with the programmer type of stk500v2, and that it was issuing a reset, via some sort of DTR toggle…


c:\tools\arduino-022\hardware/tools/avr/bin/avrdude -CC:\tools\arduino-022\hardware/tools/avr/etc/avrdude.conf -v -v -v -v -cstk500v2 -p atmega2560 -P COM5 -b 115200
... version stuff ...
Using Programmer: stk500v2
Overriding Baud Rate: 115200
avrdude: ser_open(): setting dtr
avrdude: Send: . [1b] [20] . [00] . [03] . [0e] . [11] . [01] . [01] ' [27]

Ok, so now I had enough to try and run it myself, using avrdude 5.10, as comes with recent versions of WinAVR


C:\Users\karlp>avrdude.exe -p atmega2560 -P COM5 -c stk500v2 -v -U lfuse:r:-:h -b 115200
---snip---
avrdude.exe: stk500_2_ReceiveMessage(): timeout

But, as you can see, this just timed out. Looking at the LEDs, I could see that the board wasn’t getting magically reset. With a bit of reading and searching, I found out that avrdude added a way of resetting the board, if you use the programmer type of “arduino”


Using Programmer : arduino
Overriding Baud Rate : 115200
avrdude.exe: Send: 0 [30] [20]

Interesting, following the lights on the board, I could see that this was now resetting properly, but clearly, those were not the right commands. It seems that the “arduino” programmer type, is set up to talk to the bootloader on the atmega328 of the prior versions of arduino, the Duemilanove and so on, that still had a direct USB-serial bridge, from the FTDI chip. So, if the “arduino” programmer does the reset, but the wrong protocol, looks like I’ll have to reset it myself.

I finally tried holding reset on the board, issuing the command with the programmer of “stk500v2” and immediately releasing reset. Presto!


C:\Users\karlp>avrdude.exe -p atmega2560 -P COM5 -c stk500v2 -v -b 115200
... more snipped ....
Programmer Type : STK500V2
Description : Atmel STK500 Version 2.x firmware
Programmer Model: AVRISP
Hardware Version: 15
Firmware Version Master : 2.10
Vtarget : 0.0 V
SCK period : 118.3 us

avrdude.exe: AVR device initialized and ready to accept instructions

Reading | ################################################## | 100% 0.03s

avrdude.exe: Device signature = 0x1e9801
... more snipped ...

Hooray! we’re working from the command line again. Now, if only the arduino gang’s pile of extra patches for avrdude would keep making their way back into mainline. It seems they don’t play well with others :(

Hehe: Twitter checks my own email for availability

I thought this was a bit funny. I’m trying to reduce the number of different email addresses I uses, start simplifying some things, so I was changing the email listed for my twitter account, from twitter@tweak.net.au to karl@tweak.net.au I thought this would just be a field to edit and save, but no! Twitter started animating a “checking…” text beside the box, and when I’d finished, happily told me that the email was “available!”

What are they trying to find/stop? Multiple twitter accounts that have the same email address? Why is that a problem?

View only preferences for Android

Have you ever wanted to show a bunch of statistics, or read only config or something like that, and wished you could just use the built in PreferencesActivity like you can for user editable preferences?

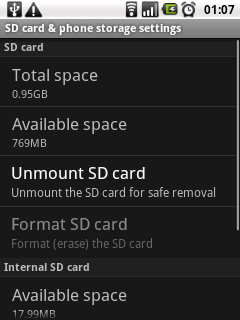
Just like how the stock android does for the “About Phone” page and the “SD card & phone storage” Android "preferences" that are uneditable

I wanted to have some figures like this in my own app, and I wanted them to show up under menu → preferences as well. Here’s how…

First, just declare a plain “Preference” in the layout, not an EditTextPreference or anything fancy, we’re going to make a pretty simple custom preference.

<PreferenceScreen xmlns:a="http://schemas.android.com/apk/res/android" a:key="PintyPrefs">
    <PreferenceCategory>
<!-- other stuff -->
    </PreferenceCategory>
    <PreferenceCategory a:title="stats">
        <Preference a:title="@string/preference_last_data_update"              
                            a:key="preference_lookup_key"
                            a:editable="false"
                            a:defaultValue="unknown"
                />
    </PreferenceCategory>
</PreferenceScreen>

Now, in your preferences activity, just stick in some code like this…

//.. onCreate/onResume..
        lastUpdatedPref = findPreference(preference_lookup_key);
        String lastUpdated = calculateYourStatisticsSomehow();
        lastUpdatedPref.setSummary(lastUpdated);

That’s it. You can see here how I’ve got it in my own preferences dialog

In my case I wanted to see when the supporting server for my app had last been updated.

Combining two git repositories into one

I went down some dead ends trying this, but it was pretty easy in the end. Here’s how I did it, because my search keywords didn’t turn up what I was looking for first.

I have two repositories, AAA and BBB, and I want them to end up looking like below. Also, I don’t want to keep using the old repositories, but I do most definitely want to see the full history of each file.

    AAA   
    AAA/aaa-oldAAA
    AAA/bbb-oldBBB

Or something along those lines anyway. I chose AAA to be the new final parent, so I started by moving all the original AAA files down a level. This was straightforward

    cd AAA
    mkdir aaa-oldAAA
    git mv x y z aaa-oldAAA
    git commit

I then did the same thing in the BBB repository.

Now, the fun, adding the other repository as a remote in this repository.

    cd AAA
    git remote add bbb-upstream /full/path/to/old/BBB
    git fetch bbb-upstream
    git checkout -b bbb-u-branch bbb-upstream/master

This is pretty neat. Right here, you’re only looking at the code from the BBB repository! If you git checkout master again, you’re back looking at your AAA/aaa-oldAAA repository. This makes sense when you think about it, nothing says that branches have to have the same or even related code in them.

Now, we just merge the bbb-u-branch into our local master!

   git checkout master
   git merge bbb-u-branch
   git remote rm bbb-upstream # no longer needed

Presto! Finito! The only problem I had was a merge conflict in the .gitignore files.

Note: to see the logs of files that have been moved, you need to use git log --follow filename.blah This has nothing to do with the dual merge however.

pyspatialite – spatial queries in python, built on sqlite3

I’ve been doing some work with spatial queries recently, and I really didn’t feel like setting up a full blown PostGIS setup, which is the “traditional” way, nor did I really feel like going and trying out these trendy NoSQL stores, like CouchDb and MongoDb, both of which apparently now support spatial work. Then I heard about pyspatialite.

I like python, and sqlite is lovely all those times you want to stuff a bunch of data somewhere, and not have to think too much about it. But, pyspatialite has virtually zero documentation, other than the hint that’s basically just a sqlite3 “standard” api on pyspatialite. Ok, well, let’s give it a go anyway, using Ubuntu 10.04,

Simple installation via sudo [easy_install pyspatialite|pip install pyspatialite] will fail miserably. The distribution includes the C for spatialite, and builds it’s own extension. I have no particular opinion on that either way but it feels a bit rough around the edges. Anyway, on a clean Ubuntu, you’ll need at least the following three packages, libgeos-dev libproj-dev python-dev Try and reinstall and now you should be good to go!

Ok, but now what? As there’s no real python examples, you need to follow the raw spatialite examples. I found these ok, but I wasn’t thrilled. Too much time spent with WKB and hex dumps of geometry and explaining sql.

So, here’s a couple of examples that actually use python, and some notes I found awkward. (I’m not a geo expert, and these are just some of the ways I’m doing it.)

First, actually creating some data, you can run these commands via pyspatialite, or from the command line. (For the command line tool, spatialite you can install spatialite-bin on Ubuntu 10.04, it’s not exactly the same version as comes built into pyspatialite, but it seems to work ok. It’s virtually identical to running sqlite3 from the command line)

CREATE TABLE bars(PKUID INTEGER PRIMARY KEY autoincrement,
                            name text NOT NULL, TYPE text, geometry BLOB NOT NULL);
SELECT RecoverGeometryColumn('bars', 'geometry', 4326, 'POINT', 2);

This will create a table, and create some magic behind the scenes to tell spatialite that the column named “geometry” in the “bars” table contains geometry data, which are POINTs, in the spatial reference id 4326 (good ol WGS84) POINTs could be something else, have a good read on OGC well known text stuff if you want to get into this. You can also create the geometry column by adding the column to an existing table, but I found that actually harder to understand. However, for completeness, here’s the same table as above, created the other way….

CREATE TABLE bars(PKUID INTEGER PRIMARY KEY autoincrement,
                            name text NOT NULL, TYPE text);
SELECT AddGeometryColumn('bars', 'geometry', 4326, 'POINT', 2);

Your choice. Anyway, moving on. That’s just a table, we want to put some data in…

from pyspatialite import dbapi2 as sqlite3
 
conn = sqlite3.connect("/home/karl/src/karltemp.sqlite")
c = conn.cursor()
# some data from somewhere....
bar = Bar(name="the pig and whistle", type="pub", lat="64.123", lon="-21.456")
c.execute("""insert into bars (name, type, geometry) 
             values (?, ?, ?, geomFromText('POINT(%f %f)', 4326))""" % (bar.lon, bar.lat),
             (bar.name, bar.type))

Well, that’s not as pretty as we’d like. See how we used both ? substitution and python % substitution? geomFromText() is a function provided by spatialite for making the right sort of background magic happen to put spatial data into that blob column we defined on our table. It seems sqlite doesn’t know how to put params inside the quoted strings. Oh well. sucks to be us. But we move on and insert a bunch of data.

Now, to use it, first, selecting the nearest 10 bars.

from pyspatialite import dbapi2 as sqlite3
 
conn = sqlite3.connect("/home/karl/src/karltemp.sqlite")
conn.row_factory = sqlite3.Row
c = conn.cursor()
lon = -21.9385482
lat =  64.1475511
c.execute("""select b.name, b.type, 
                  distance(b.geometry, 
                              geomfromtext('point(%f %f)', 4326))
                  as distance from bars b
                  order by distance desc limit 10""" % (lon, lat))
for row in c:
    log.info("bar: %s, type: %s, distance: %f", row['name'], row['type'], row['distance'])

4326 is the EPSG SRID for WGS84. Did that sentence mean nothing to you? You’re not alone. Suffice to say, if you want to work with data all over the world, and share your data with people who know even less about this, just stick with WGS84. (FIXME? Actually, after playing with this a bit more, this seems to have NO affect whatsoever for me)

Firstly, again note that we can’t use regular sql parameter escapes via the ? character. Secondly, this actually has terrible performance. The order by distance, even if limited to 10, means that it has to actually calculate the distance for all the bars in the table, then throw away all but the last 10 results.

Thirdly, the distances returned, what are those in? A little bit of probing with some fake data, and it seems that at least how I’m using it so far, this is NOT geospatial at ALL! This is purely cartesian!

spatialite> select distance(geomfromtext('point(60 60)', 4326), geomfromtext('point(59 60)', 4326));
1.0
spatialite> select distance(geomfromtext('point(60 0)', 4326), geomfromtext('point(59 0)', 4326));
1.0
spatialite>

I’m clearly doing something wrong. The distance between 60N 60E and 60N 59E is most definitely NOT the same distance as between 0N 60E and 0N 59E. It is however exactly 1 unit on a cartesian plane.

So, this post will have to be continued! Even if it’s only cartesian, if it does the indexes right, this could still be very useful, stay tuned, or, if you know what I’m missing, please feel very free to comment :)
SoapUI 3.6.1 is broken for REST, use 3.6.0 or 3.6.2-SNAPSHOT

That’s about all you need to know :) SoapUI 3.6.1 has a bug that causes duplicate requests to be made to REST endpoints. It will mostly seem to work fine, but you’re getting more requests to your server than you expected, with not quite the data you expected :) I’ve moved to a snapshot of 3.6.2, which seems to be working fine so far.

ttyACM ports missing with teensy arduino on Ubuntu

So, I was reverifying my teensyduino MRF24J40 code recently, and ran into a most infuriating problem, where the /dev/ttyACMXXX devices simply didn’t exist! I could upload code to the teensy via the arduino GUI, and teensy-halfkay could see the device ok, but lsusb didn’t show the device. Weird.

I found lots of stupid terrible advice around the internet, including such insanity as “mknod blah” to simply create the devices, and even such batshit crazy suggestions like updating the rxtx jars that arduino uses. No, no, no.

I still don’t realllly know what’s going on, but someone hinted that because my device might be flooding data out the “serial” (USB CDC ACM serial) port from the instant it’s connected, the linux detection might be getting confused.

Well, I could still program the device ok, somehow, so I tried simply programming the basic teensyduino blink demo. That worked, and it started blinking, and presto, ttyACM0 got created!

NOW I could reprogram with my own mrf24j40 demo code, and I could watch the output on ttyACM0 as expected. Good news.

Except, if I unplug the device, and plug it in again, ttyACM is gone, and doesn’t come back until I reprogram with something else.

Something’s clearly broken, and it happened recently, and I’m grumpy, but at least I have a terrible workaround :(

open source webmail packages review

Far from complete, but some notes on the few I tried. First, this is for a setup basically following this linode guide for postfix, dovecot and system user accounts. I’ve slightly modified it to work with multiple domains. [1]

I have a few requirements, first and foremost that it must be able to support multiple sender identities. This will be used by people who have mail from multiple accounts collected here, and they need to be able to reply as that account. Secondly, the address book must be able to support groups. My mother users the webmail while travelling, and she has come to depend on this. Thirdly, and not _quite_ as essential, it would be nice to be able to filter messages into a different folder. (I know that this could/should be done server side, but my mother wants to be able to do this herself, and a) she’s not going to configure postfix, and b) I’m not always going to be around to configure it and c) I don’t even (yet) know how to do that)

Imp – discarded due to excessive requirements. I’m not looking for groupware

Squirrelmail – near effortless install. apt-get install squirrelmail I then had to add an Alias/Directory config somewhere in apache. Squirrel provides the basic config in /etc/squirrelmail/apache.conf. I added this to my apache config, and presto, it all worked. Multiple identies works easily, but address groups comes via a poorly packaged and documented plugin, which I didn’t even bother trying out.

Atmail open / @Mail Open source – nice slick installer. Then pretty much epic fail. It is incompatible with dovecot out of the box. It tries to login with a full user@domain, which doesn’t work when I’m using system accounts. There’s a fairly well known hack to make it work, but this didn’t inspire confidence. Address groups worked out of the box, but you only get a single identity. (With the login hack, you can actually logout and back in again to get a new idenity, but that is just worthless)

Roundcube – I left this for last, as I’d heard it was notorious for being bloated, sluggish and full of security holes. It may have security holes, but most stuff does, and it’s certainly not bloated and sluggish anymore. I’m using version 0.5.1, and it is so far much much better than the rest, and the only one I’m going to be opening up for my mother to try out. Installation was not quite effortless, but pretty good. The installation instructions for setting up the db ahead of time are pretty good. [2] A slightly unusual copy/paste from the generated setup webpage to the config files on disk, but hey, it works pretty well.

Multiple identities work, and are intuitive to both setup and use. Address groups work, but are not quite as easy to use. The setup wasn’t instantly obvious (There’s a plus button on the bottom of the screen) and adding users to groups wasn’t immediately obvious either. You just drag them over the group name. :) I guess I’m used to older webmail clients :) Also, to send mail to a group, you need to start typing the name of the group in the To: field. I haven’t found a way to select a group/groups from a checkbox.

I ignored BlueMamba and IlohaMail for having no recent updates. I’d had quite enough of trialling webmail by now, and roundcube was clearly in front. I’d be interested in hearing any other suggestions though if anyone’s out there :)

  1. I had to add a virtual_alias_domains = ekta.is for each extra domain, and I had to add the base domain to the mydestination line in postfix’s main.cf file
  2. roundcube supports a few different databases, including sqlite, but only sqlite2 ?! what decade is this?