Category Archives: software

View only preferences for Android

Have you ever wanted to show a bunch of statistics, or read only config or something like that, and wished you could just use the built in PreferencesActivity like you can for user editable preferences?

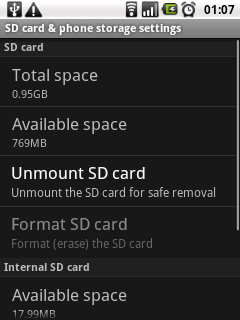
Just like how the stock android does for the “About Phone” page and the “SD card & phone storage” Android "preferences" that are uneditable

I wanted to have some figures like this in my own app, and I wanted them to show up under menu → preferences as well. Here’s how…

First, just declare a plain “Preference” in the layout, not an EditTextPreference or anything fancy, we’re going to make a pretty simple custom preference.

<PreferenceScreen xmlns:a="http://schemas.android.com/apk/res/android" a:key="PintyPrefs">
    <PreferenceCategory>
<!-- other stuff -->
    </PreferenceCategory>
    <PreferenceCategory a:title="stats">
        <Preference a:title="@string/preference_last_data_update"              
                            a:key="preference_lookup_key"
                            a:editable="false"
                            a:defaultValue="unknown"
                />
    </PreferenceCategory>
</PreferenceScreen>

Now, in your preferences activity, just stick in some code like this…

//.. onCreate/onResume..
        lastUpdatedPref = findPreference(preference_lookup_key);
        String lastUpdated = calculateYourStatisticsSomehow();
        lastUpdatedPref.setSummary(lastUpdated);

That’s it. You can see here how I’ve got it in my own preferences dialog

In my case I wanted to see when the supporting server for my app had last been updated.

Combining two git repositories into one

I went down some dead ends trying this, but it was pretty easy in the end. Here’s how I did it, because my search keywords didn’t turn up what I was looking for first.

I have two repositories, AAA and BBB, and I want them to end up looking like below. Also, I don’t want to keep using the old repositories, but I do most definitely want to see the full history of each file.

    AAA   
    AAA/aaa-oldAAA
    AAA/bbb-oldBBB

Or something along those lines anyway. I chose AAA to be the new final parent, so I started by moving all the original AAA files down a level. This was straightforward

    cd AAA
    mkdir aaa-oldAAA
    git mv x y z aaa-oldAAA
    git commit

I then did the same thing in the BBB repository.

Now, the fun, adding the other repository as a remote in this repository.

    cd AAA
    git remote add bbb-upstream /full/path/to/old/BBB
    git fetch bbb-upstream
    git checkout -b bbb-u-branch bbb-upstream/master

This is pretty neat. Right here, you’re only looking at the code from the BBB repository! If you git checkout master again, you’re back looking at your AAA/aaa-oldAAA repository. This makes sense when you think about it, nothing says that branches have to have the same or even related code in them.

Now, we just merge the bbb-u-branch into our local master!

   git checkout master
   git merge bbb-u-branch
   git remote rm bbb-upstream # no longer needed

Presto! Finito! The only problem I had was a merge conflict in the .gitignore files.

Note: to see the logs of files that have been moved, you need to use git log --follow filename.blah This has nothing to do with the dual merge however.

pyspatialite – spatial queries in python, built on sqlite3

I’ve been doing some work with spatial queries recently, and I really didn’t feel like setting up a full blown PostGIS setup, which is the “traditional” way, nor did I really feel like going and trying out these trendy NoSQL stores, like CouchDb and MongoDb, both of which apparently now support spatial work. Then I heard about pyspatialite.

I like python, and sqlite is lovely all those times you want to stuff a bunch of data somewhere, and not have to think too much about it. But, pyspatialite has virtually zero documentation, other than the hint that’s basically just a sqlite3 “standard” api on pyspatialite. Ok, well, let’s give it a go anyway, using Ubuntu 10.04,

Simple installation via sudo [easy_install pyspatialite|pip install pyspatialite] will fail miserably. The distribution includes the C for spatialite, and builds it’s own extension. I have no particular opinion on that either way but it feels a bit rough around the edges. Anyway, on a clean Ubuntu, you’ll need at least the following three packages, libgeos-dev libproj-dev python-dev Try and reinstall and now you should be good to go!

Ok, but now what? As there’s no real python examples, you need to follow the raw spatialite examples. I found these ok, but I wasn’t thrilled. Too much time spent with WKB and hex dumps of geometry and explaining sql.

So, here’s a couple of examples that actually use python, and some notes I found awkward. (I’m not a geo expert, and these are just some of the ways I’m doing it.)

First, actually creating some data, you can run these commands via pyspatialite, or from the command line. (For the command line tool, spatialite you can install spatialite-bin on Ubuntu 10.04, it’s not exactly the same version as comes built into pyspatialite, but it seems to work ok. It’s virtually identical to running sqlite3 from the command line)

CREATE TABLE bars(PKUID INTEGER PRIMARY KEY autoincrement,
                            name text NOT NULL, TYPE text, geometry BLOB NOT NULL);
SELECT RecoverGeometryColumn('bars', 'geometry', 4326, 'POINT', 2);

This will create a table, and create some magic behind the scenes to tell spatialite that the column named “geometry” in the “bars” table contains geometry data, which are POINTs, in the spatial reference id 4326 (good ol WGS84) POINTs could be something else, have a good read on OGC well known text stuff if you want to get into this. You can also create the geometry column by adding the column to an existing table, but I found that actually harder to understand. However, for completeness, here’s the same table as above, created the other way….

CREATE TABLE bars(PKUID INTEGER PRIMARY KEY autoincrement,
                            name text NOT NULL, TYPE text);
SELECT AddGeometryColumn('bars', 'geometry', 4326, 'POINT', 2);

Your choice. Anyway, moving on. That’s just a table, we want to put some data in…

from pyspatialite import dbapi2 as sqlite3
 
conn = sqlite3.connect("/home/karl/src/karltemp.sqlite")
c = conn.cursor()
# some data from somewhere....
bar = Bar(name="the pig and whistle", type="pub", lat="64.123", lon="-21.456")
c.execute("""insert into bars (name, type, geometry) 
             values (?, ?, ?, geomFromText('POINT(%f %f)', 4326))""" % (bar.lon, bar.lat),
             (bar.name, bar.type))

Well, that’s not as pretty as we’d like. See how we used both ? substitution and python % substitution? geomFromText() is a function provided by spatialite for making the right sort of background magic happen to put spatial data into that blob column we defined on our table. It seems sqlite doesn’t know how to put params inside the quoted strings. Oh well. sucks to be us. But we move on and insert a bunch of data.

Now, to use it, first, selecting the nearest 10 bars.

from pyspatialite import dbapi2 as sqlite3
 
conn = sqlite3.connect("/home/karl/src/karltemp.sqlite")
conn.row_factory = sqlite3.Row
c = conn.cursor()
lon = -21.9385482
lat =  64.1475511
c.execute("""select b.name, b.type, 
                  distance(b.geometry, 
                              geomfromtext('point(%f %f)', 4326))
                  as distance from bars b
                  order by distance desc limit 10""" % (lon, lat))
for row in c:
    log.info("bar: %s, type: %s, distance: %f", row['name'], row['type'], row['distance'])

4326 is the EPSG SRID for WGS84. Did that sentence mean nothing to you? You’re not alone. Suffice to say, if you want to work with data all over the world, and share your data with people who know even less about this, just stick with WGS84. (FIXME? Actually, after playing with this a bit more, this seems to have NO affect whatsoever for me)

Firstly, again note that we can’t use regular sql parameter escapes via the ? character. Secondly, this actually has terrible performance. The order by distance, even if limited to 10, means that it has to actually calculate the distance for all the bars in the table, then throw away all but the last 10 results.

Thirdly, the distances returned, what are those in? A little bit of probing with some fake data, and it seems that at least how I’m using it so far, this is NOT geospatial at ALL! This is purely cartesian!

spatialite> select distance(geomfromtext('point(60 60)', 4326), geomfromtext('point(59 60)', 4326));
1.0
spatialite> select distance(geomfromtext('point(60 0)', 4326), geomfromtext('point(59 0)', 4326));
1.0
spatialite>

I’m clearly doing something wrong. The distance between 60N 60E and 60N 59E is most definitely NOT the same distance as between 0N 60E and 0N 59E. It is however exactly 1 unit on a cartesian plane.

So, this post will have to be continued! Even if it’s only cartesian, if it does the indexes right, this could still be very useful, stay tuned, or, if you know what I’m missing, please feel very free to comment :)
SoapUI 3.6.1 is broken for REST, use 3.6.0 or 3.6.2-SNAPSHOT

That’s about all you need to know :) SoapUI 3.6.1 has a bug that causes duplicate requests to be made to REST endpoints. It will mostly seem to work fine, but you’re getting more requests to your server than you expected, with not quite the data you expected :) I’ve moved to a snapshot of 3.6.2, which seems to be working fine so far.

ttyACM ports missing with teensy arduino on Ubuntu

So, I was reverifying my teensyduino MRF24J40 code recently, and ran into a most infuriating problem, where the /dev/ttyACMXXX devices simply didn’t exist! I could upload code to the teensy via the arduino GUI, and teensy-halfkay could see the device ok, but lsusb didn’t show the device. Weird.

I found lots of stupid terrible advice around the internet, including such insanity as “mknod blah” to simply create the devices, and even such batshit crazy suggestions like updating the rxtx jars that arduino uses. No, no, no.

I still don’t realllly know what’s going on, but someone hinted that because my device might be flooding data out the “serial” (USB CDC ACM serial) port from the instant it’s connected, the linux detection might be getting confused.

Well, I could still program the device ok, somehow, so I tried simply programming the basic teensyduino blink demo. That worked, and it started blinking, and presto, ttyACM0 got created!

NOW I could reprogram with my own mrf24j40 demo code, and I could watch the output on ttyACM0 as expected. Good news.

Except, if I unplug the device, and plug it in again, ttyACM is gone, and doesn’t come back until I reprogram with something else.

Something’s clearly broken, and it happened recently, and I’m grumpy, but at least I have a terrible workaround :(

MRF24J40 with arduino (teensyduino)

Earlier, I’d been working in pure C land, but I know not everyone uses pure C, and sometimes, the arduino environment is a nice easy way to get something prototyped.

So, I turned my mrf24j40 library into an arduino library! It supports all the basic stuff for sending and receiving 802.15.4 frames in a non-beacon network. It’s been tested so far with teensyduino, but it doesn’t use any teensy specific features, so it should work just fine on any arduino style board that has SPI and three spare pins for the reset, interrupt and chip select pins.

You can get the library from github, and like any arduino library, just extract it into your arduino/libraries directory. There are examples for tx only, rx only, and two way data.

Get the MRF24J40 arduino library

The examples are about the extent of the documentation so far, but just email me with questions!

MRF24J40 with AVR SPI (atmega32u4) part3

Update 2011 Oct 6 See Christopher’s comments below! Specifically, line 172 might need to be removed, if you’re using this with a pure mrf24j40 network, or a network that doesn’t contain xbee series 1 devices!
Update 2011 May 29 The sample code and library have been substantially upgraded. See my newer post for the details

And now I have TX working too. The microchip datasheet is _reallly_ sparse on details, and you have to go and get a copy of the actual IEEE 802.15.4 spec (either 2003, or 2006, we’re only concerned with the specification of the MAC header)

I had some problems trying to reconcile bit ordering between the IEEE spec (MSB rightmost, most of the time) and the Microhip docs (MSB leftmost, most of the time) but from there it pretty much just worked. I have yet to try out acknowledgements, I was trying to keep it pretty simple, but working code is working code.

Except… The microchip docs say that you write out one byte with the header length, one byte with the frame length, (header plus packet body) then the header, then the packet body. No gaps anywhere. Try as I might, I had to leave a two byte gap after the header, and before the packet data, when writing to the MRF24J40’s tx normal fifo. (And allow for this in the “length” fields)

I thought I had the addressing modes wrong, and my first two bytes of packet data were being used as some sort of header field I didn’t understand, but I tried out 4 different addressing modes, and in all cases, the data on the received side passed all checksums, and was only consistent with there being a _gap_ in the fifo.

Strange, but workable, as long as you know it’s there. It still makes me feel uncomfortable though.

For reference, I’m using 16 bit (short) addressing for both source and destination, PAN ID header compression (only destination PAN ID is sent) with no security.

The library code is over at github and allows sending packets to existing series one xbee listeners just like this…

mrf_reset();
mrf_init();
// set our PAN ID
mrf_pan_write(0xcafe);
// set our local source address
mrf_address16_write(0x6001);
// send something to a given node
mrf_send16(0x4202, 4, "abcd");

MRF24J40 with AVR SPI (atmega32u4) part2

Update 2011 May 29 The sample code and library have been substantially upgraded. See my newer post for the details.

Good progress last night and today. I get an interrupt for each received packet, working in both promiscuous mode and normal mode.

A fair bit of code to get here, compared to using xbees, but SPI is much much faster, and you don’t need to dick around with baud rates and getting clock timing perfect. UARTs are terrible. From the datasheet, and the little bit of information you can find on the web, it seems that these modules have some rather odd silicon errata. It seems the original datasheet was completely wrong. This is the only thing that I can think of to explain why you need to set up so many registers just to get it to work. The defaults in the silicon are all worthless. Oh well :) It works :)

Note to self: be careful to use mrf_read_long() when you want to use a long address, the address spaces overlap, so using mrf_read_short works, just doesn’t return anything useful.

Working code to get this far, with an AVR host is over at github

MRF24J40 with AVR SPI (atmega32u4) part1

Ouch, this took a lot longer to get started than I thought. SPI is meant to be easy right? All my SPI reads from the MRF24J were returning 0xff.

Turns out that, even with the /SS pin disconnected, if you don’t explicitly set it as an output pin in the DDR register, the AVR falls out of SPI mode if it ever goes low.

So, even though the pin is not connected, (I’m using a general IO pin to do chip select on the radio module) nothing worked until I explicitly made it an output.

And now, presto, I can read data from the MRF24J properly now! Now we can finally move on to the rest of this bring up.

(The MRF24J40 is an 802.15.4 module, with a SPI interface. It’s about 6€, vs about 20€ for xbees, and is on a standard 2.54mm pin spacing, instead of xbee’s 2mm spacing)

Valentines day heart chaser

I’ll be doing something a bit more romantic for Konudagur, next week, but seeing as my girlfriend was working late on Valentines day, I took a break from wireless and frequency counters and software, and whipped up a little love heart.

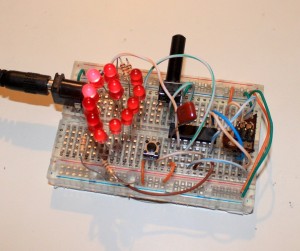
Valentines LED Heart chaser

Not much to it really, just a bunch of LEDs arranged in a heart, driven straight off general IO pins of an ATtiny84, with a pot to adjust the delay between parts. The heart is 12 LEDs, in three groups of four, and can do a nice slow chase, flicker, or appear solid on.

In reality, my board has some extra current limiting resistors, as I didn’t have 12 exactly the same LEDs, and the different diode drops between the different LEDs I had meant they couldn’t share the same resistors. In reality, I also tried to hook up a pushbutton and toggle between two patterns of lights, but I have forgotten everything I learned about switch debouncing, and ran out of time.

Code is available at github, considered to be public domain.

The schematic is available at github as well, in eagle format.
Valentines chaser schematic

And, here’s a video of it, you can see the different LEDs have a slightly different colour & intensity. (And that I turned the pot the wrong way at first :)