Category Archives: software

Static analysis for AVR code with Splint

Over on #avr, static analysis came up, particularly, getting Splint to run. _abc_ put this guide together, which I’ve reproduced verbatim below.

Running splint(1) on avr-gcc source code


Version 0.0 - tested 15.05.2012

by _abc_ @irc.freenode.org

software versions:
splint 3.1.2 compiled from source
avr-gcc-4.5.1 as supplied by Atmel (binary build for Linux)

Splint is a static C source code analyzer which can help
keep C source files and headers tidy and consistent. It can
also prevent a lot of silly errors, which is more important
in embedded C code than elsewhere. Many embedded code error
signals involve smoke, sparks, and lost devices.

Splint was never designed to run on embedded C, with its
extensions. In addition to that, splint has not been maintained
that much. The Wikipedia article on splint mentions that is is
'not relevant' as software anymore and that its Wikipedia page
should be removed. I disagree with that statement.

The following shows how splint (3.1.2) can be run successfully
on abr-gcc source code in 2012.

Checklist:

1. Install splint (it compiles cleanly from source on any gnu
compiler equipped system, using ./configure && make && sudo
make install). Alternately, get the distribution specific
package of splint if it exists.

2. Make a copy of your embedded source files for backup in case
something goes wrong.

3. Get used to the fact that the splint manual page is not so
useful. Running splint -help [something] 2>&1|less is much more
so. The pdf manual which comes in the package of splint 3.1.2 is
dated 2003 (proudly, on the first page). That's okay, since the
C standard most used today is dated 1999 (C99)...

4. Copy the following commands into a shell command file in
your project directory, and edit the relevant parts (path to
avr installed toolchain include, source file name etc):

--snip--
#
# splint-avr-gcc-code.sh 644
#
# V0.0 tested 15.05.2012 by _abc_ @ irc.freenode.org
#
# run the splint static source analyzer on a avr-gcc C source code file,
# in a avr-gcc compatible way.
#
# initial revision, tested with avr-gcc, throws lots of warnings on avr-gcc
# includes but runs AS LONG AS:
# i. __fuses and __lockbits sections are hidden from splint using 
#    #ifndef S_SPLINT_S
#      ...
#    #endif
# ii. any binary constants (0b000f) in the C source are either rewritten as
#   decimal or hex numbers, OR their sections are guarded as above, and
#   binary or hex values are provided instead.
#
# Comment: the splint parser should be patched to accept binary constants.
# The usual makefile used for project building should have a new section
# (target) called lint or splint which should lint the source. It can be
# easily written by adding the code below:
#

## adjust to suit your installation
AVR_TOOLCHAIN_INSTALLED_LOCATION="/some/where/" ;# edit me

SRC="mysource.c" ;# edit me, ONE source file per shell file for now

DEFS="-D__AVR_ATmega8__" ;# etc, edit this

#SPLINT_EXTRA_ARGS="-nolib"
## actually run
splint \
	-preproc \
	-unrecogcomments \
	$SPLINT_EXTRA_ARGS \
	-I${AVR_TOOLCHAIN_INSTALLED_LOCATION}/avr/include/ \
	$SRC
--snap--

5. while editing the required areas of the command file above, also 
read its header. It explains how the source can be splint proofed. It is
really easy. The -unrecogcomments comment is needed because there are
some semantic comments in the header files which throw errors. The other
ways to splint proof your code are explained by executing the commands:

  splint -help parseerrors 2>&1|less

in a shell.

6. splint should really be updated with embedded C extensions, especially
the 0b0001 style binary constant support.

7. avr-libc maintainers should run splint as above on sources which include
them (hello_world.c with just #include  and #include  are
enough for a start), as splint shows more than 90 warnings on running through
the avr-libc headers included by the simple main alluded to above at the
time of this writing.

-- the end --

Note, I haven’t actually used splint myself, on AVR code or regular desktop code. I do however endorse static analysis, having used PMD and friends on java code quite a lot. If you don’t like splint, or are looking for alternatives, perhaps something still being maintained, abcminiuser suggests Cppcheck, which covers both C and C++. There’s also the commercial Coverity and gimpel. I’ve not used any of these, but it seemed like such a worthwhile record that I was loathe to lose the discussion the depths of IRC logs.
Using netbeans for STM32 development with stlink (texane)

So, You got a STM32 Discovery board hey? Good for you! They’re cheap, and highly functional, but this ain’t your grandmother’s Arduino.

Here’s a rough and ready howto for developing in netbeans, and getting source level debugging for that code.

Required pieces

GNU arm toolchain installed and working.

I use summon-arm-toolchain for this. To test that it’s working, you can try any of the following:

You want to make sure that you can successfully compile via make from the command line first. If you can’t compile with the raw tools, netbeans isn’t going to magically fix that for you.

texane/stlink

A confusing name, but so be it. stlink (the software tool) provides tools for flashing STM32 chips via ST/Link v1 and v2 hardware. It also provides a gdbserver for debugging those chips. Get it from github (Sorry, there’s no tagged releases or anything yet, though there really should be)

Netbeans

Duh, this post is covering that. You need the c/c++ plugin and the gdbserver plugin. Download it here. For reference, I’m using 7.1 at the moment.

Setting up the toolchain in netbeans

  1. Click Tools->Options->C/C++
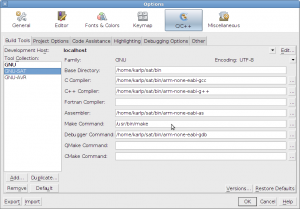
  2. Click on “Add” and set up a new toolchain for arm development. See the screenshot below
    Netbeans add tools dialog for gnu-arm

    Netbeans add tools dialog for gnu-arm

  3. Import your project as a makefile based project from existing sources. You can get netbeans to actually do all the compiling and things for you, but I find it hard to share the project that way. Not everyone uses netbeans, but makefiles are pretty portable.
  4. Build your project
  5. Flash your binary to the target. You can actually do this anyway you want, but we’ll use stlink’s st-flash tool.
    $ arm-none-eabi-objcopy -O binary your_project.elf your_project.bin
    $ /path/to/stlink/flash/st-flash write your_project.bin 0x08000000
    

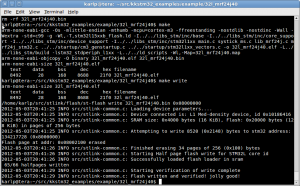
    Here’s a screenshot from my makefile. (You can set up run modes in netbeans to do this too, but that’s not the focus here)

    console log for make and upload via stlink

    make and upload via stlink

  6. Start stlink’s gdbserver.
    karlp@tera:~/src/stlink$ ./gdbserver/st-util 
    2012-05-03T20:44:56 INFO src/stlink-common.c: Loading device parameters....
    2012-05-03T20:44:56 INFO src/stlink-common.c: Device connected is: L1 Med-density device, id 0x10186416
    2012-05-03T20:44:56 INFO src/stlink-common.c: SRAM size: 0x4000 bytes (16 KiB), Flash: 0x20000 bytes (128 KiB) in pages of 256 bytes
    Chip ID is 00000416, Core ID is  2ba01477.
    init watchpoints
    Listening at *:4242...
    
  7. Whew, ok, just about there. Now in netbeans, choose “Debug->Attach debugger”.
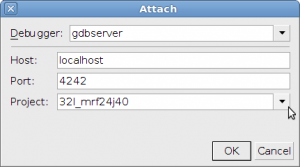
  8. Choose “gdbserver” and make sure you put in the right host and port, (normally localhost, and 4242) and make sure it’s set to debug your project.
    screenshot for netbeans gdbserver attach dialog

    gdbserver-attach

  9. MAKE SURE you have set at least one breakpoint first. Something in netbeans doesn’t like adding breakpoints while it’s running, and it doesn’t like pressing the pause button. (but see the footnotes)
  10. Profit…
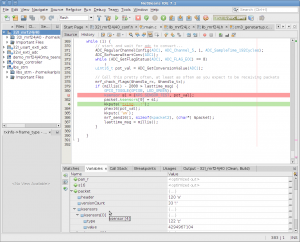
    screenshot showing netbeans Source debugging STM32 via stlink gdbserver

    Source debugging STM32 via stlink gdbserver

  11. That’s it. If any of the steps are glossed over too much, mail me and I’ll try and update to clarify.

    Sidenote: If you didn’t set any breakpoints in netbeans first, or you pressed pause, or you double clicked in the gutter to add some breakpoints, and nothing happened, you’ve hit whatever weirdness is in the gdbserver plugin. This problem is reported with other stm32 gdbservers, so it doesn’t appear to be a problem with stlink, but with netbeans. You can wake up netbeans again with kill -INT $(pidof arm-none-eabi-gdb)
    Thanks to gsmcmullin on ##stm32 on irc.freenode.net for that gem.

    Update for netbeans 7.2: Apparently you now have to put “target localhost:4242” into the gdbserver box, not just “localhost:4242”.

MRF24J40 driver for STM32

A while ago I put together a C driver for the MRF24J40 802.15.4 modules from microchip. I had been using them as a cheap alternative to xbees in some AVR projects. As I’ve been moving on to STM32 parts for hobby projects, (more power, cheaper) I started off porting my driver code from AVR over to cortex m3.

This has been quite an experience. The arm toolchain experience, and particularly the libc support and general documentation is completely different to, say, avr-libc (AVR-libc is a great project, reallly solid)

However, with lots of learning, and lots of mistakes, I’ve got it all working. It’s a first cut, but the basic features are there. There’s no magic for DMA, and you have to do a lot of the pin setup yourself, but this is Cortex M3, there’s so many pins you could be using for this! I’ve tried to reduce the required function calls as much as possible, but there’s still room for improvement.

    // Required by the user code
    extern void mrf_select(void);  // Chip select, if necessary
    extern void mrf_deselect(void);  // chip deselect, if necessary
    extern uint8_t spi_tx(uint8_t cData);
    extern void _delay_ms(int);  // only used at init time.

This still needs to move to a clear sub project, currently it’s a separate code base to the AVR code.

Get the code now!

More to come, as it gets tidied up and put into use!

Mailers and attached patches

The patch submission policy to open source projects is about as diverse as the number of projects. One policy that comes up fairly often is, “Email submission to blah-developers@example.org. Entire message plain text only, with patch inline, not as an attachment.” Apparently this is so that someone, somewhere, using some sort of mail agent can review the patch while reading their email, and still save the patch cleanly to be applied.

Projects with this sort of policy tend to enforce it rather fanatically. It also means that the list is often covered in reposts of patches, and complaints, about, “Your mailer has mangled your patch (spaces to tabs or vice versa), please fix it and resend” or, “Your mailer has sent the patch as an attachment instead of inline, please resend.” or even just the friendly, “You’ve sent a html message, don’t do that

Really? That’s the world we’re living in? What mailer in the world won’t let you view a plain text attachment inline? We’re in some lowest common denominator worldview, where for half the people, the answer is NOT USE their email mailer, but an entirely separate program, just for sending patches. (git-send-email)

One the one hand, yes, this sort of policy keeps out amateurs. It also makes damn sure that no amateur ever gets any better. It makes sure that only previously established members can ever submit anything. It’s one of the least friendly ways of accepting work I’ve ever dealt with. And somehow this is OK. I say we’ve failed, and we’ve failed on purpose, and I don’t understand it.

netbeans debug gdbserver: “Invalid argument”

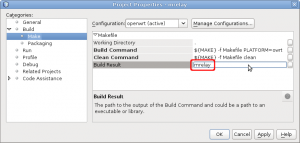
I was trying to do some remote debugging via gdbserver the other day, using netbeans. I knew I’d had this working before, but I kept getting a rather bizarre (to my mind) error dialog:

I could connect happily via gdb on the command line, and on a whim I tried a different project in netbeans, which worked as expected. A bit more thought, and some comparison in the project properties showed up what was missing, the name of the binary output built for this project. After filling it in again everything works just fine :)

(This is with Netbeans 7.0.1, we won’t get into why it didn’t detect from the Makefile what the binary output was, when it runs quite fine in the non-cross configuration)

Getting started with ARM Cortex-M3 (STM32L1xxx) programming

So yeah, we fixed the linux development and programming tools for the STM32 series of ARM cortex M3 chips. And I spent quite a few weeks getting distracted by the tools, and never got around to actually developing for the platform.

Today I sat down to try and wire up a Microchip MRF24J40MA 802.15.4 module to the STM32L discovery board. Seemed straight forward enough, “what pins are for SPI”

“…..” What the… These pins could be anywhere! The reference manual doesn’t say, it refers to the datasheet, which has a table, “Table 5, Alternate function input/output” on page 35 of the actual device datasheet, revision 4. That table says that there are two SPI ports, and they can be made available on a variety of pins. Apparently, SPI1 and SPI2 can be made available on two separate sets of pins each!

All well and good, but how? That’s for another day :)

Traps for new players, select() and FD_ISSET

So, you’re moving up into the world of multiple active tcp connections, and you know that you don’t want to poll them, but you haven’t learnt about libevent yet, or even heard of it perhaps. So you’re using select(), and it all seems pretty cool and groovy.

However, there’s a trap! when select returns, remember that it MODIFIES the fdsets, you need to reset the fd sets before each call to select(), and use FD_ISSET after the call to see which fd was hit.

Oh, and most importantly, more than one fd can trigger select to return. So don’t make any assumptions that FD_ISSET will only find a single fd.

Review of Íslandsbanki Android App

Íslandsbanki has started offering a smartphone app, with access to your accounts, make transfers, and a bunch of things they probably shouldn’t have bothered with. Having ran into issues once or twice where I wished I could just transfer some money on the spot, rather than having to find a computer, or remember some account numbers, I thought this had potential. Here’s my review of the android version, version 1.1.0. I wrote a review for the android market, or at least started to, but it requires reviews be twitter length. Here’s the full review…

Things that are just bad, silly or outright wrong

  • Requires camera permissions. This seems to be for the built in QR code reader.
    1. There’s no need for building in a QR code reader! I have a separate app for that! This is a banking app!
    2. It crashes on my phone, (vodafone 845, android 2.1)
  • Requires directly call permissions. This seems to be for the “connect me to a branch” feature. This is a common feature, that is commonly done badly. Instead of requesting permissions to directly call numbers, (which allows you to call any number anytime) the app should simply fire the android intent to request a call. This has the benefit for the user that a) they see what call is about to be made, b) they can choose to complete the call with a different service, such as skype, rather than the regular dialer, and c) it properly integrates with any other phone call apps, that might record, or track for the user.
  • It’s an iPhone app? This is my only explanation for the UI. The back button and the menu button do nothing at all. There are UI buttons if you scroll down, and a cog wheel settings type icon that you have to press. Likewise, the currency converter section uses a custom built UI, rather than the built in android input methods. This means it looks different, the cursors are messed up, and the backspace button behaves weirdly. Really, use the built in input methods! Just make it a text box, with the numeric hints!
  • The login screen has a font problem with the password
  • The login screen doesn’t switch to numeric for the “auðkennisnumer” field
  • Not all my accounts are shown! “Mína siða” only shows the top 2 accounts, plus the first credit card account. I have an empty account in position 2, so it doesn’t show the main account. (It does show up in my list of accounts)
  • The screen showing the list of transactions is badly scaled and centered.
  • The list of transactions doesn’t allow showing the full transaction details

The rest

Well, it does mostly work though. That’s something I guess. However, a half decent mobile stylesheet for the general website would probably have done just as well or better, and been a whole lot less work. If you’re going to make it native, it should be done properly.

C UnitTests with Check, and reporting in Jenkins/Hudson

Update 20110910 – This is now available as a standard feature in the current xUnit plugin for Jenkins/Hudson.

I’ve gotten quite spoilt over the years with things like Jenkins/Hudson, and automated test tools magically creating output that Jenkins understands, and magically creating pretty graphs and charts. But that is working in Java and python, where unit tests are common and easy. Working in raw C, this isn’t quite so common, nor quite so easy. I’ve been wanting to add unit testing to my C code for a while, and with a new task at hand, and having finally gotten Jenkins set up, it was time to get this done

I found http://stackoverflow.com/questions/65820/unit-testing-c-code and given the number of votes, gave Check a go. I had a few niggles with makefiles and library load paths and so on, (Isn’t C coding fun?) but then it was beautifully and happily giving me nice output on the command line.

XML output for Jenkins was another story. Check supports XML output, with just a single line of config in the test suite, but it’s yet another format. The regular standard JUnit plugin didn’t recognise it, and the xUnit plugin, depsite supporting almost a dozen other tools outputs, didn’t support Check. So much for Check being big and popular. However, the xUnit plugin does support applying a custom XSL stylesheet to your tool’s results. So I made a basic XSL for converting Check’s results into something compatible. And now I have pretty charts and graphs for my raw C code too. Whee

 
<xsl:stylesheet version="1.0"
xmlns:xsl="http://www.w3.org/1999/XSL/Transform"
xmlns:ck="http://check.sourceforge.net/ns"
exclude-result-prefixes="ck"> 
   <xsl:output method="xml" indent="yes"/> 
 
<xsl:variable name="checkCount" select="count(//ck:suite/ck:test)"/>
<xsl:variable name="checkCountFailure"
select="count(//ck:suite/ck:test[@result='failure'])"/>
<xsl:variable name="suitename" select="//ck:suite/ck:title"/>
 
<xsl:template match="/"> 
      <testsuite> 
         <xsl:attribute name="errors">0</xsl:attribute>
         <xsl:attribute name="tests"> 
          <xsl:value-of select="$checkCount"/> 
         </xsl:attribute> 
         <xsl:attribute name="failures"> 
          <xsl:value-of select="$checkCountFailure"/> 
         </xsl:attribute> 
         <xsl:attribute name="name"> 
            <xsl:value-of select="$suitename" /> 
         </xsl:attribute> 
         <xsl:apply-templates /> 
      </testsuite> 
   </xsl:template> 
 
<xsl:template match="//ck:suite/ck:test">
    <testcase>
      <xsl:attribute name="name">
        <xsl:value-of select="./ck:id"/>
      </xsl:attribute>
      <xsl:attribute name="classname">
        <xsl:value-of select="$suitename" /> 
      </xsl:attribute>
      <xsl:attribute name="time">0</xsl:attribute>
      <xsl:if test="@result = 'failure'">
        <error type="error">
          <xsl:attribute name="message">
            <xsl:value-of select="./ck:message"/>
          </xsl:attribute>
        </error>
      </xsl:if>
    </testcase>
</xsl:template>
 
<!-- this swallows all unmatched text -->
<xsl:template match="text()|@*" /> 
</xsl:stylesheet>

Known issues:

  • Check reports the duration of the entire testsuite. Junit expects a time per test. I tried putting the duration element from Check on the top level suite, but Jenkins ignored it.
  • The “classname” is a bit funky, but so be it.

JENKINS-10909 is tracking this as a feature over on their issue tracker.

As a friend said, “xml is just like violence. if it’s not solving your problem, use more.”

OpenSSL PEM_read_RSA_PUBKEY vs PEM_read_RSAPublicKey

File this in the “Everybody hates OpenSSL’s API” category. From the expansive documentation:

The RSAPublicKey functions process an RSA public key using an RSA structure. The public key is encoded using a PKCS#1 RSAPublicKey structure.

The RSA_PUBKEY functions also process an RSA public key using an RSA structure. However the public key is encoded using a SubjectPublicKeyInfo structure and an error occurs if the public key is not RSA.

Seeing as I’m in the “PEM” functions, so at least in theory, I’m using methods for processing files that look like this:

-----BEGIN PUBLIC KEY-----
MIIBIjANBgkqhkiG9w0BAQEFAAOCAQ8AMIIBCgKCAQEAxKMFS0eoDxn6YltlCM4P
uIHK1bp3+7Lt0aWZ9rimjd4uvx49ZYT1DKrUZi96rUkzdJuCqtYbFtUVAy0V5AtZ
EtQGRoZBN5JQ9u80I8NNS4jhtHZU2i6CY9Aeb6KHY790ceD+lMCbXCgrtl1yPUVE
s8pFwEwO2Vqjim2pO0iVsAzUJAyppjn/7FjxyqOHZHL+OPi7vNule1V9OdVrb9m3
mHVy3u9LWdA+3Ch/YJe8FgenRncQEVrDbA/0wHlRE5fH+nQ9OwPTDYP6A6pphAbk
ZUhc9VjIDKrTCQP2o4RDLz0OKyBs5xZc7vjGXpHG+kL3OVpHxpSrK9EVGIX65ofN
9QIDAQAB
-----END PUBLIC KEY-----

I’ve got no idea where the PKCS#1 vs SubjectPublicKeyInfo comes into it when I’m just trying to load that file. Regardless, the only one that works is PEM_read_RSA_PUBKEY()