Category Archives: infrastructure

Emby and Jellyfin with Podman

I had some “unplanned outages” with my home infrastructure, and had to quickly get something up to watch some TV. I was planning on running plex again, when the “main” infrastructure is up again, but took a moment to try out Emby and Jellyfin, to see what they’re like. I’m just running them as quick demos from my main PC, so I had zero intention of setting up some permanent custom linux. And I’ve gotten pretty happy with podman these days, instead of root docker, so….

Emby

$ podman run -d -p 8096:8096 -v $(realpath some-place-to-keep-config):/config:z  -v /mnt/<some local path to tv>:/mnt/share-tv:z emby/embyserver:latest

Pretty normal really. Add as many volume maps as you need for different media types, remembering that everything for the last X years insists that tv and movies are kept in entirely separate top level directories…. for… reasons…. The :z is “normal” to get the mapping permissions right

I’ve not yet tested whether it’s finding things well with local web browsing, might need a –network=host but… nothing special.

Jellyfin

Same same…. Just had to map the port differently, as I was running them both side by side to give them a try…

$ podman run -d -p 8097:8096 -v $(realpath media-jellyfin/config):/config:z -v $(realpath media-jellyfin/cache):/cache:z  -v /mnt/blah/somewhere/tv:/mnt/share-tv:z jellyfin/jellyfin:latest

Now to just see how they both go?

Podman and OpenCart

I have been doing some experiments with shopping cart systems, and was trying to run them on podman for some “quick” testing. (I’m not much of a container expert, but I don’t have a php setup on my workstation right now, so this seemed like a good time to become one)

Now, OpenCart installation instructions are super manual but that shouldn’t be too hard right?

Well, after a bit of faffing around, looking for an nginx+php-fpm container ready to go, I just fell back and tried:

$ podman run -p 8081:80 -d -v ./opencart-4.0.2.1/upload:/var/www/html php:8-apache

This runs ok, but you’ll instantly get problems trying to access it:

Warning: mkdir(): Permission denied in /var/www/html/system/storage/vendor/twig/twig/src/Cache/FilesystemCache.php on line 50
Warning: file_put_contents(/var/www/html/system/storage/logs/error.log): Failed to open stream: Permission denied in /var/www/html/system/library/log.php on line 34
Warning: file_put_contents(/var/www/html/system/storage/logs/error.log): Failed to open stream: Permission denied in /var/www/html/system/library/log.php on line 34RuntimeException: Unable to create the cache directory (/var/www/html/system/storage/cache/template/c3). in /var/www/html/system/storage/vendor/twig/twig/src/Cache/FilesystemCache.php on line 53

Ok… you are clever and wise, and have been around computers. You understand, in your bones, that podman’s rootless containers means that “apache” is really running as your normal user id, but thinks it has another id inside the container. You do a lot of reading about “podman unshare” but, you really don’t give a shit what fucking UID is being used inside the php apache container?! You finally find what sounds like the right solution, which sounds exactly right, but… not… quite?

$ podman run -p 8082:80 -d --userns=keep-id -v ./opencart-4.0.2.1/upload:/var/www/html php:8-apache
0e726377f1ecdf7120cdd74f9c9b89b424eba6602c01c167440da91e7069685a

$ podman logs -l
AH00558: apache2: Could not reliably determine the server's fully qualified domain name, using 10.0.2.100. Set the 'ServerName' directive globally to suppress this message
(13)Permission denied: AH00072: make_sock: could not bind to address [::]:80
(13)Permission denied: AH00072: make_sock: could not bind to address 0.0.0.0:80
no listening sockets available, shutting down
AH00015: Unable to open logs

Ok, this is because apache runs as root to bind port 80 inside the container, even though you’re always going to map it from the outside anyway, that sucks. Ok, one more bit of magic right? We can just tell the container that it’s allowed to bind to low ports!

podman run -p 8083:80 -d --userns=keep-id --sysctl net.ipv4.ip_unprivileged_port_start=0 -v ./opencart-4.0.2.1/upload:/var/www/html php:8-apache

And you finally get the OpenCart installation page at http://localhost:8083 None of this addresses the rest of the installation, like “removing the install folder once you’re done” and “configure mysql…”

Jenkins agent systemd unit file

So, you try to setup an agent, and instead of getting a nice package or anything, you get told, “run this long java command line app” …. wat. Here’s a (very) basic system unit file to run your agent. You can copy the command lines from what jenkins provides itself.

$ cat /etc/systemd/system/jenkins-agent.service 
[Unit]
Description=My radical Jenkins agent
Wants=network-online.target
After=network-online.target

[Service]
ExecStart=/usr/bin/java -jar /var/opt/jenkins-agent/agent.jar -jnlpUrl https://radical.example.org/computer/blah/slave-agent.jnlp -secret @/var/opt/jenkins-agent/my.jenkins.secret-file -workDir /var/opt/jenkins-agent
Restart=always
RestartSec=10

[Install]
WantedBy=multi-user.target

(And remember, JDK8 for your agent, until https://issues.jenkins-ci.org/browse/JENKINS-63313 is fixed)

Then, just systemctl enable jenkins-agent and systemctl start jenkins-agent.

Using SWO/SWV streaming data with STLink under linux – Part 1

This is part 1 in a short series about using the SWO/SWV features of ARM Cortex-M3 devices [1]
This post will not explain what SWO/SWV is, (but trust me, it’s cool, and you might work it out by the end of this post anyway) but will focus on how to use it.

First, so you have a little idea of where we’re going, let’s start at the end…

enum { STIMULUS_PRINTF }; // We'll have more one day
 
static void trace_send_blocking8(int stimulus_port, char c) {
        while (!(ITM_STIM8(stimulus_port) & ITM_STIM_FIFOREADY))
                ;
        ITM_STIM8(stimulus_port) = c;
}
 
int _write(int file, char *ptr, int len)
{
        int i;
        if (file == STDOUT_FILENO || file == STDERR_FILENO) {
                for (i = 0; i < len; i++) {
                        if (ptr[i] == '\n') {
                                trace_send_blocking8(STIMULUS_PRINTF, '\r');
                        }
                        trace_send_blocking8(STIMULUS_PRINTF, ptr[i]);
                }
                return i;
        }
        errno = EIO;
        return -1;
}

You can get this code from either:

  • My github repository
  • The swo-1-printf directory in swo-stlink-linux-1

    That’s all[2] you need to have printf redirected to an ITM stimulus port. It’s virtually free, doing nothing if you don’t have debugger connected. [3]

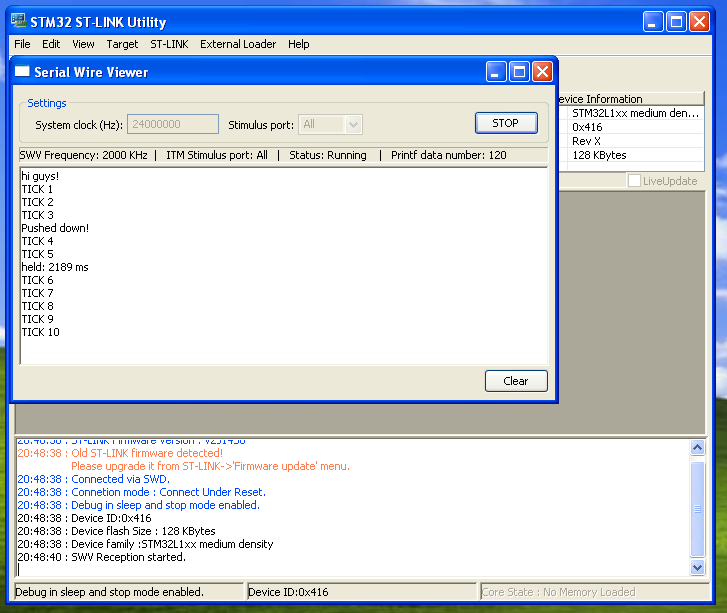
    Groovy. If you have the Windows STLink Utility, you can use this right now. Enter the correct clock speed of your main app, and choose stimulus 0 (or all) and watch your lovely console output.

    stlink-windows-swv

    Ok, that’s cool, but weren’t we going to do this in linux? We were, and we will, but let’s stop here with a good working base, so we can focus on just the extra stuff later.

    [1] Cortex M4 too, but not M0, that’s another day altogether. Specifically, STM32L1 parts, but the concepts and code are the same
    [2] Expects you have your general makefiles all set up to do “the right thing” for newlib stubs and so on.
    [3] Except for generating the formatted string of course, that’s not free. And it does take a _little_ bit of time to write the characters out without overflowing, but that’s a story for another day.

Installing Eagle (5.12) on Fedora 17 (64bit)

Eagle is only provided as a 32bit package for linux, even as of version 6.3. I’m still using 5.x, for compatibility reasons, so I was trying to get it installed on my newish Fedora 17 64 bit install. Eagle’s #1 FAQ item is how to do this, but it’s for fedora 10, and some of the packages have changed. You also don’t need to install as many, as some of them will be pulled in as dependencies.

  • glibc.i686
  • libXrender.i686
  • libXrandr.i686
  • libXcursor.i686
  • freetype.i686
  • fontconfig.i686
  • libXi.i686
  • libpng-compat.i686
  • libjpeg-turbo.i686
  • libstdc++.i686
  • openssl-devel.i686

There, much better.
Updated with corrections 2013-Nov-18

Automatic OpenWRT builds and conflicting package versions

I’m doing some automated builds of OpenWRT here, and was running into problems with the .config file, package dependencies and versions across multiple feeds. Specifically, I have a very very tiny .config file that lists a package and platform, and that pulls in just about everything else it needs. However, depending on the order of feed update and install, (And particularly, when using ./scripts/feeds/install -a) the wrong version of one of the dependencies was being pulled in.

Now, if all feeds were instantly and magically updated in the OpenWRT upstream repository, this wouldn’t be a problem of course :) Unfortunately, that problem isn’t going away, so what to do?

Well, basically, get simpler. Originally I had a giant .config file copied out of a manually configured buildroot, a feeds.conf with all sources, and the build script ran

  1. ./scripts/feeds/update -a && ./scripts/feeds/install -a
  2. make -j5 V=s

That way’s crap. The new way runs with a much much much smaller .config file, onyl about 10 lines (enough to specify the platform, a “master” package that depends on what we want, and one or two things we explicitly don’t want) Then, it’s a matter of calling feeds install -p feedname -a IN ORDER so that if there’s a package in one feed that depends on a package in another feed, that the dependency’s feed is installed first.

Specifically, this happened here when our “master” project depended on mosquitto, which is both in the stock feed for trunk, (at v0.15) as well as in the company maintained public feed (at v1.0.3) The order of the install -a call was pulling in the mosquitto dependency from trunk first.

So, the new cool way…

  1. cp tiny.config .config
  2. ./scripts/feeds update -a
  3. ./scripts/feeds install -a -p owrt_pub_feeds
  4. ./scripts/feeds install -a -p private_feeds
  5. make defconfig
  6. make -j5 V=s

Much better.

Joining linux to an AD domain for DNS

So, we have an ActiveDirectory domain at work “blah.local” on some sort of microsoft small business server or something. We also have a pile of linux virtual machines where all the fun stuff happens. They get IPs and external network connections and DNS resolution just fine from the windows DHCP/DNS server, but the machine names never get registers in DNS anywhere, so all of us internal users have to try and remember which IP address is which machine.

This is actually easy to fix, but it’s a little unusual. First, you will neeed the username and password of a user with domain admin rights. (You only need this to join the machine to the domain in the first place)

$ sudo apt-get install likewise-open
$ sudo domainjoin-cli join blah.local karlp
Joining to AD Domain:   blah.local
With Computer DNS Name: tinyweb.blah.local

karlp@BLAH.LOCAL's password: 
SUCCESS
You should reboot this system before attempting GUI logins as a domain user.
$ sudo lw-update-dns 
A record successfully updated in DNS
PTR records successfully updated in DNS
$ cowsay 'profit!!!!!'
 ____________
< profit!!!! >
 ------------
        \   ^__^
         \  (oo)\_______
            (__)\       )\/\
                ||----w |
                ||     ||
$

You’ll now be able to use the machine names from any other machine in the network that’s using the windows dns server

C UnitTests with Check, and reporting in Jenkins/Hudson

Update 20110910 – This is now available as a standard feature in the current xUnit plugin for Jenkins/Hudson.

I’ve gotten quite spoilt over the years with things like Jenkins/Hudson, and automated test tools magically creating output that Jenkins understands, and magically creating pretty graphs and charts. But that is working in Java and python, where unit tests are common and easy. Working in raw C, this isn’t quite so common, nor quite so easy. I’ve been wanting to add unit testing to my C code for a while, and with a new task at hand, and having finally gotten Jenkins set up, it was time to get this done

I found http://stackoverflow.com/questions/65820/unit-testing-c-code and given the number of votes, gave Check a go. I had a few niggles with makefiles and library load paths and so on, (Isn’t C coding fun?) but then it was beautifully and happily giving me nice output on the command line.

XML output for Jenkins was another story. Check supports XML output, with just a single line of config in the test suite, but it’s yet another format. The regular standard JUnit plugin didn’t recognise it, and the xUnit plugin, depsite supporting almost a dozen other tools outputs, didn’t support Check. So much for Check being big and popular. However, the xUnit plugin does support applying a custom XSL stylesheet to your tool’s results. So I made a basic XSL for converting Check’s results into something compatible. And now I have pretty charts and graphs for my raw C code too. Whee

 
<xsl:stylesheet version="1.0"
xmlns:xsl="http://www.w3.org/1999/XSL/Transform"
xmlns:ck="http://check.sourceforge.net/ns"
exclude-result-prefixes="ck"> 
   <xsl:output method="xml" indent="yes"/> 
 
<xsl:variable name="checkCount" select="count(//ck:suite/ck:test)"/>
<xsl:variable name="checkCountFailure"
select="count(//ck:suite/ck:test[@result='failure'])"/>
<xsl:variable name="suitename" select="//ck:suite/ck:title"/>
 
<xsl:template match="/"> 
      <testsuite> 
         <xsl:attribute name="errors">0</xsl:attribute>
         <xsl:attribute name="tests"> 
          <xsl:value-of select="$checkCount"/> 
         </xsl:attribute> 
         <xsl:attribute name="failures"> 
          <xsl:value-of select="$checkCountFailure"/> 
         </xsl:attribute> 
         <xsl:attribute name="name"> 
            <xsl:value-of select="$suitename" /> 
         </xsl:attribute> 
         <xsl:apply-templates /> 
      </testsuite> 
   </xsl:template> 
 
<xsl:template match="//ck:suite/ck:test">
    <testcase>
      <xsl:attribute name="name">
        <xsl:value-of select="./ck:id"/>
      </xsl:attribute>
      <xsl:attribute name="classname">
        <xsl:value-of select="$suitename" /> 
      </xsl:attribute>
      <xsl:attribute name="time">0</xsl:attribute>
      <xsl:if test="@result = 'failure'">
        <error type="error">
          <xsl:attribute name="message">
            <xsl:value-of select="./ck:message"/>
          </xsl:attribute>
        </error>
      </xsl:if>
    </testcase>
</xsl:template>
 
<!-- this swallows all unmatched text -->
<xsl:template match="text()|@*" /> 
</xsl:stylesheet>

Known issues:

  • Check reports the duration of the entire testsuite. Junit expects a time per test. I tried putting the duration element from Check on the top level suite, but Jenkins ignored it.
  • The “classname” is a bit funky, but so be it.

JENKINS-10909 is tracking this as a feature over on their issue tracker.

As a friend said, “xml is just like violence. if it’s not solving your problem, use more.”

Early impressions with PyDev 2.2 and Eclipse 3.7

I’ve been happily using netbeans for C/C++ and python work, which works well enough to not really complain much. Mostly, I want IntelliJ for C code. I find eclipse big and clunky and awkward on the keyboard, and just generally a pain. No Eclipse, I do NOT want to have some sort of “workspace” I want you to just leave things where they are on the disk. Anyway, in Oracle’s infinite wisdom, they are continuing to destroy things that Sun built, and python support has been dropped in netbeans 7. A pity, as netbeans 7 added some nice debugging support for C/C++, and netbeans is much more tightly integrated than eclipse. Still a pale shadow of IntelliJ, but I digress.

So, I had to go and look for some alternative python editors. I’m currently trying out PyDev 2.2 with Eclipse 3.7. It mostly works ok too. It’s capable of running some unit tests, and has the basic highlighting and so on. However, it’s completion is not as good as I would like, nor think it should be. Take this for example.

def something(self):
    self.mylist = []
    # on this line, self.mylist. will give me the full builtin completion for lists
    self.otherlist = "blah blah".split()
    # split returns a list, but self.otherlist. has no completion here

It seems this can be worked around by “pre declaring” the type.

def something(self):
  self.somelist = []
  self.somelist = "blah blah".split()
  # self.somelist. produces full completion for list here....

This is…. odd?

Possibly related is that in python unit tests, I at least, normally use the self.assertEquals(left, right, msg) form, probably because I came from Java. However, self.assertEquals in PyDev doesn’t give me any completion guidance on the parameters at all. It turns out that in the implementation of python’s unittest, assertEquals is simply an alias for another function (assertEqual = assertEquals = failUnlessEqual) For whatever reason, this means that I get full completion and parameter help if I use the _real_ implementation, failUnlessEqual but no advice/help whatsoever if I use the assertEquals form.

Google says this is unhelpful.

  • “self.assertEquals python” returns 74300 results
  • “self.failUnlessEqual python” returns 35800 results

Update: this assertEquals vs failUnlessEqual is apparently only a problem for python < 2.7. Unfortunately debian stable (squeeze) at present still uses python 2.6 :( In more mundane items, I would _really_ like to know how to get IntelliJ's "ctrl-W" shortcut, for expanding a selection. (From the cursor in the middle of "karl" in the following line, 'self.wop = "this is karl in python".split()', pressing ctrl-w once would highlight 'karl', once more would select 'this is karl in python' (without the quotes), once more with the quotes, and then on to the entire rvalue, then the entire line. This stackoverflow post mentions a solution, but it doesn’t seem to work in PyDev windows, even after getting into the keymap and adding a “Select Enclosing Element” for the PyDev views (or the editor scope? the difference being?) it still doesn’t work.

Oh well, life goes on.

avrdude 5.10, arduino mega 2560, command line uploading

Note: The following probably applies to the arduino UNO as well, as it also uses an onboard atmega 8u2, rather than the old raw serial converter.

Part 1 of probably many. I’ve inherited some arduino code, targetting the quite new mega2560 boards. You know, the ones that include an onboard atmega8u2, rather than the original old serial adapters. In many ways, this is a welcome step into the future. Anyway, this place doesn’t even have a regular AVR ISP programmer, and with the onboard real usb, the code running on the 8u2 is actually effectively an AVR ISP programmer itself, talking the stk500 protocol.

I am trying to move some of this code slowly out of the arduino IDE, and towards a more standard shared tree of c/c++. I have mostly succeeded in building plain hex files from the command line, based on arduino libraries (for things like LiquidCrystal and Ethernet and so on) but was having problems getting them to program. By editing arduino’s “preferences.txt” and adding “upload.verbose=true” I could see that when programming from the arduino IDE, it was using a private patched version of avrdude (5.4-arduino) with the programmer type of stk500v2, and that it was issuing a reset, via some sort of DTR toggle…


c:\tools\arduino-022\hardware/tools/avr/bin/avrdude -CC:\tools\arduino-022\hardware/tools/avr/etc/avrdude.conf -v -v -v -v -cstk500v2 -p atmega2560 -P COM5 -b 115200
... version stuff ...
Using Programmer: stk500v2
Overriding Baud Rate: 115200
avrdude: ser_open(): setting dtr
avrdude: Send: . [1b] [20] . [00] . [03] . [0e] . [11] . [01] . [01] ' [27]

Ok, so now I had enough to try and run it myself, using avrdude 5.10, as comes with recent versions of WinAVR


C:\Users\karlp>avrdude.exe -p atmega2560 -P COM5 -c stk500v2 -v -U lfuse:r:-:h -b 115200
---snip---
avrdude.exe: stk500_2_ReceiveMessage(): timeout

But, as you can see, this just timed out. Looking at the LEDs, I could see that the board wasn’t getting magically reset. With a bit of reading and searching, I found out that avrdude added a way of resetting the board, if you use the programmer type of “arduino”


Using Programmer : arduino
Overriding Baud Rate : 115200
avrdude.exe: Send: 0 [30] [20]

Interesting, following the lights on the board, I could see that this was now resetting properly, but clearly, those were not the right commands. It seems that the “arduino” programmer type, is set up to talk to the bootloader on the atmega328 of the prior versions of arduino, the Duemilanove and so on, that still had a direct USB-serial bridge, from the FTDI chip. So, if the “arduino” programmer does the reset, but the wrong protocol, looks like I’ll have to reset it myself.

I finally tried holding reset on the board, issuing the command with the programmer of “stk500v2” and immediately releasing reset. Presto!


C:\Users\karlp>avrdude.exe -p atmega2560 -P COM5 -c stk500v2 -v -b 115200
... more snipped ....
Programmer Type : STK500V2
Description : Atmel STK500 Version 2.x firmware
Programmer Model: AVRISP
Hardware Version: 15
Firmware Version Master : 2.10
Vtarget : 0.0 V
SCK period : 118.3 us

avrdude.exe: AVR device initialized and ready to accept instructions

Reading | ################################################## | 100% 0.03s

avrdude.exe: Device signature = 0x1e9801
... more snipped ...

Hooray! we’re working from the command line again. Now, if only the arduino gang’s pile of extra patches for avrdude would keep making their way back into mainline. It seems they don’t play well with others :(