So, You got a STM32 Discovery board hey? Good for you! They’re cheap, and highly functional, but this ain’t your grandmother’s Arduino.
Here’s a rough and ready howto for developing in netbeans, and getting source level debugging for that code.
Required pieces
GNU arm toolchain installed and working.
I use summon-arm-toolchain for this. To test that it’s working, you can try any of the following:
- build examples for libopencm3
- build my own collection of examples (these are extracted and extended from the stlink repository)
- anything else you feel like compiling
You want to make sure that you can successfully compile via make from the command line first. If you can’t compile with the raw tools, netbeans isn’t going to magically fix that for you.
texane/stlink
A confusing name, but so be it. stlink (the software tool) provides tools for flashing STM32 chips via ST/Link v1 and v2 hardware. It also provides a gdbserver for debugging those chips. Get it from github (Sorry, there’s no tagged releases or anything yet, though there really should be)
Netbeans
Duh, this post is covering that. You need the c/c++ plugin and the gdbserver plugin. Download it here. For reference, I’m using 7.1 at the moment.
Setting up the toolchain in netbeans
- Click Tools->Options->C/C++
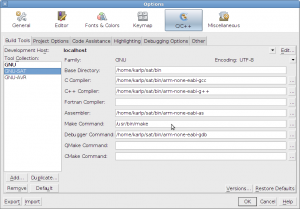
- Click on “Add” and set up a new toolchain for arm development. See the screenshot below
- Import your project as a makefile based project from existing sources. You can get netbeans to actually do all the compiling and things for you, but I find it hard to share the project that way. Not everyone uses netbeans, but makefiles are pretty portable.
- Build your project
- Flash your binary to the target. You can actually do this anyway you want, but we’ll use stlink’s st-flash tool.
$ arm-none-eabi-objcopy -O binary your_project.elf your_project.bin
$ /path/to/stlink/flash/st-flash write your_project.bin 0x08000000
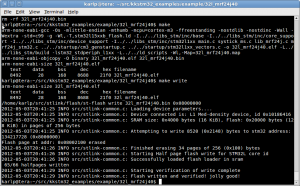
Here’s a screenshot from my makefile. (You can set up run modes in netbeans to do this too, but that’s not the focus here)
- Start stlink’s gdbserver.
karlp@tera:~/src/stlink$ ./gdbserver/st-util
2012-05-03T20:44:56 INFO src/stlink-common.c: Loading device parameters....
2012-05-03T20:44:56 INFO src/stlink-common.c: Device connected is: L1 Med-density device, id 0x10186416
2012-05-03T20:44:56 INFO src/stlink-common.c: SRAM size: 0x4000 bytes (16 KiB), Flash: 0x20000 bytes (128 KiB) in pages of 256 bytes
Chip ID is 00000416, Core ID is  2ba01477.
init watchpoints
Listening at *:4242...
- Whew, ok, just about there. Now in netbeans, choose “Debug->Attach debugger”.
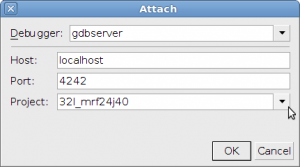
- Choose “gdbserver” and make sure you put in the right host and port, (normally localhost, and 4242) and make sure it’s set to debug your project.
- MAKE SURE you have set at least one breakpoint first. Something in netbeans doesn’t like adding breakpoints while it’s running, and it doesn’t like pressing the pause button. (but see the footnotes)
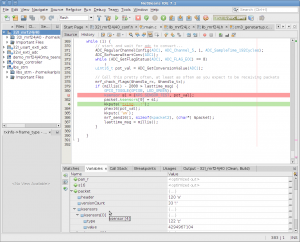
- Profit…
That’s it. If any of the steps are glossed over too much, mail me and I’ll try and update to clarify.
Sidenote: If you didn’t set any breakpoints in netbeans first, or you pressed pause, or you double clicked in the gutter to add some breakpoints, and nothing happened, you’ve hit whatever weirdness is in the gdbserver plugin. This problem is reported with other stm32 gdbservers, so it doesn’t appear to be a problem with stlink, but with netbeans. You can wake up netbeans again with kill -INT $(pidof arm-none-eabi-gdb)
Thanks to gsmcmullin on ##stm32 on irc.freenode.net for that gem.
Update for netbeans 7.2: Apparently you now have to put “target localhost:4242” into the gdbserver box, not just “localhost:4242”.


1 Comments.